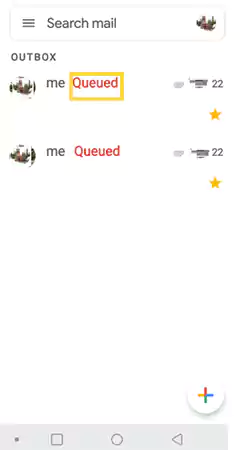
Queued Email: How to Send Queued Email in Gmail?
Everyone knows that Gmail is one of the most used email services around the world.
This email service is very useful for sending business emails, attachments, media, or anything.
Most importantly, Gmail is generally an error-free mail app, but despite this, Gmail users do encounter minor errors at times.
Among them, one of the more common and annoying errors is having multiple emails stuck in a mail queue for hours.
Receiving ‘Queued’ messages in Gmail when sending email from Gmail’s mobile app is an issue that discriminatorily affects Android users.
So, if you are one of those users who are having difficulty sending emails from your Gmail app because emails are queued and stuck in your Outbox folder, then look no further for a fix.
You have landed at the right place; just read on, as one of the mentioned solutions should fix it!
- What Does ‘Email is Queued’ Mean in Gmail?
- Why Might Your Emails Get Stuck in the Queue?
- What to Do When My Email Says Queued?
- How to Send Queued Mail in Gmail?
- Solution 1: Temporarily Disable and Re-Enable Google Sync for Gmail
- Solution 2: Clear Your Gmail App’s Cache Data
- Solution 3: Force Close Your Gmail App
- Solution 4: Ensure Gmail Background Data Is Enabled
- Solution 5: Check Gmail Should Not Be in Offline Mode
- Solution 6: Remove and Re-Add your Google Account
- Solution 7: Decrease the ‘Days to Sync’
- Bonus Solution: Try Another Device
- FAQs
First and foremost, chances are that if you have any email stuck as ‘Queued’ in Gmail, you might be wondering why Gmail is queuing up your email, right!
But before we answer this question, let us briefly explain for those who do not know what it means to have an email stuck in the queue!
What Does ‘Email is Queued’ Mean in Gmail?
For those who wonder what it means when an email is queued in Gmail, let us tell you that Gmail queue means that Gmail is unable to send your mail at this time and will be in the Outbox mail folder until sent.
Basically, when the Gmail app marks an email as a queue, it cannot send the same immediately; rather, it will try to send it later.
Can’t Miss Reading: How to Send Mass Email Using Gmail?
Why Might Your Emails Get Stuck in the Queue?
Email queues in Gmail happen when there is a problem with sending messages. This could be due to the mail service provider itself or a problem on your end. For example, your mobile device or an interrupted Internet connection.
To be more precise, take a look at these reasons when you wonder why are my emails queued—
- Running Out of Space on Your Mobile Phone: If you send mail on Gmail, it will take up storage space on the app. So, if you are getting low on storage space, you may fail to send your emails as there are chances that Gmail cannot adjust the data size due to low storage.
- Poor or No Internet Connection on Your Phone: If you’re experiencing a drop in your Internet speed, it’s possible that your Gmail application is struggling to communicate with the mail server.
- Your Inbox May Have Reached a Threshold Limit: Gmail places a cap on many things within Gmail, such as the number of emails you can send within a time limit or the size of your emails. Of these, if any limit is exceeded, be aware that you may find your email queued for several hours.
So, when a message cannot be sent immediately for one or all of these reasons, the mail provider will automatically queue them. This is, of course, incredibly frustrating when you are trying to send an instant message or some important work email.
However, fret not! We’ll go over some of the possible fixes for the Gmail queuing error.
But, before working through the solutions, here is a list of a few things to check to prevent it from happening again!
What to Do When My Email Says Queued?
If you are a mobile app user of Gmail and facing a ‘Queued email’ issue in your Gmail account, then you should double-check these things on a priority basis before moving to the next level of troubleshooting.
- Do you have a stable internet connection?
Sometimes Gmail messages get stuck because of network issues. So, if your internet is unstable, Gmail cannot send your emails, and they will end up in the Gmail queue.
Tip: Make sure you have a stable network connection—whether over Wi-Fi or mobile data. For that, check if all lights are working on your Wi-Fi router. And if you’re on mobile, check that your Wi-Fi and Mobile Data are on.
- Is there a problem with Google’s servers?
While Google’s servers rarely go down, it is likely to happen when no one expects it.
Tip: You should check the Google server status here and make sure all the lights are green whenever you encounter such issues with your Gmail account. If the Gmail server seems to be down, rest assured that Google is working to fix it.
- Are you running the latest Gmail version?
When an app is updated, its older version becomes out of date and is likely to encounter an infinite number of problems. So, using such an old version means setting yourself up for trouble.
Tip: Make sure you check if any updates are available. This is because—Google might have fixed the issue you’re experiencing in its latest version. So, head to your app store and see if there’s an update. If you’re using Android then you can head to the Play Store here and if you’re using iPhone, you can head to the Apple App store here.
- Have you exceeded the email file size limit?
If you’re trying to send a mail with an attachment, check that it doesn’t exceed Gmail’s 50MB file size limit.
Tip: In that case, you should reduce the size of the email and then try sending it again. Or, consider file sharing with Google Drive instead. This is because Google recommends that you should use Google Drive if you’re sending files larger than 25MB.
- Have you reached the threshold?
It doesn’t matter whether you are using a free or paid account; you should check whether you have reached the threshold.
Tip: If so, you will have to wait for 24 hours till the quota is renewed. Alternatively, you might consider using a mass-sending tool such as Mailmeteor.
- Is there a problem with Gmail’s Mobile App?
It’s also worth making sure whether the problem is specifically with Gmail’s android mobile app.
Tip: A good way to do this is to send yourself an email message from the web app on your computer, and if there’s no queuing issue when using the web app, you’ll get to know if it’s a mobile-specific issue or not!
Also, Read to Know: 11 Trusted Fixes When Your Gmail Emails Are Disappearing!
Now, if none of these checks have helped, it’s time to consider trying the below-listed solutions to troubleshoot the issue.
How to Send Queued Mail in Gmail?
There are as many as 7 effective solutions that can help you fix the ‘Queued up emails in Gmail’ issue. So, here are given step-by-step instructions for each of the 6 solutions to help you fix the ‘Queued Email in Gmail’ issue—
Solution 1: Temporarily Disable and Re-Enable Google Sync for Gmail
Sometimes your Gmail account can have sync issues with your mobile device, causing emails to queue up. So, first of all, you can try to disable and enable the Gmail sync option on your respective Android phone to check whether it is working properly or not. To do this, one has to follow these steps—
- Step 1: Open the ‘Gmail app’ on your Android.
- Step 2: Then, tap the “Three lines” in the top left to go to the ‘Settings’ option within the Gmail app menu.
- Step 3: Inside settings, select the ‘Accounts’ option and then, pick your ‘Google Account.’
- Step 4: After that, select ‘Email Account’ and tap on the respective Gmail email you have been having issues with!
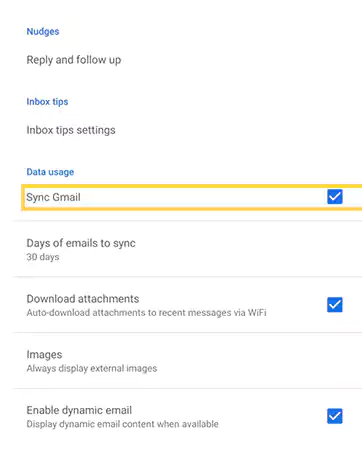
- Step 5: Now, from the given options, you have to uncheck the ‘Sync Gmail’ option under “Data usage.”
Alternatively, you can also open your Android Phone’s ‘Settings’ and scroll down to tap on the ‘Accounts and Sync’ option and then, tap on ‘Google’ to access your google account – choosing the ‘Email account’ that you have linked with Gmail – and unchecking the circle next to ‘Gmail.’

- Step 6: Once you’ve done that, do a quick ‘Restart’ to your phone.
- Step 7: When your phone restarts, go back in and ‘Turn Sync On’ to see if the Gmail queuing issue is resolved!
If not then you may need to try the next lined solution according to which you need to clear the cache of the app.
Solution 2: Clear Your Gmail App’s Cache Data
Although the cache data is kept temporarily to help launch a certain app and access its features faster, sometimes the cache can accumulate which can cause problems with your application. So, assuming this is a reason for the Gmail app to queue your emails, you can clear the cache of your Gmail app like this—
- Step 1: Tap on the ‘Settings icon’ to go to your android device settings.
- Step 2: Inside the Settings menu, you need to find ‘Application Manager.’ Note, however, that on recent Android versions, this menu is called ‘Apps.’
- Step 3: Next, select ‘All’ or ‘See All Apps’ from the Apps menu.
- Step 4: After that, find ‘Gmail’ from the available apps and open it.
[Note: While the apps should be listed alphabetically, you can also use the Search feature to find the Gmail app.]
- Step 5: As soon as you open Gmail from the list of all apps, you will be navigated to Gmail’s App Info page. From there you have to tap on ‘Storage.’
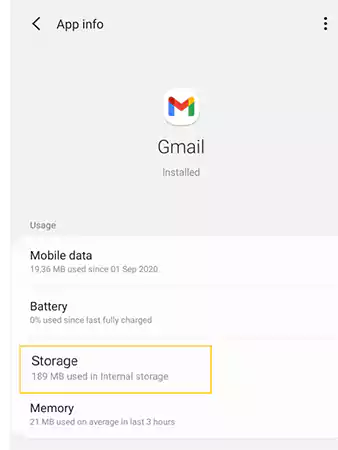
- Step 6: Now at the bottom of the screen, you should see buttons i.e., ‘Clear Cache’ & ‘Clear Data.’ Of the provided two options, tap on both.
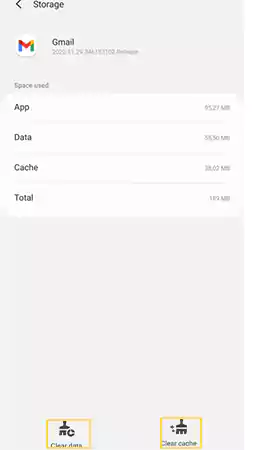
- Step 6: Now, return to the home page and turn your device ‘Off and On’ again.
- Step 7: Once you have done this, you will have to ‘log back into your Gmail account’ and check your Gmail Queued.
While this method should work, there are a few other solutions to try if it doesn’t resolve the encountered issue.
Solution 3: Force Close Your Gmail App
Upon clearing the data and cache of your Gmail app, it is suggested that you force close your Gmail app to ensure that it works smoothly and without any errors again. To do so—
- Step 1: Go to ‘Settings’ on your android device.
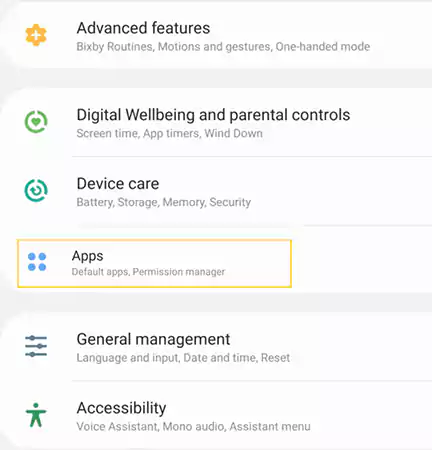
- Step 2: Then, you’ve to go to the ‘Apps’ from the settings menu.
- Step 3: After that, click the ‘See all apps’ option.
- Step 4: Next, you need to scroll down and find the ‘Gmail app’ or use the search feature for doing the same.
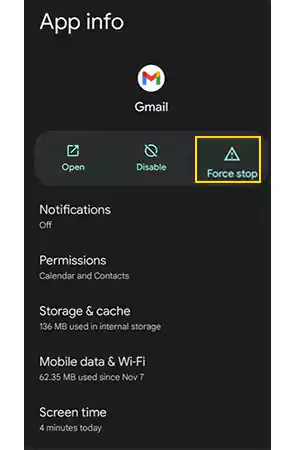
- Step 5: When you see the Gmail app, tap on it to ‘Open.’
- Step 6: Now, tap on the ‘Force Stop’ option available on the app interface of Gmail to restart the Gmail app.
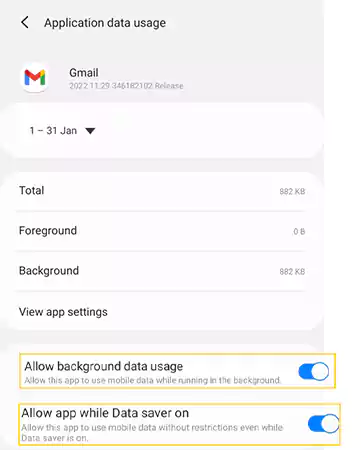
Solution 4: Ensure Gmail Background Data Is Enabled
Sometimes email cannot be sent and gets stuck in the queue due to lack of data. So, to avoid this, you have to check whether Gmail background data is enabled or not, and if not, then follow these steps to allow Gmail to use background data—
- Step 1: Execute the first few steps given in the above two solutions, i.e., you need to go to ‘Settings > Apps option > View all apps list > Find Gmail’ to get to the Gmail app interface.
- Step 2: There on the Gmail app interface, tap on the ‘Mobile Data’ option.
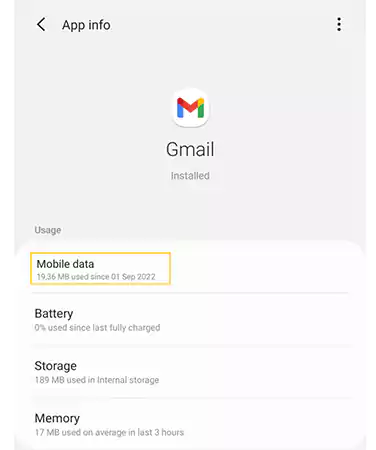
- Step 3: After that, you’ve simply toggled the ‘Background Data’ option to turn it on. For that, make sure the ‘Allow background data usage’ and ‘Allow app while Data saver on’ toggles is on.
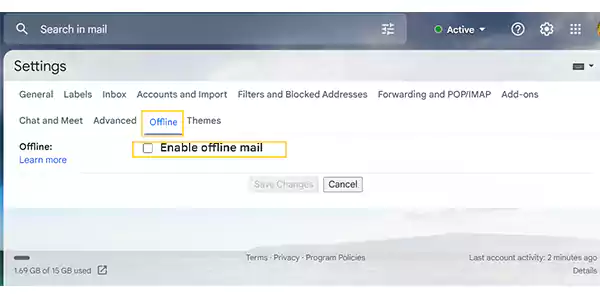
Solution 5: Check Gmail Should Not Be in Offline Mode
Like Android devices, Gmail web has an offline mode too that when enabled can prevent email from leaving the Gmail queue. And, needless to say, if Gmail is in offline mode, all emails you send will be sent directly to your Gmail queued outbox instead of being delivered. So, here’s how you can ensure that Gmail isn’t in Offline mode—
- Step 1: On your respective computer, open ‘Gmail’ using you’re preferred
- Step 2: Then, click on the ‘Gear icon’ at the top right corner of the window to go into ‘Settings.’
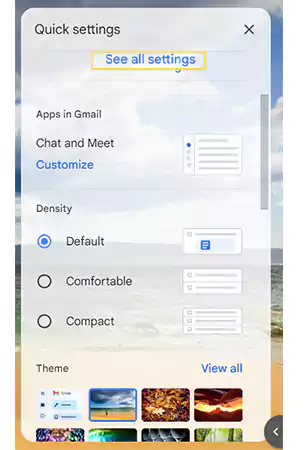
- Step 3: Inside settings, click ‘See all settings’ option.
- Step 4: Now, select the ‘Offline’ tab.
- Step 5: Here, you’ve to make sure that the ‘Enable offline mail’ setting checkbox is unchecked.
Solution 6: Remove and Re-Add your Google Account
If your emails are still queued up in Gmail’s Outbox folder, consider deleting and re-adding your account back on your mobile. While this can be a lengthy process for users, you should definitely try deleting your Google account from your phone and setting up your account again to fix this problem—
- Step 1: To remove your account, first navigate to your ‘Android device settings.’
- Step 2: Inside Settings, scroll down until you find the ‘Account & Backup’ option and once you find it, tap on it to open.

- Step 3: In the account & backup section, you have to tap on ‘Accounts.’
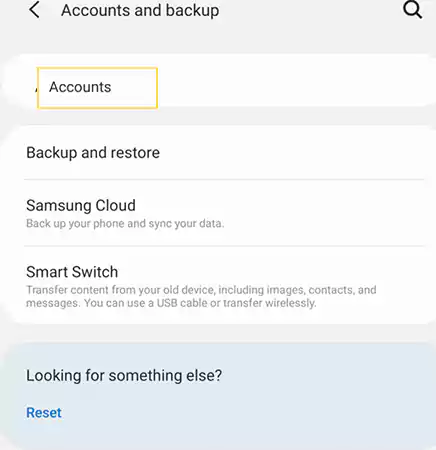
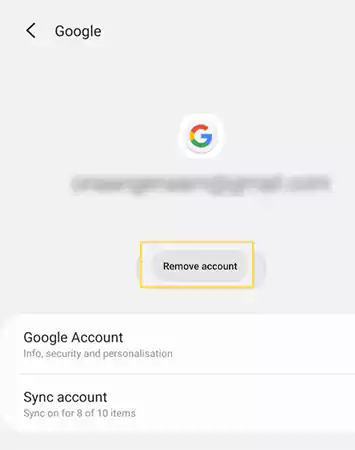
- Step 4: After that, scroll down until you find and select the Gmail account you’re having issues with!
- Step 5: Now, simply tap on the ‘Remove account’ option.
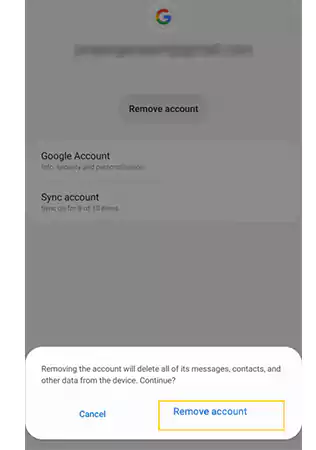
- Step 6: Finally, from the pop-up window, confirm that you want to remove your account by tapping on the ‘Remove account’ option again.
- Step 7: Once you’re done, double-check that your account is gone by trying to open the ‘Gmail app.’
- Step 8: When you’re sure, simply ‘Reboot’ your device and navigate to the Gmail app.
- Step 9: As soon as you do this, Gmail will show you the standard setup message before adding the account. So, that time, fill in your ‘Email address and password’ to add your account back.
Now, give it a few minutes, and you should see your Gmail inbox look like before, with no emails in your Gmail outbox.
Solution 7: Decrease the ‘Days to Sync’
Last but not least, you may or may not know that when you configure the phone with Gmail, your Gmail account usually receives mail for a few days. Because of that, when you use your Gmail account, it also syncs your old emails, which can increase the cache and storage size of Gmail.
With this in mind, the best option you have is to reduce the days of sync option. This way, Gmail will clear all emails from storage that are over a period of 5 days.
So, here’s how you can decrease the days to sync option—
- Step 1: On your respective Android phone, tap on the ‘Gmail app icon’ to open your Gmail app.
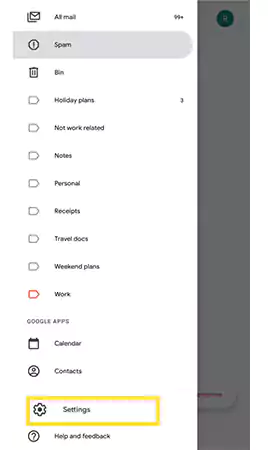
- Step 2: On the Gmail app, you need to tap on the ‘Hamburger icon,’ located at the top left corner of the screen in the search email bar.
- Step 3: As soon as you do this, a menu will appear and you will need to scroll down to tap on ‘Settings’ to open it.
- Step 4: Under settings, choose your ‘Email account.’
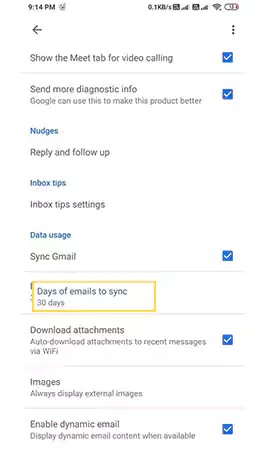
- Step 5: After that, simply scroll down and tap on the ‘Days of emails to sync’ option.
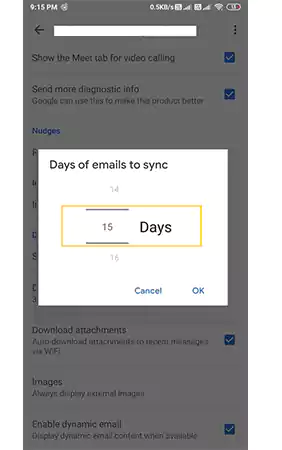
- Step 6: Now, what you’ve to do is decrease the days to 30 days or less. For example, you can decrease it to ‘15 days.’
- Step 7: After you make the changes, make sure you again ‘Clear the cache and data for Gmail’ using the same steps given above.
Bonus Solution: Try Another Device
If none of the above methods work, don’t worry! Try sending the queued email from your desktop. Yes! You read that right. If you’re short on time, one of the quickest fixes may be to try another device.
If none of the above methods work, don’t worry! Try sending the queued email from your desktop.
Yes! You read that right. If you’re short on time, one of the quickest fixes may be to try another device.
For example; if you’re on mobile, try using Gmail from your computer to send your email without them being queued up!
Wrapping Up!
Some Android users face Gmail queuing issues while sending emails from mobile apps with or without PDF attachments.
Firstly, Gmail users ‘cannot send emails’ because the emails get stuck in the Outbox folder for some reason. Later on, they receive a ‘Failed to send email’ error for emails that are stuck in the Outbox folder for hours.
We understand that it can be really frustrating when you are trying to send some important mail before the deadline, for example, a business mail to your boss or an assignment to your teacher.
Therefore, to help you out, we have come up with this descriptive guide that you can follow to fix Gmail queued up and a failed error. And, hopefully, one of the solutions discussed in this guide will get your emails out of the queue in Gmail and send them successfully.
FAQs
Ans:Queuing up in Gmail simply means that your emails cannot be sent, and are waiting in the queue until and unless they get delivered to the recipient.
Ans: Queued emails in Gmail happen when something is preventing Gmail from sending your emails. Basically, your emails can be queued for a number of reasons, ranging from issues with your Gmail app, and an internet connection to hitting email size or volume limits for sending emails with very large attachments.
Ans: You can get your email out from queued Gmail only after solving this problem using the solution mentioned above in this post.
Ans: If connectivity, Google Sync, or attachment size isn’t the cause of Gmail queuing, you might be sending too many emails. And, since Gmail has a daily limit, you may have to wait till the next day.
Ans: The first thing you need to do to fix your outbox queuing in Gmail is to identify your problem and use the methods we’ve discussed in this article.
Ans: Yes, you can delete queued emails in Gmail. To do so, simply click the checkbox next to the message and select ‘Delete.’
Ans: When you delete an email in your Outbox, it simply means that the recipient will no longer receive the message.
Ans: Yes. With less storage space on your phone, Gmail may not be able to send out an email, and your email gets queued in the Outbox folder.
Ans: You can refresh your app to clear your Gmail queue. To do so, follow these steps—
- Step 1: Head into Settings on your Android device.
- Step 2: Click Apps (from here you can manage default apps and app permissions)
- Step 3: Choose All. Scroll until you find Gmail.
- Step 4: Click Storage.
- Step 5: Click the Clear data and Clear cache buttons to clear the app’s cache.
Ans: The most common solution is to force-quit the Gmail app, or even easier, close the Gmail app and reopen it. As you restart the Gmail app, your emails were sent immediately without any user intervention.
Next, Read This Also: How to Send a Group Email in Gmail?
Share