iPhone Email App Not Updating? 17 Practical Ways to Fix It!
If you are looking for ways to fix the ‘iPhone email not updating’ issue, then this guide is all you need.
Here, you will get as many as 17 practical ways of troubleshooting when you cannot get mail on your iPhone’s email app. So, let’s dive into the details to know what you should do to fix iPhone mail not updating issue—
- iPhone Email Not Updating Issue
- Possible Reasons Why Is My Mail App Not Updating on My iPhone?
- 17 Troubleshooting Ways to Fix the Mail App Not Updating Issue on Your iPhone!
- Manually Refresh Your Mail App
- Quit and Relaunch Your Mail App
- Restart Your iPhone
- Check Your Internet (Wi-Fi | Mobile Data) Connection
- Reset Network Settings
- Toggle Airplane Mode On and Off
- Disable Low Data Mode on iPhone for Wi-Fi
- Disable Low Power Mode
- Check Cellular Data Settings
- Check Mail Fetch Settings
- Check & Change the Mail Notification Settings
- Enable Background App Refresh
- Delete and Reinstall the Mail App
- Remove and Re-Add the Email Account on iPhone
- Verify Your Email Address and Password
- Update Your iPhone
- Contact Mail Server Provider
- What If You’re Still Having the Mail App Not Updating Issue on Your iPhone?
- FAQs
Every professional communication nowadays is done through email. While we receive more than 10 to 100 important emails on a daily basis, it is very frustrating to miss some important emails (that require an immediate response) due to the email app not updating automatically.
iPhone Email Not Updating Issue
The Apple Mail app (one of the most popular email apps pre-installed on every iPhone) allows you to access, view, and manage mail from all your email accounts in one place. You’re free to compose professional-looking email messages on the go with the great text formatting tools on your iPhone.
But, despite this, the System Mail app makes it possible for Apple users to manage more than one mail account in one place, and it generally works well; you may find that sometimes your iPhone Mail app does not automatically update. You can access the Mail app, but no email is refreshed or received.
Regarding this, we’ve found “my iPhone wasn’t automatically updating the latest email, what’s going on with my email, how to solve this issue” question on Apple Communities, and there were hundreds of iOS users who have this question too!
So, if you are also looking for the answer to this question, then read this guide till the end. It not only tells you what causes this problem but also explains how to address this issue.
Also, Read To Know: These 16 Solutions If Email Not Working on iPhone!
Possible Reasons Why Is My Mail App Not Updating on My iPhone?
There could be several reasons why your Mail app is not updating on your iPhone. So, if your Mail app is not updating on your iPhone, it could be due to one of the following reasons—
- There might be a problem with your iPhone’s mobile data.
- Internet service problems in your area could also be a reason.
- Your iPhone’s Fetch New Data option might have been disabled.
- It is likely because you’ve not allowed the app to refresh in the background.
- The email service provider may be down.
- Your iPhone may be having software issues &
- Incorrect email server configuration.
Other than this, your mail may not update on your iPhone if—
- If you changed your email password on another device.
- If the email account itself has been configured incorrectly.
- If notifications have been disabled in the iPhone’s Email app.,
- If you’ve accidentally disabled some settings in the Mail system.
Now that you know if your iPhone email is not updating, a number of issues could be the culprit, including incompatible system settings, differences in email protocols, software issues, and more; it’s time to go over each possible cause and see how you can fix them!
17 Troubleshooting Ways to Fix the Mail App Not Updating Issue on Your iPhone!
The Email app in your iPhone needs to be constantly updated so that you get notifications whenever you receive a new email. But, if your email app is not updating on your iPhone, you should know that there is no straightforward way to help you fix that!
Don’t worry, though; here are some of the best troubleshooting ways to help you get to the root of the problem and fix it—
Manually Refresh Your Mail App
First thing first, try manually refreshing the Mail app on your iPhone. To do so,
- Step 1: Open the ‘Mail app’s inbox.’
- Step 2: Drag your finger down the ‘iPhone screen.’
- Step 3: Once you see a ‘Spinning wheel,’ release it.
This will ask the app to (re)connect to the email server and start communication without any issues.
Note: Refreshing the Mail app also helps with manually updating mailboxes with accounts that use fetch instead of push.
Quit and Relaunch Your Mail App
If manual refreshing doesn’t work, then the next quick way to fix an iPhone Mail app that won’t update is to force quit and relaunch it. To do so,
- Step 1: Swipe up from the bottom of the ‘iPhone’s screen.’
- Step 2: Then, drag the ‘Mail app card’ up and out of the app switcher.
- Step 3: After that, ‘launch the app’ again.
Doing so can solve some problems like the odd technical and cache issues that may be causing mail not to update. Clearing cache is what you need at the moment.
Restart Your iPhone.
In case force quitting and restarting the email app doesn’t work too, try restarting your iPhone.
To do that,
- Step 1: Go to ‘Settings > General > Shut Down.’
- Step 2: Then, slide the ‘Power icon’ to the right to power off your iPhone.

- Step 3: Now, when your iPhone shuts down completely, hold down the ‘Side button’ to reboot it.
This is the most common solution that helps Apple users a lot when an app on the phone is not working properly.
Check Your Internet (Wi-Fi | Mobile Data) Connection
Next, you know that one of the common reasons why your mailbox won’t update is because of an unstable Internet connection. A stable network connection is a prerequisite for mail to update automatically.
So, if restarting your iPhone doesn’t solve the problem, consider checking the network connection to make sure that your iPhone is connected to Wi-Fi or cellular.
Basically, you need to turn off and turn on the cellular or Wi-Fi again to have a try.
Wi-Fi Connection: If you’re using wi-fi on your iPhone, then;
- Step 1: Open up the ‘Settings app’ on your iPhone.
- Step 2: Then, tap on the ‘Wi-Fi’ option.
- Step 3: Next, turn ‘Off’ the Wi-Fi switch.
- Step 4: After that, tap the Wi-Fi switch again to turn it ‘On.’
Tip: On a Wi-Fi connection, additional connectivity-related issues can be fixed by changing the DNS (Domain Name Server) to a popular service like Google DNS.
Mobile Data: If you’re using cellular data on your iPhone, then;
- Step 1: Go to ‘Settings.’
- Step 2: Then, tap on ‘Mobile data.’
- Step 3: Next, tap the toggle in front of mobile data to turn it ‘Off.’
- Step 4: After that, turn mobile data ‘On’ by switching the toggle again.
Doing so will hopefully help you fix the issue of email not updating on iPhone.
Reset Network Settings
If there is no issue with your internet then, Mail on your iPhone may not be updated automatically due to network issues. So, make sure that the internet that your iPhone is connected to is working properly.
For that, you can reset the networking settings of your iPhone. This step will fix the network connectivity issues, and your mailing app should start working properly after that!
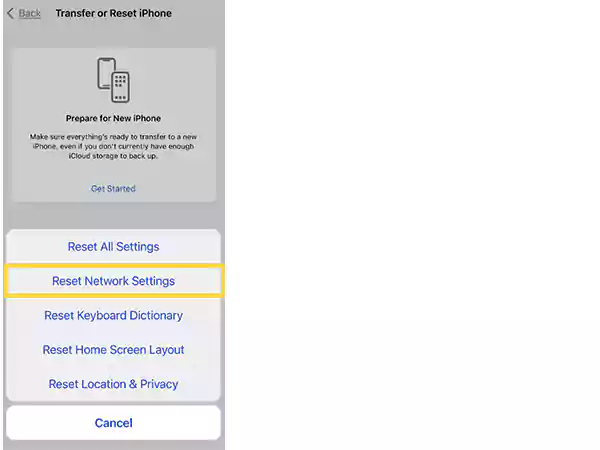
On that note, here’s how you can reset network settings on your iPhone;
- Step 1: Go to ‘Settings.’
- Step 2: Inside settings, navigate to the ‘General’ section.
- Step 3: Then to ‘Transfer or Reset iPhone > Reset > Reset Network Settings.’
- Step 4: After that, when you get a confirmation pop-up, tap ‘Reset Network Settings’ to reset the network settings.
- Step 5: Finally, press ‘Reset Network Settings’ to restart.
Toggle Airplane Mode On and Off
Sometimes, the Mail app won’t update due to lack of connection. So, you can also try toggling your Airplane mode on and off. To do this;
- Step 1: Open the ‘Control Center.’
- Step 2: Touch the ‘Airplane symbol’ to turn ‘On’ Airplane Mode.
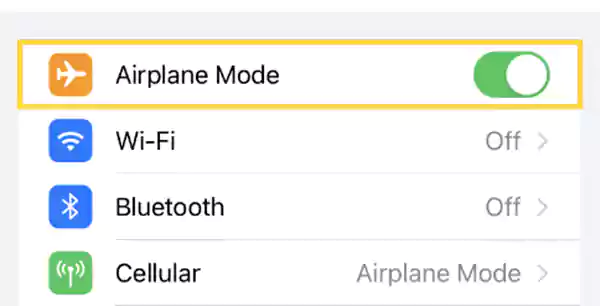
- Step 3: Now, wait a few seconds and turn the Airplane Mode ‘Off.’
Tip: Airplane mode is also available in the Settings app, where you can turn it on or off by tapping on the Airplane mode toggle.
Disable Low Data Mode on iPhone for Wi-Fi
You may not know that Low Data Mode prevents rapid consumption of WiFi data during background activities. Therefore, disabling low data mode to save Wi-Fi data can kill one of the most likely reasons why your iPhone email won’t update. On that note, to disable the low data mode, what you need to do is;
- Step 1: Go to ‘Settings.’
- Step 2: Then, tap on ‘Wi-Fi or Network & Settings.’
- Step 3: Afterwards, hit the ‘I’ i.e., Info icon next to the connected Wi-Fi symbol.
- Step 4: Now, just toggle the switch ‘Off’ to disable the low data mode.
Alternatively, to disable Low Data Mode on cellular data;
- Step 1: Go to ‘Settings > Cellular > Cellular Data’ Options.
- Step 2: There, turn off the switch next to ‘Low Data Mode.’

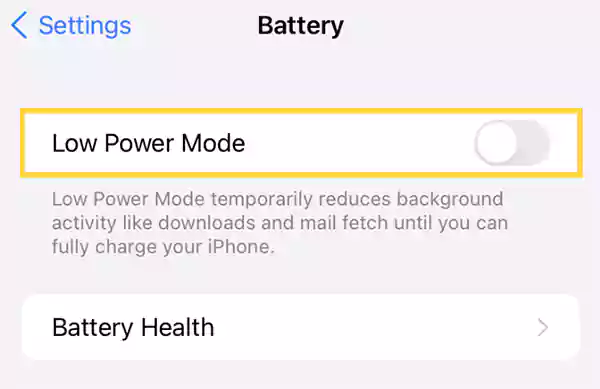
Disable Low Power Mode
A bunch of Apple users turn on Low Power Mode to save extra battery drain, so their batteries drain more slowly. As a result, new emails do not arrive in their inbox because there is not enough data to make room for the additional data.
Therefore, it is suggested that if you have enabled Low Power Mode on your iPhone, you should immediately disable it to check whether your iPhone responds to the issue or not. To do this,
- Step 1: Go to ‘Settings.’
- Step 2: Then, tap on ‘Battery.’
- Step 3: After that, you just need to toggle it ‘Off’ to disable low power mode on your iPhone.
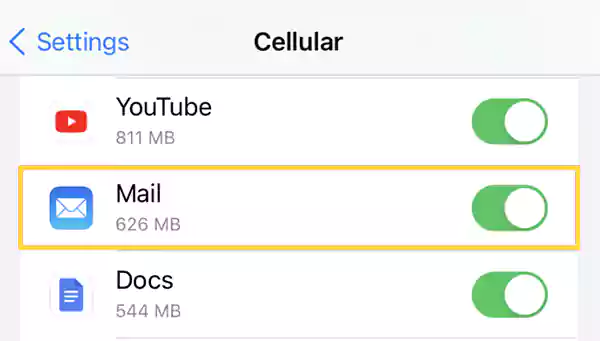
Check Cellular Data Settings
Next, if the Mail app fails to update your email when on cellular data, you need to make sure it isn’t restricted from using the iPhone’s mobile bandwidth. To make sure this;
- Step 1: Open the ‘Settings app.’
- Step 2: From settings, select ‘Cellular.’
- Step 3: Inside this option, scroll down the ‘App’ and simply turn on the switch next to ‘Mail.’
Check Mail Fetch Settings
Sometimes, by default, the Fetch New Data setting gets changed which also affects the way your iPhone receives and updates emails. So, you need to check it because if the “Fetch New Data” option is turned off, it could be the culprit for your email not updating or refreshing.
Don’t worry though, to solve this problem, you can easily turn on “Fetch New Data” permanently. To do this;
- Step 1: Open ‘Settings app’ on your iPhone.
- Step 2: Go to ‘Mail > Accounts & Passwords.’
- Step 3: There, tap on ‘Fetch New Data.’
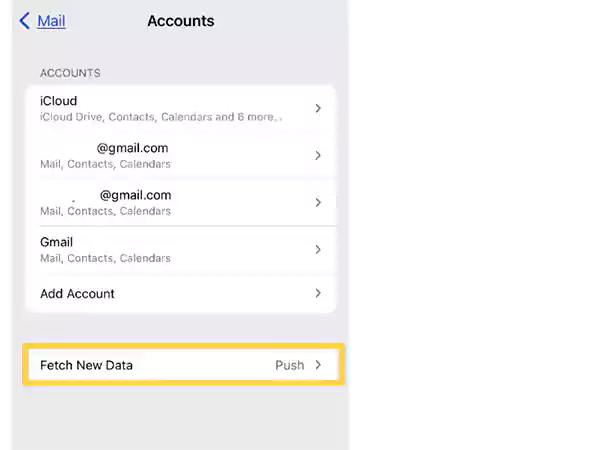
- Step 4: After that, tap on your ‘Email service provider’ and press the ‘Push’ button to turn it on. However, if Push is not supported, set it to ‘Fetch.’
- Step 5: Now, choose a setting, such as ‘Automatically or Manually.’
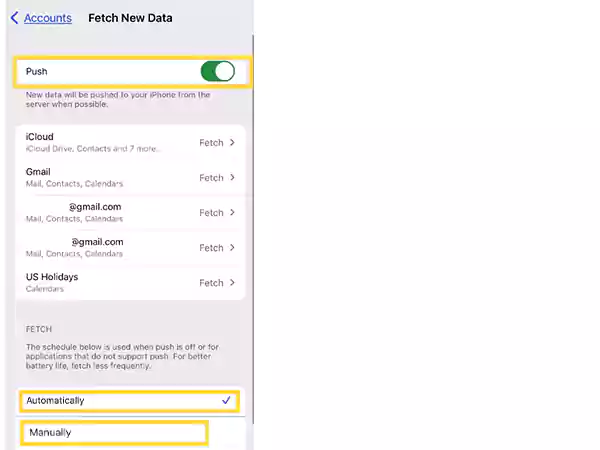
- Step 6: If you choose the manual option, then you can select the update frequency to the fastest possible setting i.e., ‘15 minutes’ for how often the mail app will fetch the data. Doing so will fetch new data on your iPhone every 15 minutes without lag.
Read This Also: How to Block Emails on iPhone?
Check & Change the Mail Notification Settings
In case the problem is related to the Mail app’s notifications, you’ll need to adjust these settings. To do so;
- Step 1: Go to ‘Settings.’
- Step 2: Inside settings, select ‘Mail > Accounts > Notifications.’
- Step 3: There, make sure that ‘Allow Notifications’ is enabled.
- Step 4: Then, select the ‘Customize Notifications’ option to check the notifications settings (such as ‘sounds, alerts, or badges’) for individual accounts to ensure they’re set up the way you want.
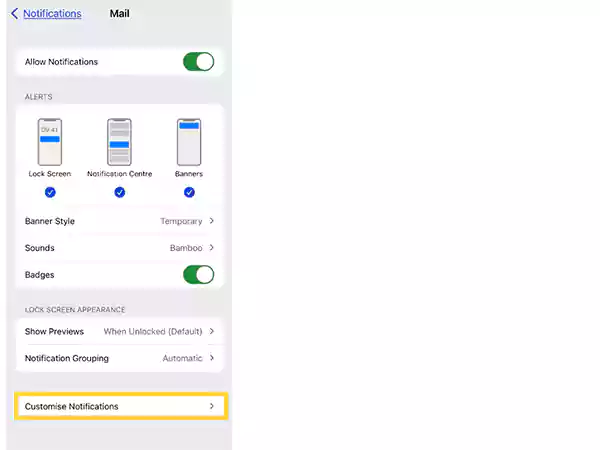
- Step 5: In addition, you can also select different alerts here, such as ‘Show on Lock Screen, Show in History, and Show as Banner.’
Tip: Occasionally, you may choose whether or not to get alerts from the mail app.
Enable Background App Refresh
Whether you know it or not, enabling Background App Refresh helps iOS refresh its content when a Wi-Fi network is available. So, if you want your iPhone email to update automatically and receive new emails, turn on this feature. To do that,
- Step 1: Go to ‘Settings’ on your iPhone.
- Step 2: Inside settings, tap on ‘General.’
- Step 3: Then, navigate to ‘Background App refresh.’
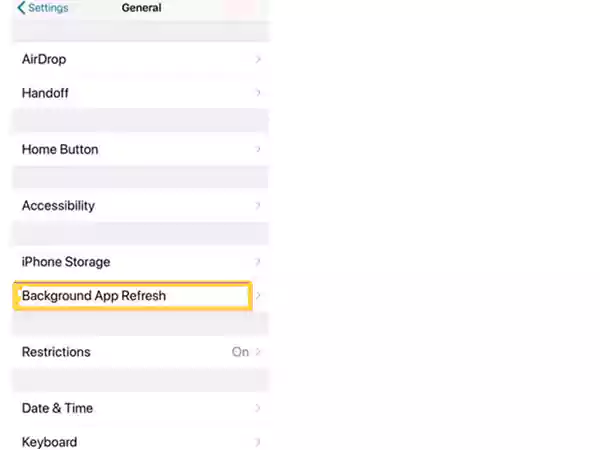
- Step 4: After that, tap on the background app refresh option to turn it ‘On.’
Delete and Reinstall the Mail App
You can reset your iPhone and iPad’s mail app by deleting and reinstalling the same. Doing so will provide you with a blank slate to set up your email accounts from scratch and get rid of frequent problems with the current version. So, to delete and reinstall the Mail app, here’s what you need to do;
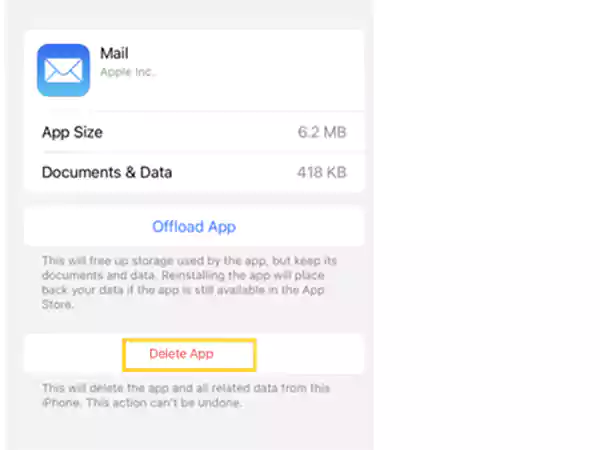
Delete the Mail App
- Step 1: Go to ‘Settings’ on your iPhone.
- Step 2: Then tap on ‘General.’
- Step 3: Under it, tap ‘iPhone Storage > Mail.’
- Step 4: Finally, just tap on the ‘Delete App’ option.
Reinstall the Mail App
- Step 1: Go to the ‘App Store.’
- Step 2: From the App Store, ‘redownloading the Mail app.’
- Step 3: Once re-downloaded, launch the app and ‘Sign in’ to your email account.
Remove and Re-Add the Email Account on iPhone
If you are not receiving email in your iPhone mailbox despite deleting and reinstalling the Mail app, the best practice is to remove your email account from the Mail app and add it again.
Deleting and re-adding your email account from the Mail app on your iPhone not only helps you reset some settings but also fixes the email not updating problem as soon as possible. So, to try this method out, what you need to do is;
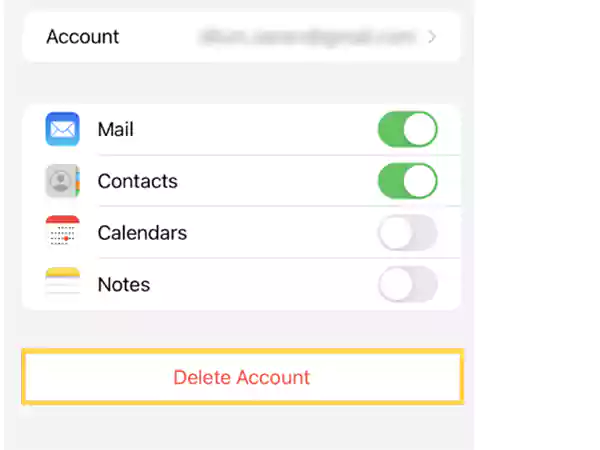
Remove Your Email Account
- Step 1: Open ‘Settings’ on your iPhone.
- Step 2: Then tap on ‘Mail’ and look for ‘Accounts.’
- Step 3: After that, touch the email account you want to remove and tap on ‘Delete Account.’
Alternatively, you can also do this;
- Step 1: ‘Log in’ to your mail account (if not already).
- Step 2: Then, make sure you tap the ‘Email account’ you want to remove, and then do one of the following—
- Go to Mail app, select iCloud Mail, and turn it off.
- If you are deleting another email account, turn off Mail.
- Tap Delete Account to deactivate the email account from all your iPhone’s applications.
Add Your Email Account
- Step 1: Go to ‘Settings > Mail’ and choose ‘Accounts’ in the Mail menu.
- Step 2: Then, tap on the ‘Add account’ option.
- Step 3: After that, choose one of the following options to complete this task— ‘IMAP or POP Protocol’
- Step 4: Next, you’ve to do is select an ‘Email provider’ (e.g., iCloud or Microsoft Exchange).
- Step 5: Once you’ve selected the email provider, input your ‘Email account details.’
- Step 6: Next, you need to choose ‘Other’ and following that, tap on ‘Add Mail Account’ to add your email account again in your iPhone.
Tip: You can always set up additional accounts by going to ‘Settings > Mail > Accounts.’
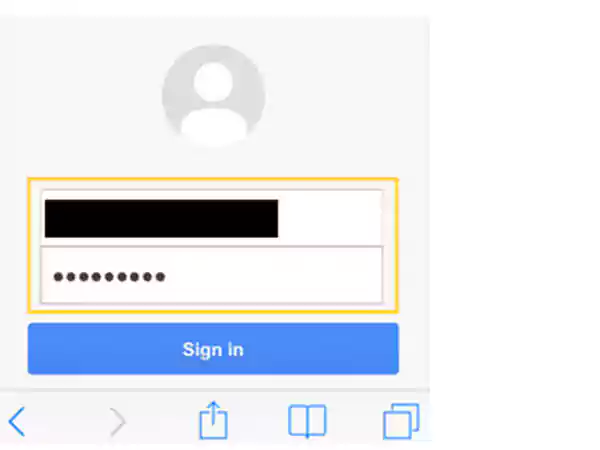
Verify Your Email Address and Password
Nevertheless, if the Mail app on your iPhone is not updating and asks you to enter the password for your email account, make sure that the password is correct. Well, because, sometimes you change your email password on another device like a laptop, and forget to update it on your phone. That’s why emails don’t automatically update on your iPhone.
So, considering that, what you need to do is;
- Step 1: Open your ‘Email app.’
- Step 2: As you do so, a new password prompt will appear. In that, enter your new updated ‘Password.’
- Step 3: Also, verify the ‘Recovery email address you gave when signing up for your respective email account. If you didn’t provide an email address for account recovery, alternate options are also available.
- Step 4: Now, when you enter your ‘New Password’ and verify your email address as well—your email will be able to send and receive messages again.
Tip: If you forget your mail password, worry not and check your inbox for a message titled “Verification Code.”
Update Your iPhone
Last but not least, updating your iPhone is also likely to solve this problem and help you to automatically update your iPhone email. This is because, when you update your iPhone, it helps in removing bugs and glitches in the iOS operating system. That being said, you can update your iPhone this way;
- Step 1: Before you begin, use ‘iCloud’ or your ‘PC’ to ‘Create a Backup’ of your iPhone device.
- Step 2: Then, connect your ‘iPhone to the internet.’
- Step 3: After that, go to ‘Settings.’
- Step 4: Inside settings, tap on ‘General’ and followed by that, tap on ‘Software Update.’

- Step 5: Now, what you’ve to do is choose the one you wish to install if you see two ‘software update’ choices.’
- Step 6: In the end, enter your ‘Passcode’ and hit the ‘Install Now’ button.
Contact Mail Server Provider
Even now, if you’re facing the problem of the Mail app not updating on your phone after trying all the methods listed above, then there might be a problem with the mail server you’re using.
In such a case, you are suggested to connect with your mail server provider and ask them to look into the matter.
What If You’re Still Having Mail App Not Updating Issue on Your iPhone?
While the above ways are enough to help you resolve the encountered issue within your Apple Mail app, in some cases, you may still face some troubles with your mailbox and the Apple mail app not updating. Well, in that scenario, you should contact ‘Apple Support’ as it could be due to a problem beyond your control.
Tip: You might also consider switching to the email client associated with the email service provider itself (such as Gmail or Outlook) and see if that helps.
Bottom Line
That is all! Now, if you ever run into troubles like not receiving any mail on your iPhone’s email app or the app not updating automatically, then this guide is just what you need! With one of these practical methods discussed above, you can get rid of your ‘iPhone’s email app not updating’ issue without any assistance.
FAQs
Ans: Several reasons—such as conflicting system settings, software-related issues, and differences in email protocols—can prevent your iPhone’s Email app from updating mailboxes.
Ans: While on the one hand, the formatting options and innovative 3D Touch implementation in the program make Apple Mail one of the best email clients. On the other hand, if you want to use features like Google Tasks, Smart Compose, Smart Reply, etc., you should choose Gmail over Mail app.
Ans: No. If you reset the Mail app, it won’t delete your email. Rather, the app will revert to its default settings. This means that if you have customized any settings, you will need to reconfigure them after resetting the app.
Ans: To manually sync your Mail accounts, you can follow these steps—
- Go to ‘Settings & Mail.’
- Then, select ‘Accounts’ from the drop-down menu.
- After that, tap the ‘Add Account’ button and choose ‘Other.’
- After that, tap the ‘Add Account’ button and choose ‘Other.’
- Next, select ‘Add Mac Mail Account’ to add a new account.
- Now, simply enter your ‘Name, Email Address, Password,’ and a brief ‘Account Description’ in the fields provided.
- Once done, hit the ‘Next’ button.
- Now, to complete the account creation, ‘Mail’ will look for your ‘Email Settings’ so, enter the same and you’re good to go!
Ans: If we compare both then, the push is generally considered better than fetch as it works faster. It also puts less burden on your iPhone’s battery.
Ans: To immediately get email notifications on your iPhone, make sure that notifications are enabled for email and that you have a good network connection to receive an email promptly.
Ans: To change email settings on your iPhone, go to Settings > Mail. Here, you will be able to change the settings related to email.
Next, Read to Know: 15 Solutions to Try If Your iPhone Calls Keep Failing!
Share