4 Simple Steps to Archive Emails in Outlook
What does it mean to archive an email?
How can you archive an email in Outlook?
How to retrieve archived emails?
How to enable the auto-archive feature in Outlook?
These are some of the most common questions asked regarding the archiving of emails in Outlook.
Well, starting with the very first, achieving emails is basically like a process of storing some emails separately for accessing them later. This also helps you to declutter your inbox, isolating important emails from the useless promotional emails that must have acquired all your inbox space.
Now, the question comes, how can you do that? Archiving emails in Outlook is a very straightforward process; you just have to pick out the email and hit the Archive option. Too direct to understand? Don’t worry; the process for doing so, stated further in the article, is pretty much detailed, which would leave you with no queries (at least, I hope so!).
So, let’s see what we have in here!
Steps to Archive Emails in Outlook
As you know archiving emails is the best way for storing important emails away for easy access, without putting in much effort to find them in the first place. With all the valuable emails archived in Outlook, you would know where to look exactly for one.
But do you know how to archive emails in Outlook? If not, then just jump into the steps given below to archive emails in Outlook:
On Outlook Web:
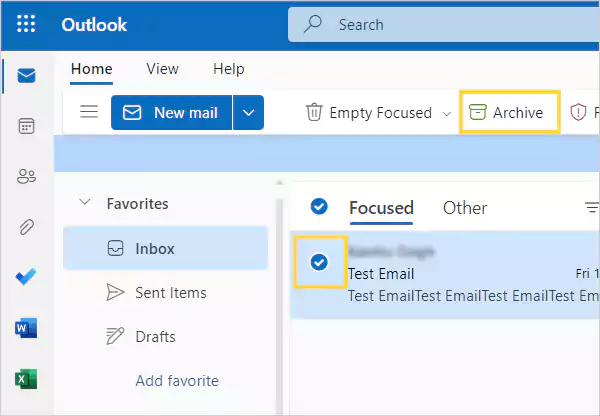
- First off, visit outlook.com on your system, click on the Sing In button and log in to your account.
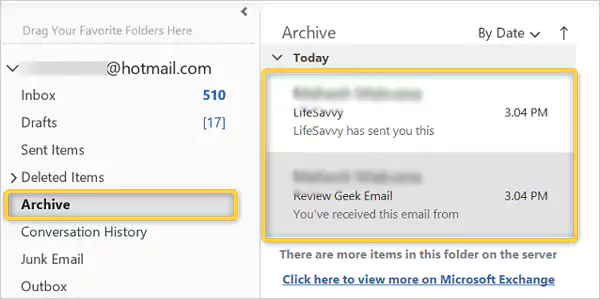
- From the left menu pane of your Outlook dashboard, switch to the folder where the emails you want to archive in Outlook are located.
- Now, click on the checkbox to select the emails to be archived.
- After that, click on the Archive option from the top menu bar of the window. As soon as you click on the Archive option, your selected emails will be archived in your Outlook Web application.
Tip: If you realize that you have mistakenly archived some important email, you can click on the Undo button that appears at the bottom of the screen after archiving the emails. Though, you have to be quick in your action as the option remains there only for a few seconds.
On Outlook for Windows:
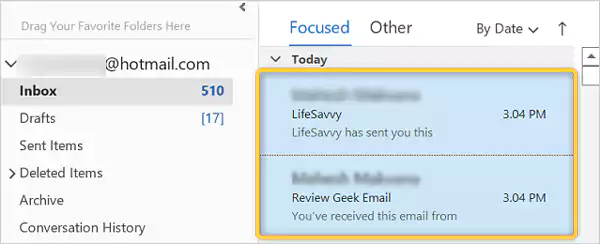
- Launch Outlook on your system.
- From the left pane of your Outlook dashboard, go to the folder from which you want to archive emails.
- Now, select the email to be archived. In order to select more than one email at a time, press and hold down the Ctrl key from the keyboard and click on all the emails that you want to archive in your Outlook.
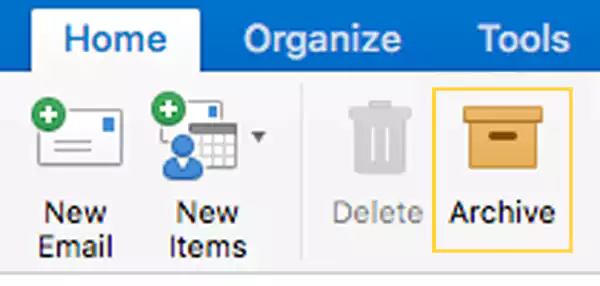
- After you have selected all the emails, click on the Archive option from the menu present at the top of the screen.
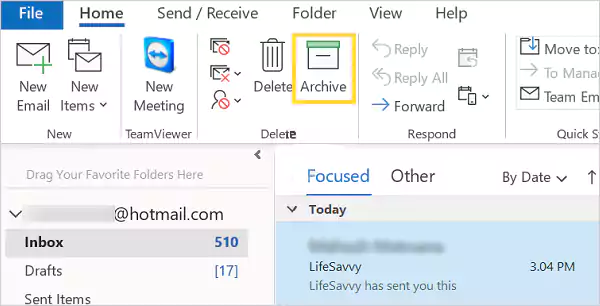
- As soon as you click on the Archive option, all the selected emails will be archived in your Outlook.
On Outlook for Mac:
- Launch the Outlook app on your Mac.
- Navigate to the folder from where you want to archive emails in Outlook.
- Now, select all the emails you want to archive.
- After that, look for the Archive option in the top menu ribbon of the Outlook dashboard and click on it. When you choose Archive, messages are instantly transferred to the archive folder.
Note: If you haven’t previously archived emails in Outlook, you will get a prompt stating that “The Archive folder for Microsoft does not exist.” On that prompt, you have to click Continue. After that, a new Archive folder will appear in your Outlook folder’s list. You have to do the same for all the email accounts added in Outlook when archiving emails for the first time. However, if you don’t see the prompt, then the archived emails will be automatically moved to the Archive folder.
On Outlook for Mobile:
- To begin with, if you have set up Outlook on your iPhone or Android, then open the Outlook app on your phone.
- Now, move to the folder where the email to be archived is present in your Outlook.
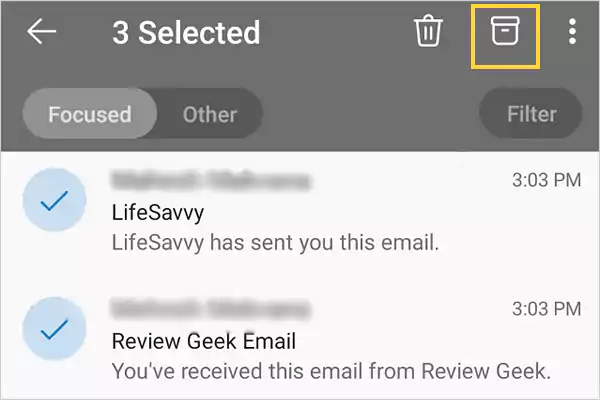
- Tap and hold the email you want to archive. If you want to archive more than one email, then just tap on them all.
- After all the emails are selected, tap on the Archive icon present in the upper right corner (beside the three dots) of your Outlook app. With this done, all the selected emails will be archived in your Outlook.
With this done, the emails from your Outlook inbox or other folders will be disappeared to the Archive folder. Now, in order to know how you can access them, move on to the next section.
Retrieving Archived Emails in Outlook
Now that you have learned how to archive emails in Outlook, the next thing to learn is how to access them. Well, doing so is pretty simple and straightforward.
Follow the steps jotted down to know how to retrieve archived email in Outlook:
On Outlook Web:
- Start by visiting outlook.com and signing into your Outlook account.
- Once you are in your Outlook dashboard, click on the Archive option from the left side panel on your screen. This will open the Archive folder, where all the archived emails are saved in your Outlook.
- Now, from the list of archived emails, select the ones you want to retrieve on your Outlook by clicking on the checkbox adjacent to them.
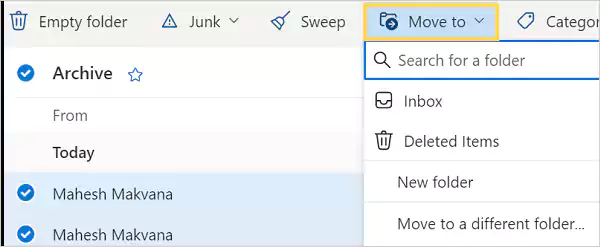
- After you have selected all the emails, click on the Move To option from the top menu bar.
- This will open the menu to select the folder where you want to move the emails. So, choose the folder. However, if you don’t immediately see the folder name you want to retrieve the archived emails in, click on the Move To a Different Folder option, and then select the folder.
On Outlook for Windows & Mac:
- First, open Outlook on your Windows or Mac system.
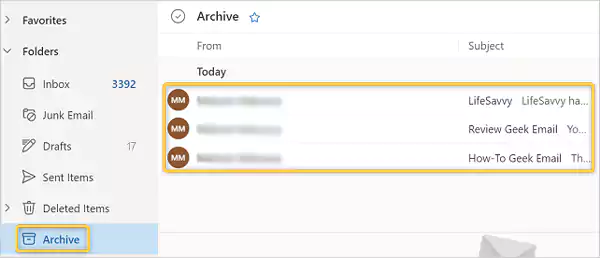
- From the left sidebar of the screen, go to the Archive folder where all the archived emails in Outlook are saved.
- Thereafter, the list of archived emails will appear. Now, find the archived email you want to retrieve in your Outlook.
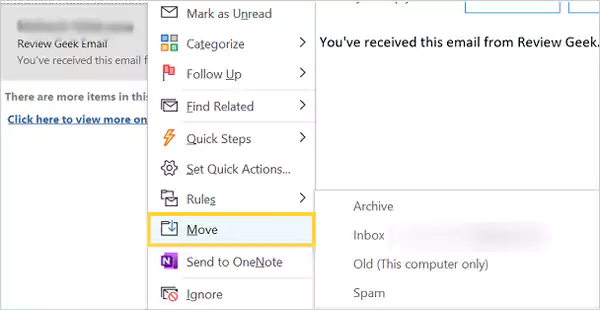
- Next, right-click on that email. From the menu that will appear, click on the Move option, and select the folder where you want to retrieve the email. And, the archived email will be moved to the selected folder.
On Outlook Mobile App:
- Open the Outlook app on your phone.
- Tap on the profile icon present in the top left corner of the screen.
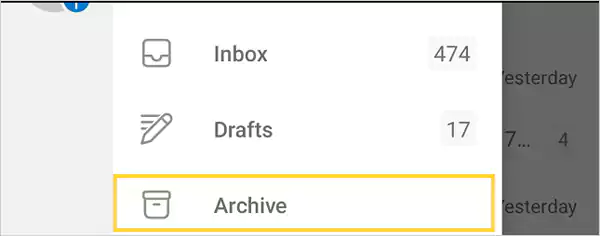
- Next, a left-side pane will appear, where you have to tap on the Archive folder to view all the emails you have archived in your Outlook.
- Now, from the list of archived emails, select the ones you want to retrieve.
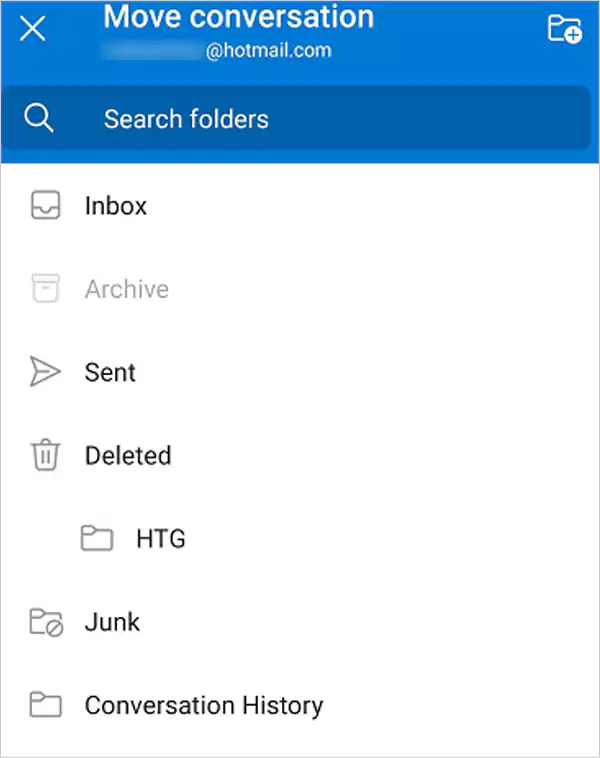
- Thereafter, tap on the more menu icon (three dots) present in the top right corner of the screen. From the menu that will appear, tap on the Move To Folder option.

- And finally, select the folder where you want the archived emails to be retrieved.
After this, you will be able to access your archived emails in Outlook and can move them to the selected folders.
However, if you don’t see emails in the Archive folder, immediately after archiving them, then your Outlook might be disconnected, checking your internet connection and refreshing the Outlook app can help you overcome the situation.
Automatically Archive Emails in Outlook
If the above-stated process looks tiresome, then don’t worry, you can enable the Outlook Auto Archive feature. With this feature turned on, all the emails, that are specified days old, will be automatically archived in your Outlook, and you won’t have to go through the email archiving process every time.
Now, in order to know how you can achieve that, go through the process stated further:
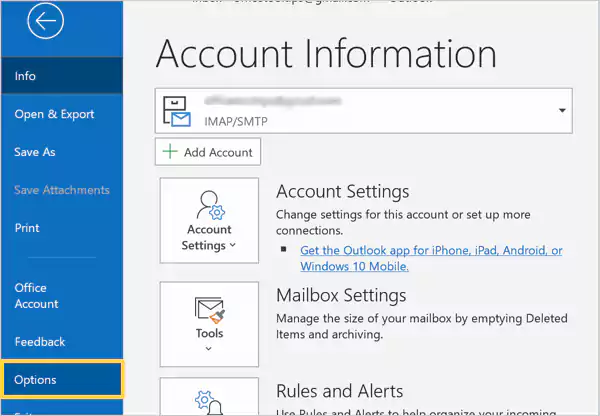
- To begin with, launch Outlook on your system, and click on the File option from the top left corner of the screen.
- Next, from the window that will open, switch to the Options tab.
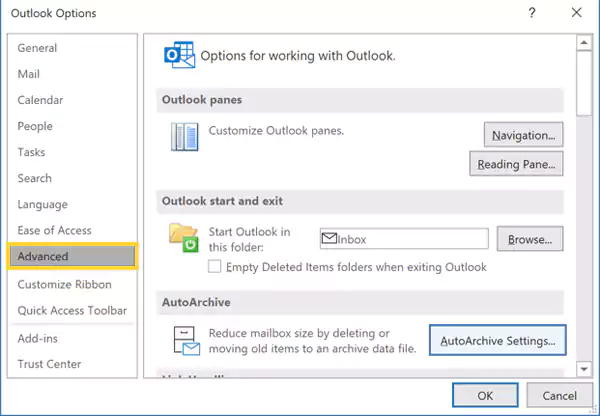
- Then, click on the Advanced option from the left sidebar of the window that appears.
- After that, click on the Auto Archive Settings button present under the AutoArchive section.
- This will open an AutoArchive window, where you have to select the Run AutoArchive Every option present at the top and specify the days for auto-running the archiving feature of emails in Outlook.
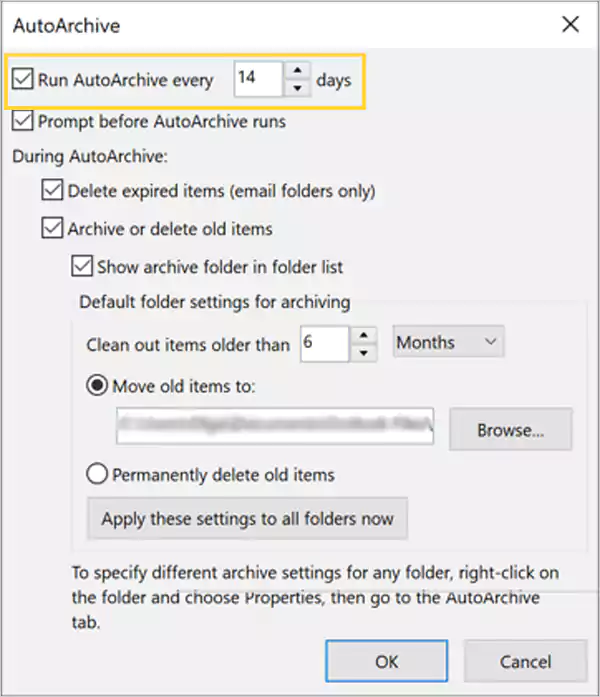
- Now, in the Default Folder Settings For Archiving section, select the appropriate options for specifying how old emails you want to archive, and where you want to save them (by clicking on the Browse button, by default all archived emails will be saved in PST directory of Outlook), or if you want to permanently delete them.
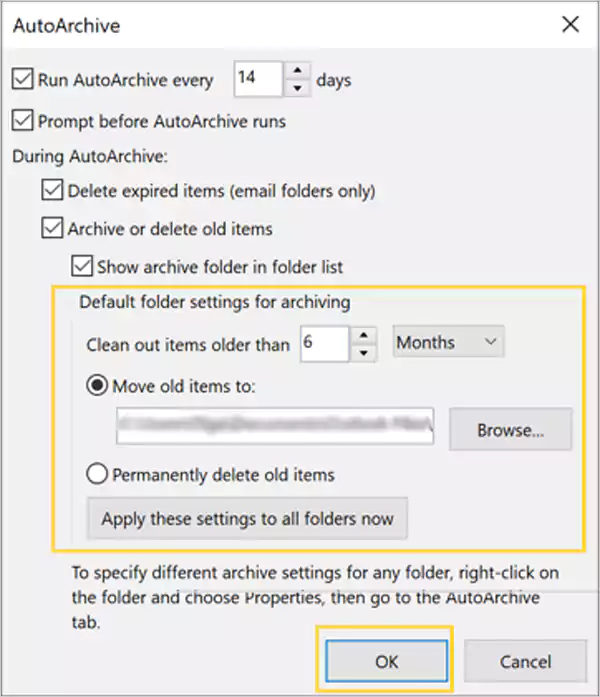
- Once you have selected the appropriate options, click on the OK button, and you have enabled the feature for automatically archiving emails in Outlook.
However, if you no longer want to automatically archive emails in Outlook, you can disable the AutoArchive feature by following the steps given below:
- Once again, launch Outlook on your machine, and click on the File menu option from the top left corner of the screen.
- Then, from the left sidebar of the window that will appear, switch to the Options tab.
- Now, select the Advanced option.
- Next, click on the AutoArchive Settings button present under the AutoArchive section.
- Finally, uncheck the Run AutoArchive Every option, and click on the OK button to apply changes.
Manually Archiving Emails in Outlook
With the steps listed under this section, you will know how to create a file for saving archived emails in Outlook:
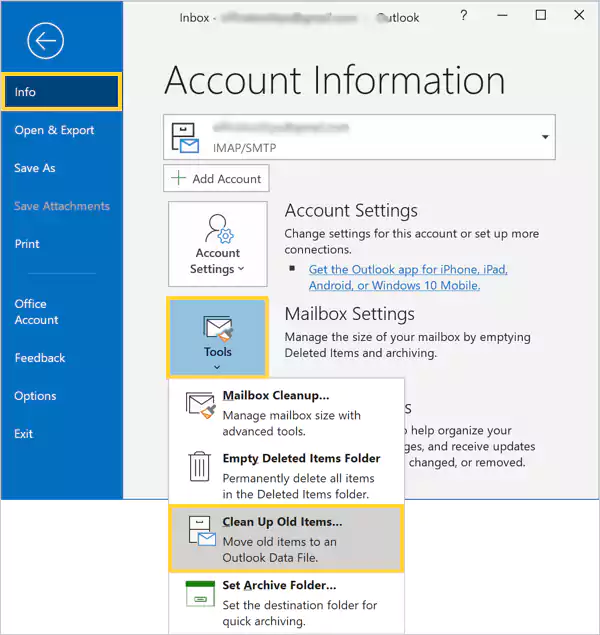
- Launch the Outlook app on your windows, and click on the File menu option, present in the upper left corner of the screen.
- Now, under the Info tab of the screen that will appear, click on the Tools menu and select the Clean Up Old Items option.
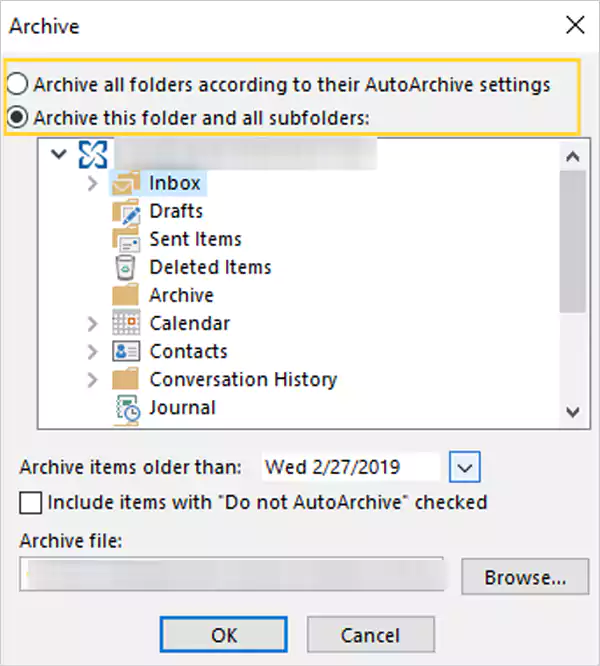
- With this, an Archive window to archive emails in Outlook will appear. There, you first have to select one of the two options for archiving the emails. If you select the second one, then also select the folder from the list to be archived.
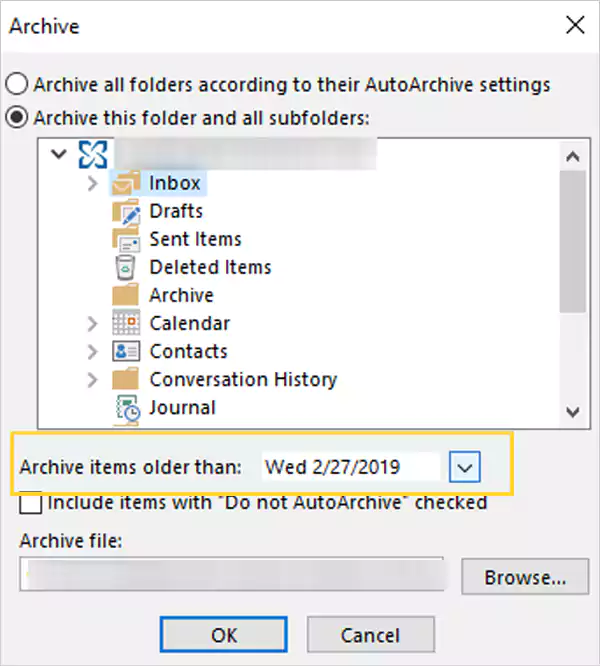
- Next, select how many days older emails you want to be archived from the selected folder.
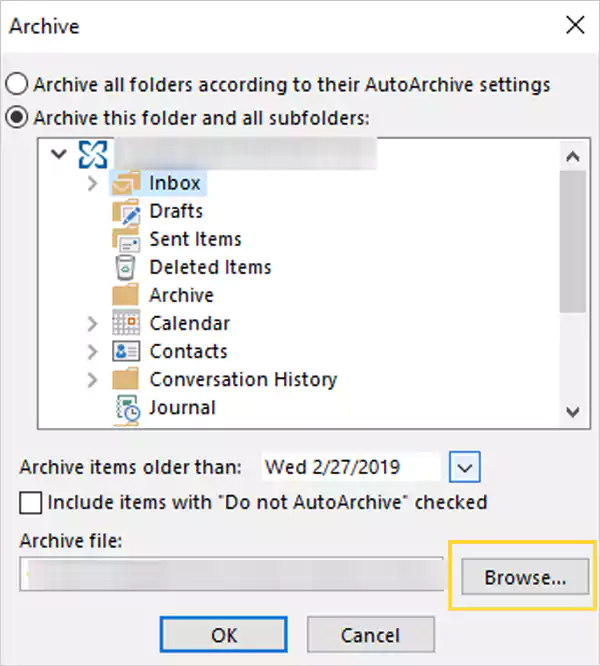
- Click on the Browse button to select the location where the archived emails are to be saved; the default is Outlook PST file.
- To archive specific things that are not included in automated archiving, choose the Include Items With the “Do Not Autoarchive” Checked box. This option ignores the Do Not AutoArchive setting for this archive alone rather than removing that exclusion from those items.
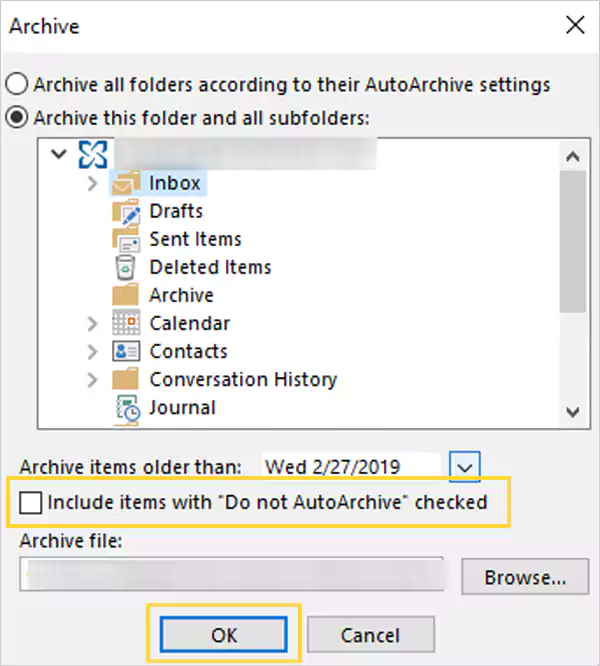
- After you have selected all the options, click on the OK button to apply the changes. With this done, all your emails from the selected folder of the given age will be archived in your Outlook.
After you have followed the above process for archiving Outlook emails, they will be saved in a separate file on your system. Now, in order to retrieve archived emails in Outlook, you can follow the steps listed below:
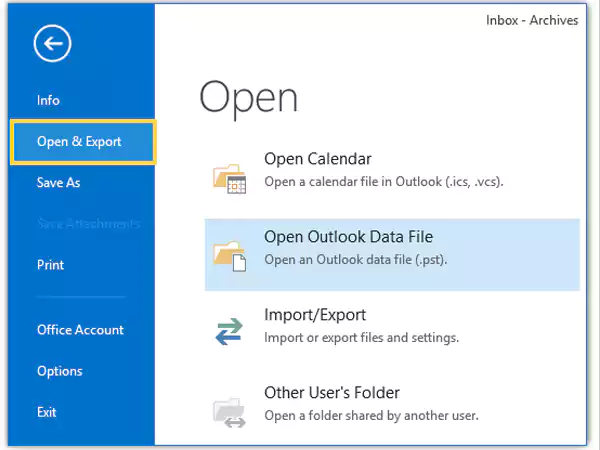
- Open the Outlook app and click on the File option from the upper left corner of the screen.
- On the window that will appear, switch to the Open & Export tab.
- After that, click on the Open Outlook Data File option present on the right side of the next window in order to open the PST file where archived emails are saved in your Outlook.
- Next, move to the location where the archived Outlook emails file is saved on your machine, select the file and click on the Open button.
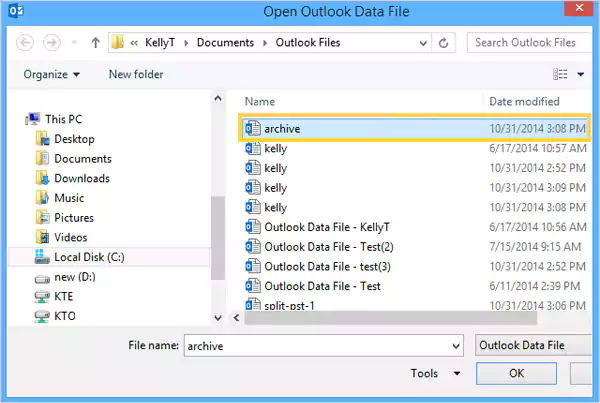
- You should be able to access all of your saved emails when your file has loaded in the software.
Read More:
- How to fix the ‘Microsoft Outlook Stopped Working’ Error?
- MS Outlook is Not Receiving Emails But Can Send? Here Is the Solution to This
- Want to Unsend or Recall Email Messages on Outlook? Here is How to Do That
- Top 11 Solutions to “Outlook Cannot Connect to Server” Error
Share