12 Fixes – An Ultimate Guide to Troubleshooting the ‘Outlook not Receiving Emails’ Issue
Microsoft Outlook is a revolutionary email service. It has made emailing much more professional and convenient. With various protection layers, Outlook offers maximum security and reliability, and hence it is popular to share and store crucial information via emails. But like any other email service, Outlook also comes across certain problems like “Outlook is not receiving emails” or “Outlook email is not working.”
These issues are not permanent and can be fixed with the right corrective measures. Therefore, we are discussing the best possible ways to fix the ‘Outlook not receiving emails issue.
- A few Basic Workarounds
- Free up Outlook Space
- Look for Emails in the Junk Folder
- Sort the Emails in the Inbox
- Turn off Outlook Offline Mode
- Auto-Refresh Outlook
- Check for Interfering Rules
- Check if you have Blocked the Sender
- Delete Outlook Cache
- Check Server Settings
- Employ a New Outlook Profile
- Run Outlook in Safe Mode & Disable Add-ins
- Key Takeaway
A few Basic Workarounds
- Check your Internet Connection: You will not be receiving emails when your Outlook is disconnected, due to some network issue. In such a case, you will see Disconnected, Working Offline, or Trying to Connect, messages in the status bar at the bottom of the Outlook window. To ensure that it is the case, try to open a web page in a browser as a test. Restart your WiFi network if you are unable to connect to the internet at all. Check your connectivity once again when the network has fully resumed.
- Restart Outlook: Outlook and other programs may hold up or become unresponsive because of prolonged running in the background. Any difficulties that you are facing in receiving emails in Outlook can be because it is not updating with the incoming formation. This can be simply resolved by restarting Outlook, closing, and opening it again.
- Check All Outlook Folders: New emails can be routed to the other folders you have created in your email account if you don’t see them in the Inbox. This can give you the delusion that your Outlook is not receiving emails. Therefore, it is highly advisable to go through all your Outlook folders to check the email you are expecting.
- Look for Emails on Other Devices: It’s possible that your emails are being downloaded to a different device, such as a phone, tablet, or office computer. This is mostly the case when you have set your email account to use POP, which saves all the messages locally on the device in which you are using the email and not on the server.
If these solutions couldn’t fix your ‘Outlook not receiving email’, don’t get disheartened. Stated further in this article are more helpful troubleshooting methods that have helped fix this difficulty for many users.
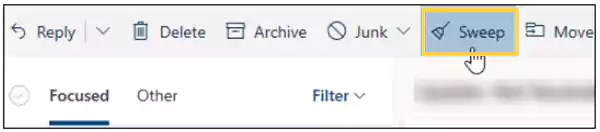
Free up Outlook Space
Like other email clients, Outlook also has space constraints. Daily, a lot of promotional and non-promotional emails are received, due to which the inbox becomes cluttered and occupies a lot of space. When you have run out of storage space, you no longer receive new emails in your inbox, though you are able to send them.
Therefore, to resolve the ‘Outlook not receiving emails issue, see if you have consumed all the available space, and if so, free up your inbox. Remove unnecessary emails, such as the subscription email. You may also use Outlook’s Sweep tool to automatically erase older messages from a sender.
Look for Emails in the Junk Folder
Spam-filtering functionality in Microsoft Outlook directs unwanted and dubious communications to the Junk folder. Outlook may be directing emails here in error if you are not receiving these emails in your Outlook inbox.
Fortunately, there is a way by which you can recover these emails from the Junk to Inbox. You can also select the option in Outlook to not forward or label emails coming from that specific sender as spam.
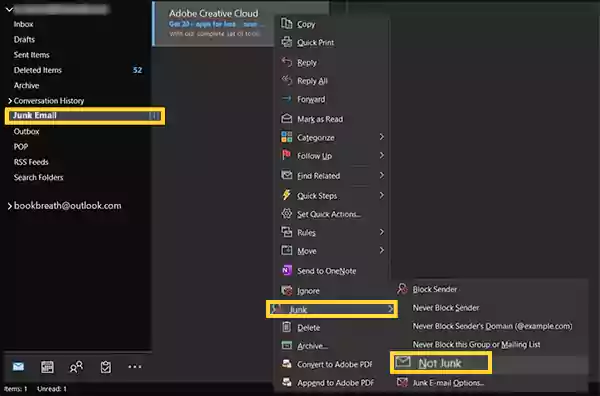
Now, in order to recover emails from the Junk folder, here’s what you need to do:
- First off, open the Outlook app on your system.
- Click on the Junk folder from the left side pane.
- Now, all the emails Outlook has marked as spam will be present here. Look for the email that you are trying to get but couldn’t receive.
- When you have found the email, right-click on it, and then, click on the Junk option. From the further menu that appears, select the Not Junk option.
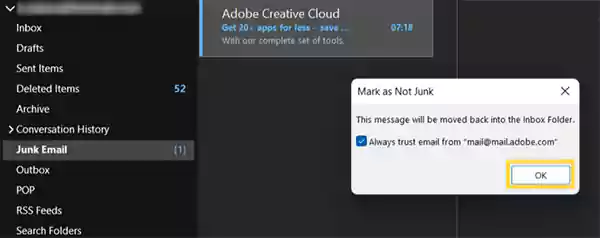
- Outlook will ask you if you wish to always trust emails from that sender before moving the email back to the inbox. If so, choose the checkbox and choose OK.
Sort the Emails in the Inbox
Outlook offers several different email sorting options. However, if you have mistakenly messed these up, then you may face difficulties. Your recently received emails may be jumbled together with other messages if these sorting settings are set up so that your most recent emails are not displayed at the top. This might give the impression that you are not receiving emails in your Outlook.
Changing Outlook’s email sorting order is a quick and simple solution to this problem. To accomplish this, follow the steps given below:
- Launch the Outlook app on your computer, and open your Inbox by clicking on the same from the left sidebar.
- Next, click on the Sort By option, and select Date to sort the emails based on the date they are received.

- Now, select the Newest on Top option from the bottom of the menu. This will place all the recently received emails at the top of your inbox. Alternatively, you can also switch between ascending and descending by using the arrow icon next to the sort option.
Your inbox should now display your most recent emails at the top. Outlook not being able to connect to the server isn’t always the problem, applying simple solutions like these, can also help fix the issue.
Turn off Outlook Offline Mode
Work Offline is one of the favorite features in Microsoft Outlook, which enables you to disconnect from the server when you don’t want to receive new emails. If this option is turned on, it may be the cause of why you are not receiving emails in your Outlook.
By turning off Outlook’s offline mode, you can solve this problem, which you can achieve by going through the process below
- To begin with, open Outlook on your machine.
- From the top menu ribbon, move to the Send/Receive tab.
- Next, in the Preferences section of the Send/Receive tab, click on the Work Offline option.
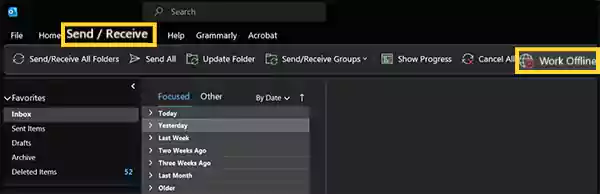
With this done, the Work Offline feature will turn off. After this, Outlook may take a minute or two to refresh and hopefully will show the emails that were not received earlier.
Auto-Refresh Outlook
If you aren’t receiving new emails, it’s possible that the auto-refreshing option is turned off or that the timer for the auto-update is set too high, which is causing your Outlook to not receive emails.
With email refreshing enabled in Outlook, it automatically refreshes all folders for recent updates every few minutes. In order to set the auto-update time in Outlook, follow the steps given below:
- First off, go to the Send/Receive tab in your Outlook.
- Click on Send/Receive Groups from the top menu bar.
- Select the Define Send/Receive Groups option.
- Thereafter, check the Schedule An Automatic Send/Receive Every option and set it to the minimum time period of 5 minutes.
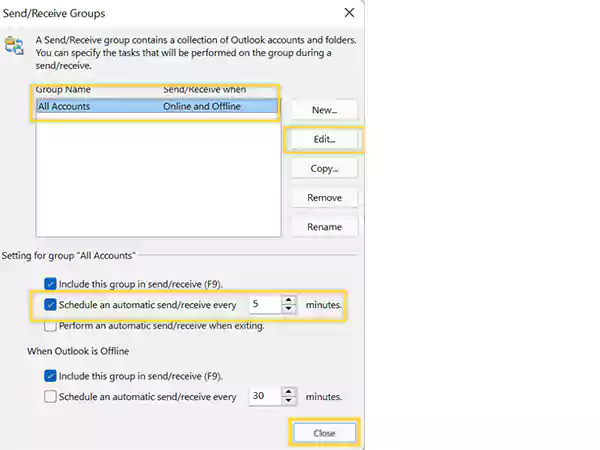
- Finally, click on the Close button.
Check for Interfering Rules
Numerous email-related actions are automated by rules that you have created in Outlook. Your emails could be sent to another folder if you have a rule that applies to the emails you receive, giving you the impression that you are not getting emails in Outlook, at all. This is also true in the case when Outlook can send but not receive emails.
Check to see whether any of the aforementioned rules exist; if they do, deactivate them to resolve the problem. The following is how to access Outlook’s rules and disable them:
- From your Outlook dashboard, click on the File menu option from the top bar.
- Now, go to the Info tab, and click on the Manage Rules and Alerts option.
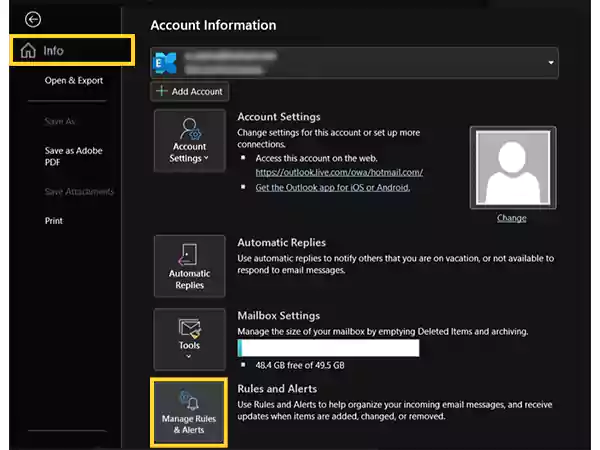
- This will open a new window, where you have to move to the Email Rules tab.
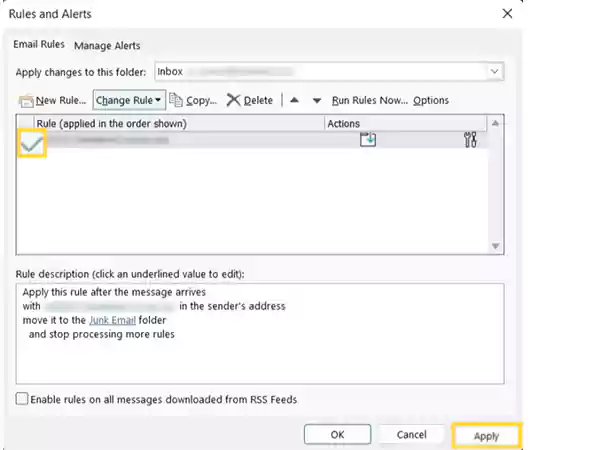
- There, you will see the list of rules you have created and also those which are functioning for your email account in Outlook. In this list, look for the rule that you think might be creating hindrance, because of which your Outlook is not receiving emails.
- Once the rule is found, disable it by deselecting the checkbox next to it. Then, click on Apply.
Check if You Have Blocked the Sender
Why am I not receiving emails in Outlook from a specific sender, you might be asking. The reason is that you could have blocked the recipient unintentionally in an attempt to organize your emails.
A list of all the email addresses you have blocked, from whom you couldn’t receive emails, can be easily found in Outlook. Perhaps a reliable email sender managed to get on this list somehow, because of which you couldn’t receive their emails.
If so, the problem should be resolved by deleting the sender from the blocked contacts list. And, the process for doing just that, is stated below:
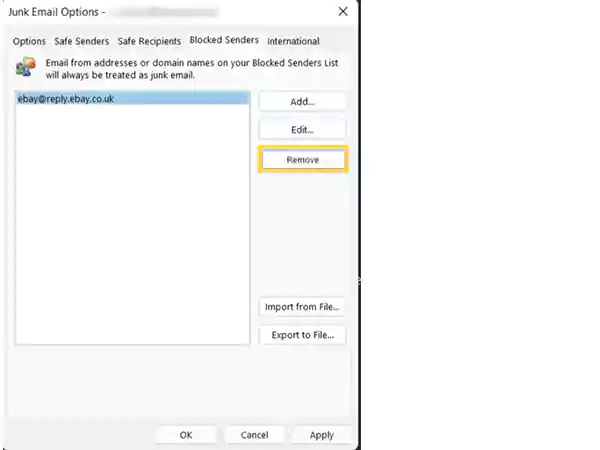
- Launch the Outlook program on your computer.
- Click on the more menu icon from the Home tab.
- Then, click on the Junk option, and from the menu that opens up, select E-mail Options.

- Now, a new window will open, where you have to go to the Blocked Senders tab. This will open the list of senders you have blocked in your Outlook program.
- Look for the sender, from whom you are expecting an email. If you find them there, click on their name, and click on the Remove button. This will remove the blocked sender from the list, and now, you will be able to receive emails from them.
Take the time to improve your email writing generally by adding an Outlook signature or creating email groups in Outlook to streamline your workflow while configuring your account so that Outlook no longer has trouble loading new emails.
Delete Outlook Cache
Outlook stores cache files on your computer, like the majority of programs, to enhance speed. However, damaged cache files can also cause a problem where your Outlook is not receiving emails but can send them.
Thereby, clearing the Outlook cache can solve the issue. Don’t worry, and this won’t remove any of the attachments from your Outlook emails or any other data.
Here’s how you can clear the Outlook cache from your system:
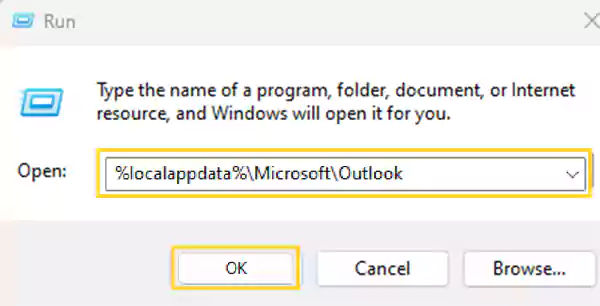
- Hit the Windows logo + R keys at the same time from your keyboard.
- In the Run dialog box that opens, type ‘%localappdata%\Microsoft\Outlook’ (without quotes), in the text field and click OK.
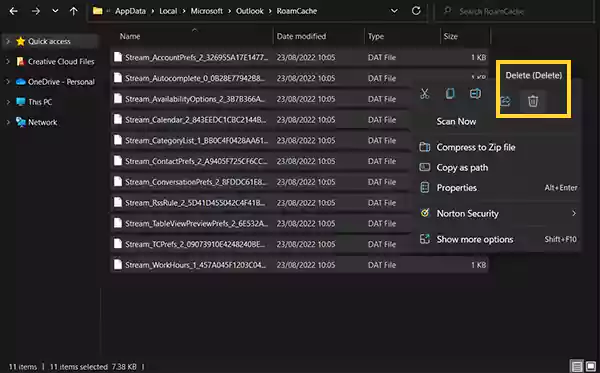
- This will open a File Explorer window, where you have to go to the RoamCache. Inside it, all your Outlook cache files will be present.
- Select all the files inside the RoamCache folder, and delete them. Optionally, you can remove these files from the Recycle Bin as well to free up the space.
Check Server Settings
Outlook not receiving emails may also be brought on by incorrect server settings. It is important that these settings are correctly configured as they govern the sending and receiving of emails.
Follow the process below to check if you are using the correct server settings for your respective email service provider, and in case they are incorrect, adjust them:
- First, click on the File menu option from the top left corner of the screen.
- Inside the Info tab, click on the Account Settings option, and again, click on Account Settings.
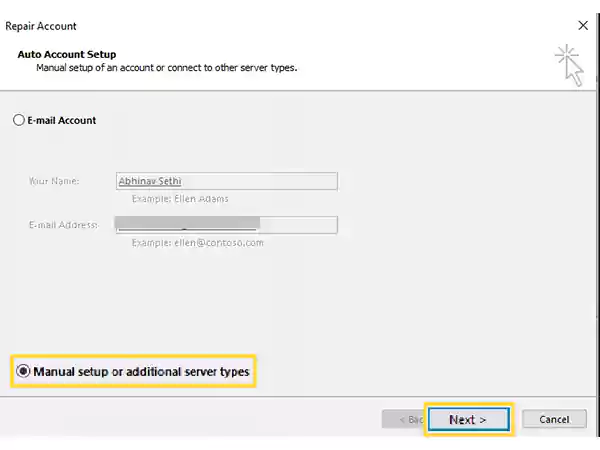
- If you have more than one email account added to your Outlook, select it from the next screen, and click on Repair.
- Next, a Repair Account window will open. There, click on Manual Setup or Additional Server Types option, and click on Next.
- Thereafter, the Server Settings window will open. There, you have to make sure that the server name, phone number, username, etc. are all correctly configured according to the email service provider of the account you are using in Outlook. Like if you have set up your Yahoo email account in Outlook, then look for Yahoo server settings, and do the same for any other email service provider.
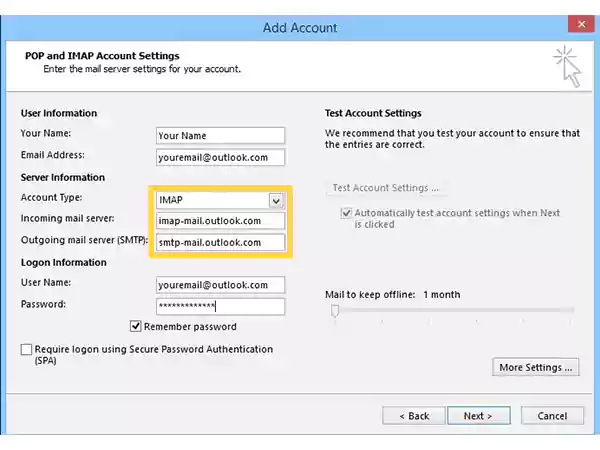
- Once you are sure that server settings are correct, click on Next and then, Finish.
Employ a New Outlook Profile
Even after attempting the suggestions above, there could be a problem with your Outlook profile if you are still unable to receive new emails in Outlook. Outlook profiles often get damaged, the reason for which can be damaged data files of Outlook. Nevertheless, you can repair any MS Office application with Windows built-in repair tool.
Removing the old profile and using the new one is one easy fix for profile difficulties because of which Outlook can’t receive emails. It just has to be reconfigured once, which shouldn’t take more than a few minutes.
Here’s how you can do this:
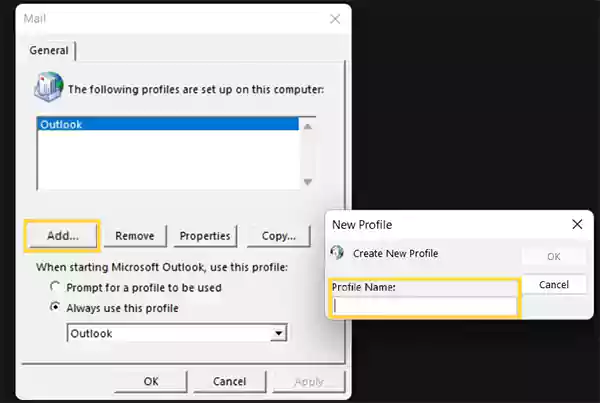
- Begin by launching the Outlook app on your system, and then going to the File menu.
- Under the Info tab, click on the Account Settings drop-down menu and select the Manage Profiles option.

- Next, hit the Show Profiles button to get to your Outlook profiles.
- On the following screen, click on the Add button to create a new Outlook profile.
- Type in the name of your new profile in the dialog box that opens, and click OK.
- Thereafter, you have to follow some instructions displayed on your screen to add your email account to the newly formed profile in Outlook.
- After that, select the Always Use This Profile option, and from the drop-down menu, select the new profile.
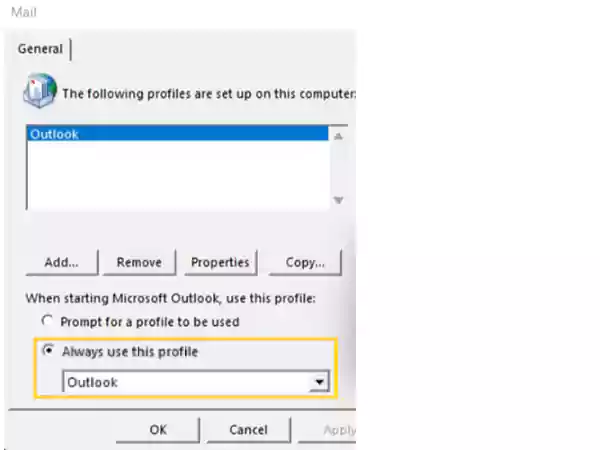
- Finally, click OK and then Apply.
- Once this is done, close Outlook and restart it using the new profile.
Run Outlook in Safe Mode & Disable Add-ins
There are several third-party add-ins for Outlook that increase its capabilities. However, some add-ins might obstruct Outlook’s functionality and lead to problems, such as Outlook not receiving emails.
In order to check if this is the case, you can run Outlook in safe mode. This will start Outlook with all the add-ins disabled. For doing so, press the Windows logo + R keys at the same time, enter “Outlook.exe /safe” (without quotes) in the text box of the Run dialog box that opens, and then click OK to complete the action.
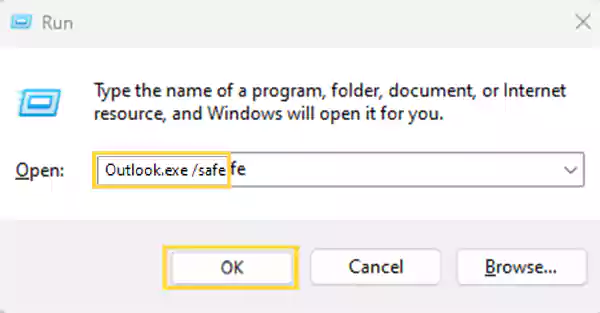
Now, ask the sender to send an email. If you can receive emails in safe mode, it proves that a certain add-in/s is to blame for the issue. The defective add-in can then be found by individually enabling each add-in, and subsequently trying to get an email.
If after enabling a certain add-in, you couldn’t receive the email, then it is the culprit. You may disable it or delete it permanently from your Outlook. Also, keep in mind that more than one add-in can be responsible for not receiving emails in Outlook, so don’t stop when you found one, repeat the process for all.
Key Takeaway
If you are not receiving emails on Outlook, then check if you are connected to the internet, try restarting your Outlook program, and see if the email is received in any other folder, or if it has been downloaded to another device.
Other than these you can try to free up space in your Outlook email, sort emails so that the most recent ones are at the top of the Inbox, check if Offline Mode is enabled, and increase the inbox refresh rate. Moreover, you can ensure that you haven’t blocked the sender of the email or any rule is preventing you from getting emails.
Further, corrupted Outlook cache and data files can also lead to not receiving emails in Outlook, which can be resolved by clearing cache files, and making a new profile, respectively.
Hope the fixes given above help and that your Outlook is now receiving emails. However, if it is still not getting them, you can get help from Microsoft Office Support.
Share