Want to Unsend or Recall Email Messages on Outlook? Here is How to Do That
- Outlook allows you to recall emails in Outlook exchange if the recipient hasn’t opened it.
- Recalling can be done from the “Actions” menu from the “Message” tab after selecting the message you want to recall.
- If you are using Outlook on the web browser, you can use the “recall” feature.
- Only Microsoft Outlook accounts allow you to recall the message.
Have you ever sent a message and felt wrong or embarrassed about it? Then, the Outlook recall feature is what you need. The “unsent” feature of Outlook is the most amazing advancement that any web service can provide. It is quite similar to “delete message” from WhatsApp.
Outlook email recall enables you to change an email that you have already sent from the recipients’ mailbox. But the only condition here is that they must not have opened the email yet.
This feature can be very helpful when you have made an accidental mistake such as an incorrect name, or wrong attachment.
Notably, this feature is only available when both the users have an Outlook email client on Exchange Server. Consequently, if both users are not using Outlook, this feature won’t render any result.
Pro Tip: If you want to avoid mishaps with Outlook emails that you are sending, try the “delay time” feature from Outlook settings. This will enable the several-second pause before actually sending the email that might need some changes later.
For those who want to know how to use the recall or unsend feature for an Outlook account, here’s the complete guide. If you are keen on reading and knowing more about Outlook, sites like emailscrunch.com would benefit you.
Here we have linked a video that can help you comprehend the entire Outlook recalling process:
What are the Requirements to Recall an Email on Outlook?
To recall Outlook email, you need to follow some of the basic requirements that are listed here, below:
- Both the users i.e. sender and the recipient should be using an Exchange server email account and must have Outlook as the email client.
- The mailbox of the recipient must be open while you are attempting to recall an email.
- The message you want to recall is unread and in the recipient’s inbox.
- The message should not be opened or touched by any process, likely to say rule, filter, add-in, or spam.
Now, if your message follows all the above-mentioned criteria, you can try recalling the message using the steps that we have listed underneath.
Important Note: When you try to recall an email, Outlook might notify the recipient about the recalled email.
Follow these steps to recall an email in Outlook
- Step 1: Launch “Outlook” and open the “Sent Items” folder from the left corner.
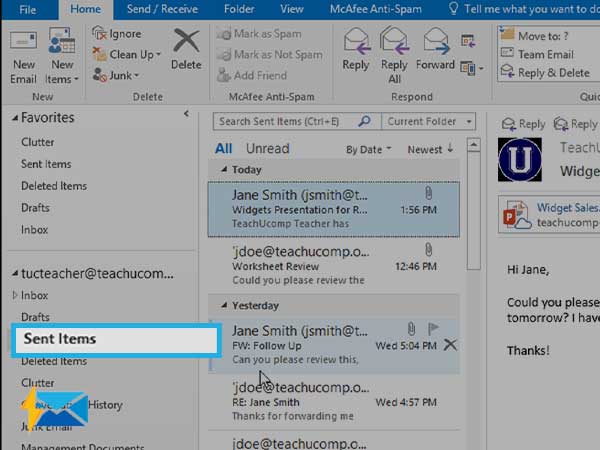
Step 2: Double-click on the message that you want to recall. It will open in a new window.
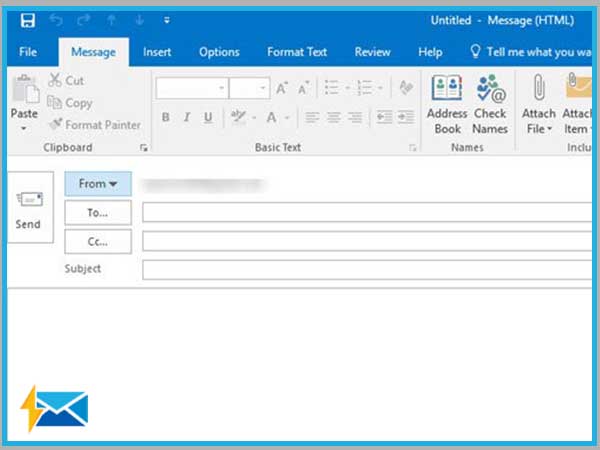
Step 3: The option recall will only be available when the message is not in the reading. If your email is placed under the Reading Pane, you won’t be able to recall it.
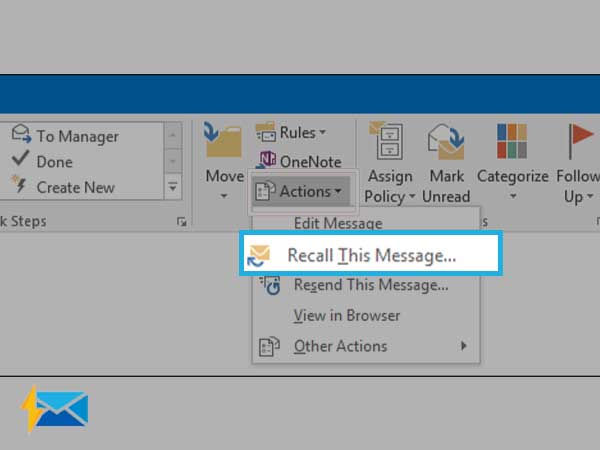
Step 4: Now, go to the “Message” tab, and click on the “Actions” dropdown menu and select “Recall This Message”.
alt: Select “Delete unread copies of this message”
Important Note: If you are using Outlook 2007, open the Message tab, go to the Actions group, and then select Recall This Message.
Step 5: Click on “Recall This Message” and select one option from the following:
- Delete Unread Copies of This Message to recall the message.
- Delete Unread Copies and Replace with a New Message to replace the message with a new one.

Step 6: If you are willing to receive notifications for every result, you need to choose the “Tell Me if Recall succeeds or Fails for Each Recipient” option.
Step 7: Click on “OK”.
Step 8: Select Delete Unread Copies and Replace with a New Message, and you can make changes in the original messages.
Step 9: Click on “Send”.
Step 10: After this, you will receive the messages for the success or failure for the attempt of replacing or retracting the email.
This is how your recalled attempt’s success or failure screens will look like:
- Failed Outlook email recall
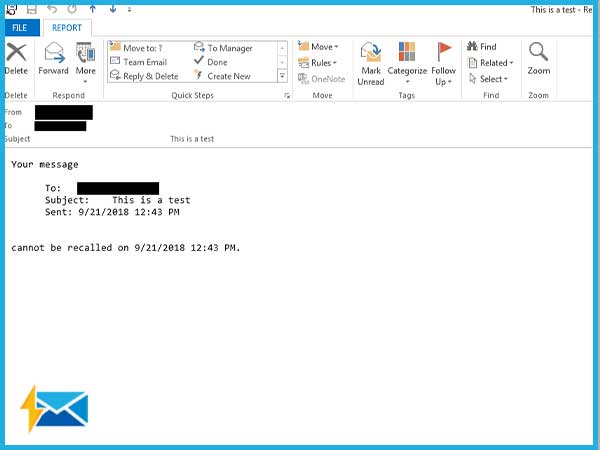
The screen about the failed recall attempt will provide all the related information such as recipient, subject, time, and date of delivery and whether the recall attempt was successful or not.
- Successful Outlook email recall
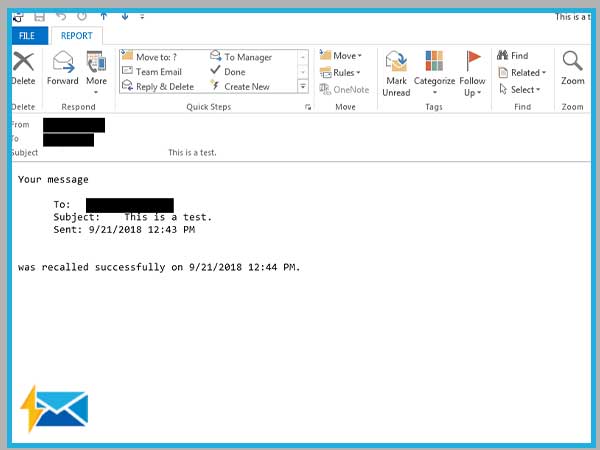
For a successful endeavor of Outlook email recall, you can take a sigh of relief for deleting or replacing the incorrect email.
How to make sure Outlook recall is successful
If you have already sent an email and now you are looking for ways to recall it, you need to understand that an email can only be replaced if it follows all the above-stated requirements as well as the recipient’s Outlook settings.
Here we will discuss some scenarios and help you deal with them for a successful recall.
Scenario 1: The “Automatically process meeting requests and responses to meeting requests and polls” feature is by default enabled.
If the recipient has already enabled the “Automatically process meeting requests and responses to meeting requests and polls” feature. The recalled message will be saved in the recipient’s Inbox, where the original message was stored. The recall’s success depends upon whether or not the message has been opened or read.
- If the recipient has not read the message, the recall message will replace the original one. And, Outlook will inform the recipient about the message being replaced.
- if the message is marked as read and the recall message arrives, the attempt will fail, and the original message will not be replaced. Nevertheless, the recipient will be informed about the recall attempt.
Scenario 2: The “Automatically process meeting requests and responses to meeting requests and polls” feature is disabled.
If the recipient is not using the “Automatically process meeting requests and responses to meeting requests and polls” feature, the original as well recall will be stored in the Inbox of the recipient. The success rate of recall attempts depends upon which email is first opened:
- If the recalled email is opened first, the original email will be removed automatically. This will make your recall successful.
- However, if the recipient opens and reads the original message instead of the recalled message, the recall will fail.
Scenario 3: An inbox rule saves the original e-mail and recall an email in a different folder.
- If the recipient has set a particular rule for incoming emails, the original email and recalled email will be saved in different folders and the recall will fail automatically. So, Outlook account having the set of rules, fail to recall messages immediately.
Scenario 4: An inbox rule saves both the original email and the recall e-mail to the same folder.
If the recipient has applied a rule according to which both the original and recalled emails will be stored in the same folder, the success of recall depends upon which email is opened first:
- If the recipient opens the recall message first, the original message will be removed, and your recall will be considered successful.
- If the recipient opens the original email, the recall attempt will be unsuccessful.
Solutions to Fix Failed Recall Attempt on Outlook
Recalls are very useful, but they tend to fail in certain scenarios. We have already discussed the cases that can lead to a failed recall attempt. As mentioned, recalling isn’t sure-fire and it may succeed due to uncontrollable factors. In case, you find your recall attempts didn’t work out, there are a couple of other ways you need to try;
- Solution 1: Try to send an apologetic email and make sure it has been sent to the right recipients. A simple apology for your mistake is the best way to get rid of the problem. If you have sent the email to the wrong recipient, type an apology mail and save your time and efforts, and it will help to build trust among recipients.
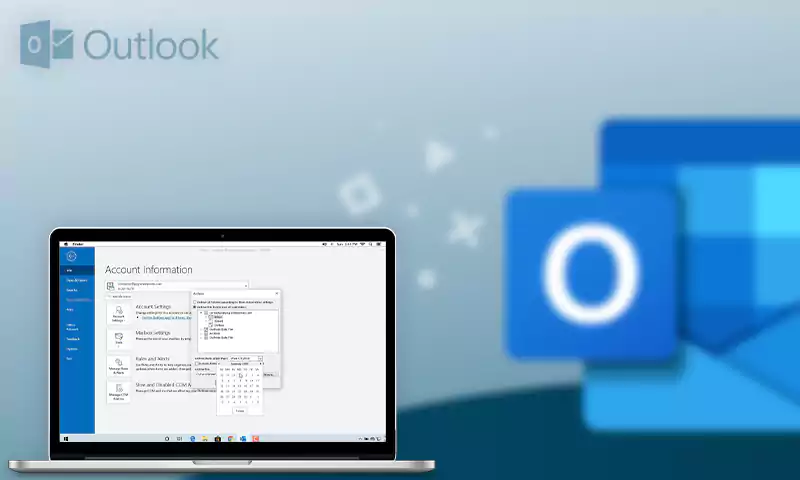
- Solution 2: Schedule your emails to avoid any sort of slip-ups. If you have to reply to emails consecutively along with important data, the chances of slip-ups are high, so to avoid such distressful situations, try to schedule or delay your emails. In Outlook, you can easily set it up by following the underneath steps;
Step 1: Click on the File option from the upper-left corner of the Outlook application.
Step 2: Move your cursor to the Manage Rules & Alerts option and click on it
Step 3: The Rules and Alerts window will pop up on your screen, Now, choose the New Rule option.
Step 4: One more window will pop up, now click on Apply Rule on Messages I Send. It will be listed beneath, Start from a Blank Rule. Press the Next button to continue.
Step 5: Now click Next to continue. A confirmation screen will pop up. Click on Yes to confirm.
Step 6: Choose the Defer Delivery by a Number of Minutes option. Select the A Number of links. A pop-up screen will appear and request you to select your preferred duration. Enter the number you want, then click the OK button. After that, click on Next.
Step 7: In case, you have any exceptions, choose the exceptions options you want and click the Next button to continue.
Step 8: Name your to rule, and check the Turn on This Rule checkbox if it’s available. Lastly, press the Finish button.
Conclusion:
This is how you can un-send or recall the message in Outlook 2019, 2016, 2013, 2010, 2007; and Outlook for Microsoft 365, but we suggest you not take a risk and check your important emails thoroughly before sending them.
Share