How to Change Your Signature in Outlook? Simple Steps to Personalize your Emails
As from the title of the post, you may already know the topic of today’s guide; ‘How to change an email signature in Outlook?’ Well, we will get back to answering it after a short intro to the topic…
Adding a signature to your email account has great significance, as you do not always have to type it yourself every time you send an email, thus saving a lot of your important time. Further, with your read-to-use signature in place, you can ensure the proper closure of an email without any worry of forgetting to type it.
Also, an email signature serves as a virtual business card, using which you can conveniently slide in some information about your business. Thus, keeping it up-to-date with the latest information is also important.
So, here’s the ultimate guide for doing so in Outlook. In the write-up below, you will find the useful steps to change a signature in Outlook and some other related valuable information.
Simple Steps for Changing Signature in Outlook
As time flies by, you change with it, and so does the signature requirement (I know it’s a terrible analogy, but bear with me, I promise here’s some useful information 😬). So, to know how to edit signatures in Outlook on different devices, you can follow the steps given below:
Outlook for Windows:
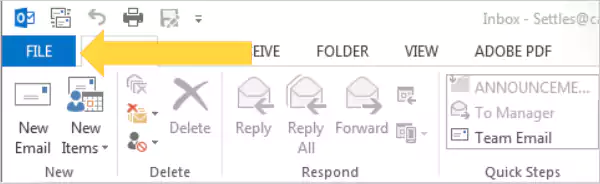
- First off, open the Outlook app on your Windows system.
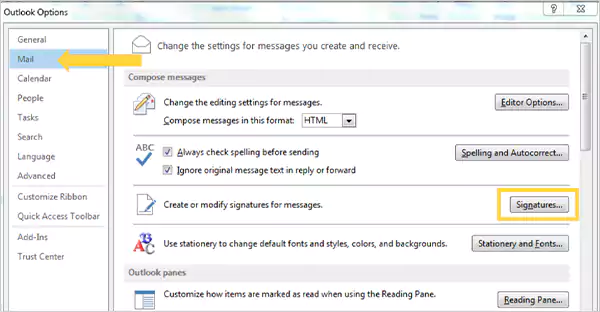
- Now, click on the File menu from the top left corner of the screen.
- Select Options from the left pane of the next screen.
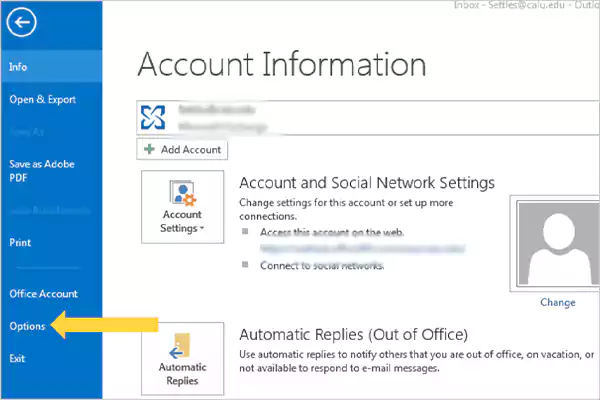
- After that, switch to the Mail tab in the Outlook Options window that appears next, and then click on the Signatures button.
- From the Select Signature to Edit list, select the signature you want to change in your Outlook.
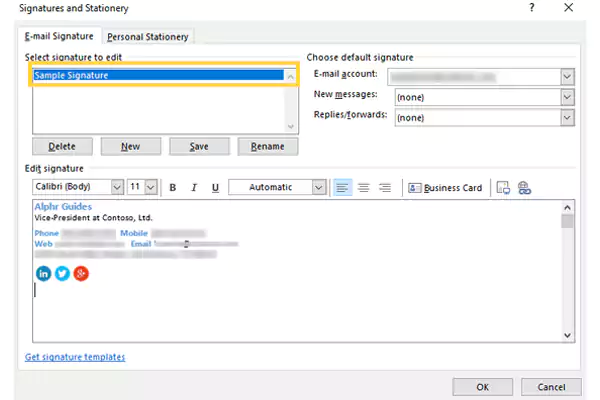
- Thereafter, the subsequent signature will appear in the Edit Signature box. There, you can do whatever change you want to your signature in Outlook.
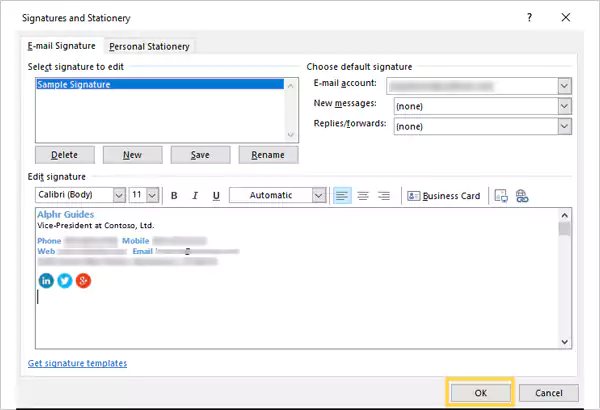
- Once you are done editing, click on the Save button and then hit OK.
Outlook for Mac:
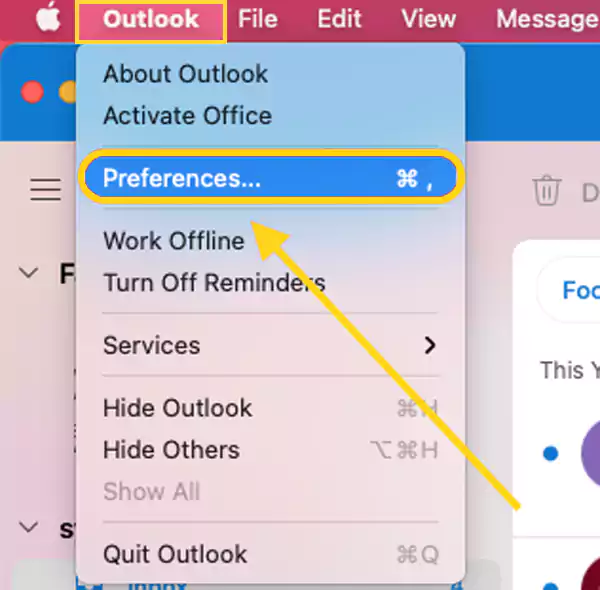
- Begin with launching Outlook on your Mac.
- Then, click on Outlook from the left corner of the window, and from the menu that appears, select the Preferences option.
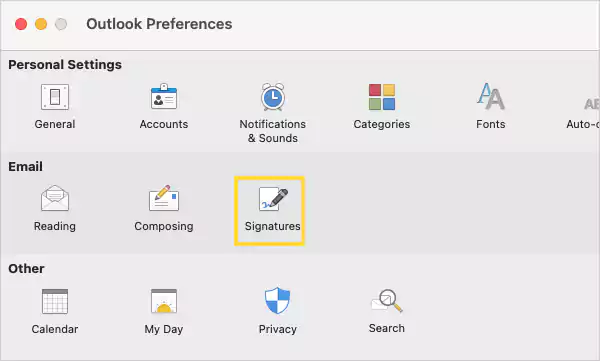
- After that, the Outlook Preferences screen will appear. There, click on the Signatures option present under Mail.
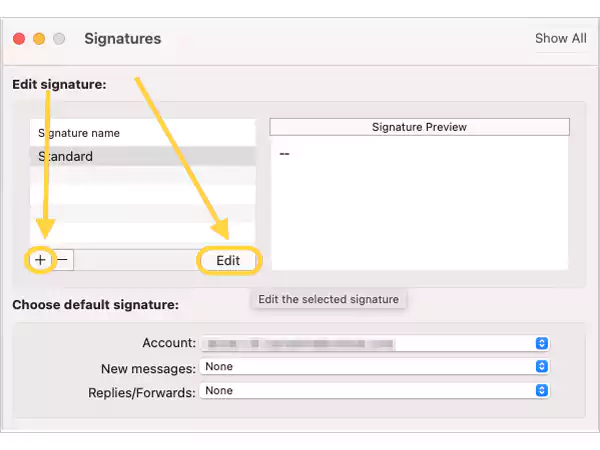
- Under the Signature Name list, in the next window, select the signature you want to change in your Outlook and click on the Edit button. If you want to add a new one, click on the + icon.
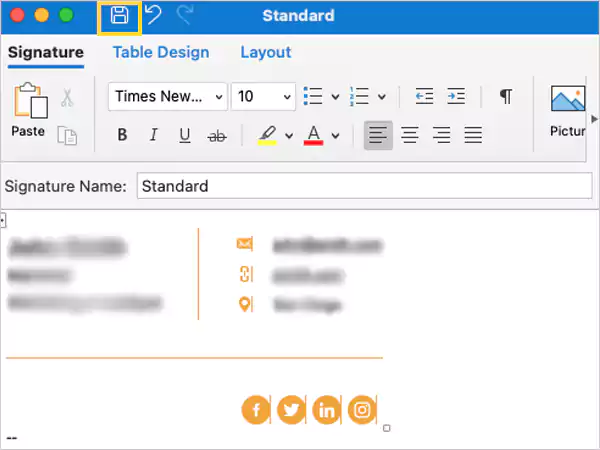
- Thereafter, the signature editing window will appear, where you can make any changes to the signature that you want. And, after you are done, click on the Save icon (floppy disk icon) present in the upper left part of the screen, and close the window.
Note: In order to change email for different email accounts added in Outlook, click on the Accounts option in Step-4, and select the email account. After that, select the signature and edit it.
Outlook Web:
- First, on your browser go to Outlook.com and sign in to your Outlook account.
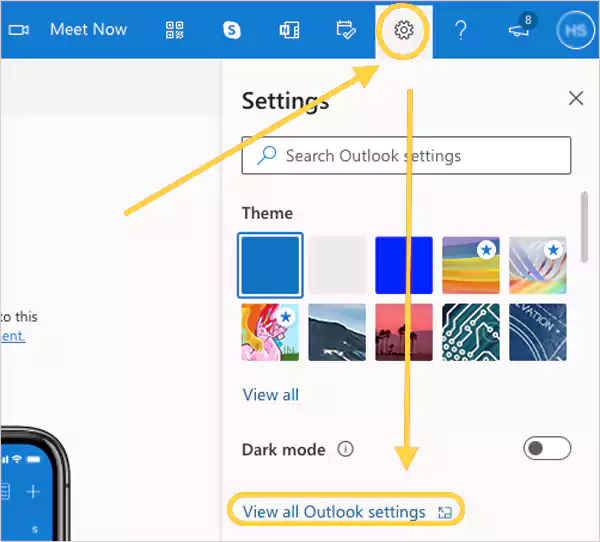
- Once your Outlook dashboard opens, click on the Settings icon present in the top right corner.
- Then, click on the View All Outlook Settings option at the bottom of the pane that will appear.
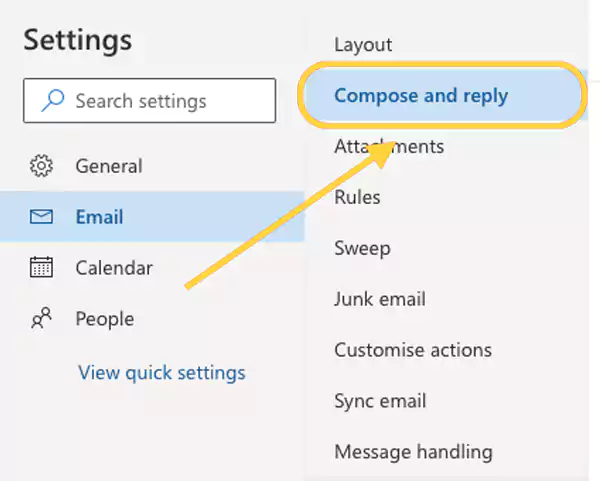
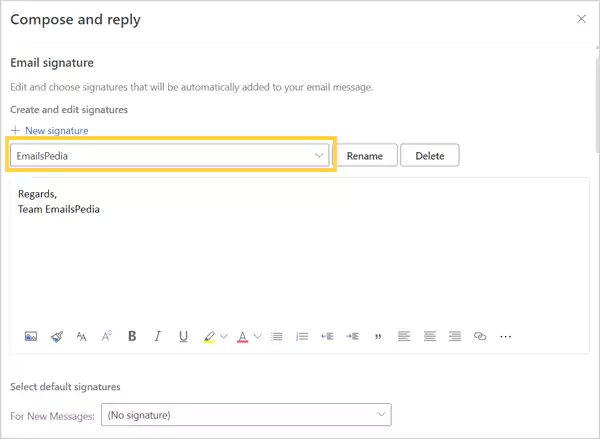
- On the subsequent window, switch to the Email tab, and under it, go to the Compose and Reply section.
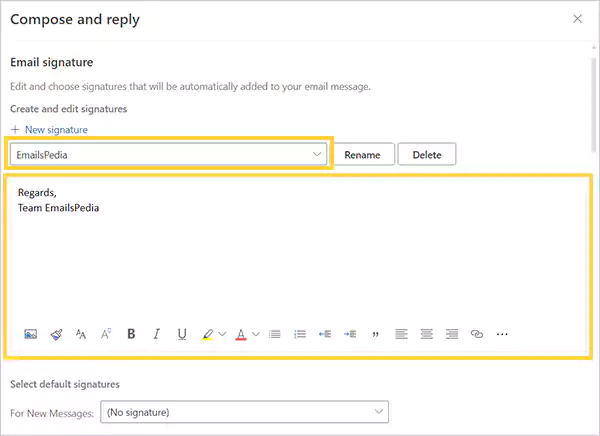
- Now, select the email signature to be changed in your Outlook from the drop-down menu. The following signature will appear in the edit box below, where you can make whatever change you want.
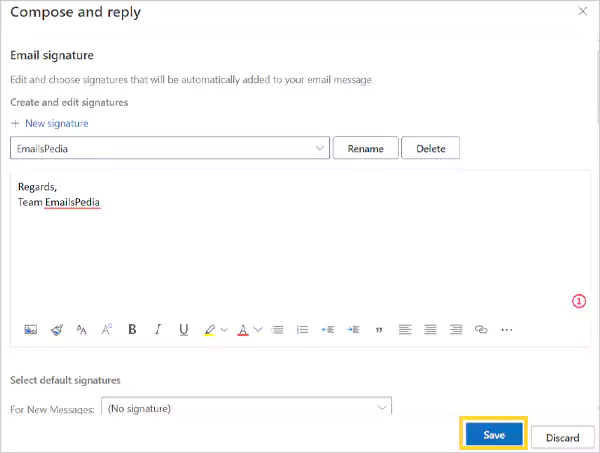
- After you are done editing the signature, click on the Save button at the bottom, and close the window to apply changes. With this done, you now know how to change your signature in the Outlook Web version.
Outlook for iPhone:
- If you have set up Outlook on your iPhone, you can easily change your signature on it. To begin with, open the Outlook app on your iPhone.
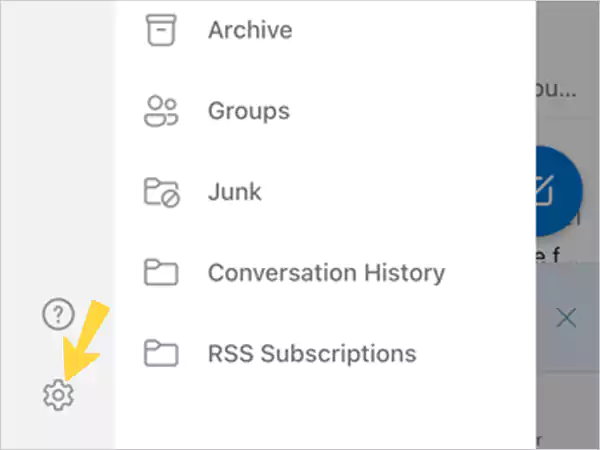
- In your Outlook app screen, tap on your profile picture/icon present in the top left corner.

- From the bottom of the left side pane that will open next, tap on the Settings icon.
- Go to the Mail section on the following screen, and tap on the Signature option.
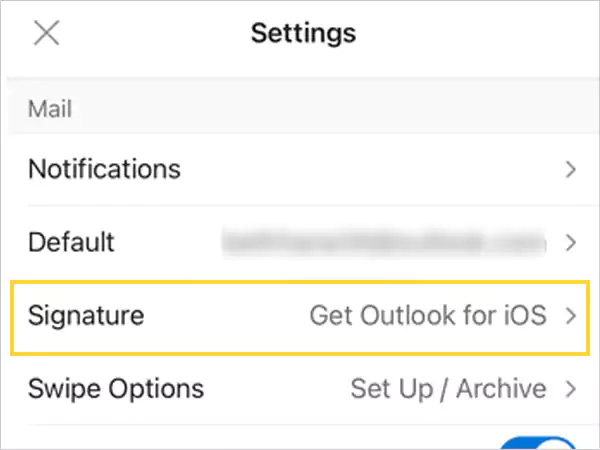
- Finally, the Signature window will open, where you can change your signature in Outlook.
Outlook for Android:
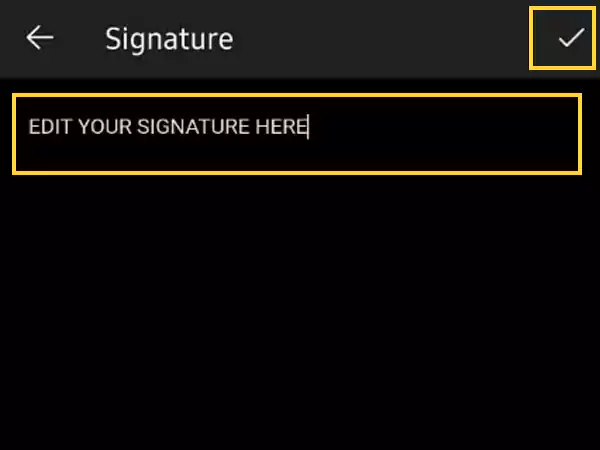
- Launch the Outlook app on your Android device.
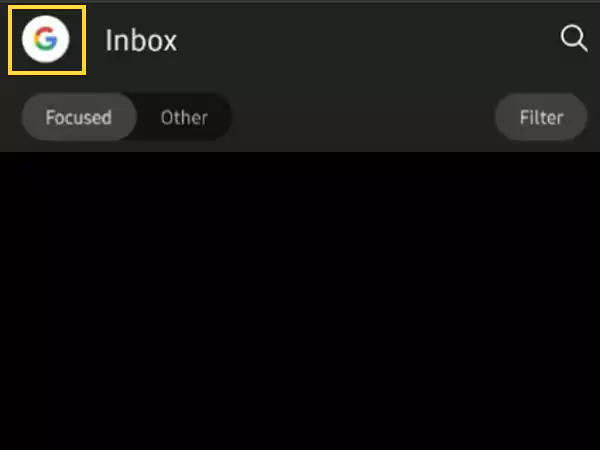
- Tap on your profile icon from the top left corner of the screen.
- Then, tap on the Settings icon present at the bottom of the left pane that appears next.

- Now, under the Email section, tap on the Signatures option.
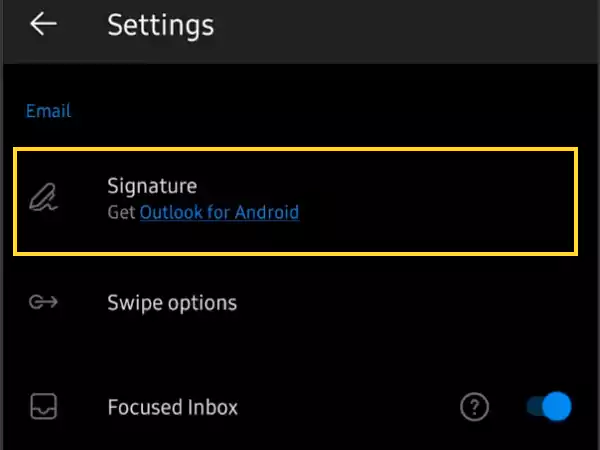
- After that, select the signature you want to make changes to in your Outlook.
- Then, edit the signature in the Edit Signature box, and once you are done, tap on Save (right tick in the top right corner).
Change Default Signature in Outlook
In case you want to know how to automatically add a signature in every email in Outlook, then make it default. By doing so, every time you write an email, the signature set as default will be automatically added to it. However, if you have already set a default signature in Outlook, and now want to change it to a new one, then you can do it as well.
Now, for doing all these things, setting a signature as default or changing the existing one in Outlook, you have to do is, follow the steps listed further:
On Outlook for Windows:
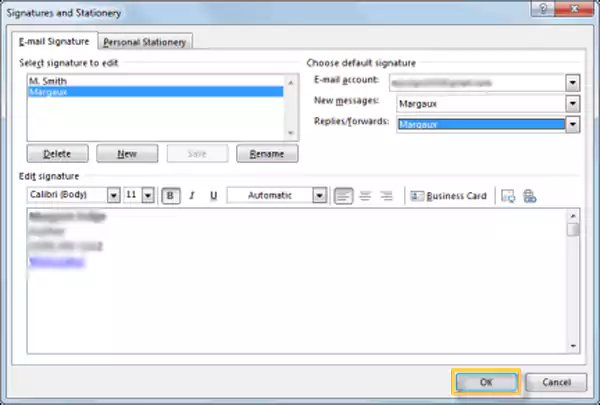
- Open the Outlook app on your system, and click on the File menu option.
- Now, click on Options present in the left sidebar of the following screen.
- Go to the Mail tab in the Outlook Options window and click on the Signatures button present under the Composers section.
- Then, choose the signature from the Select Signature To Edit list, that you want to change to default for your email account in Outlook. You can edit the signature under the Edit Signature box, and to add a new signature, click New.
- After that, under the Choose Default Signature section, select the Email Account for which you want to make the selected signature default. Further, for the New Messages and Replies/Forwards options, select the name of the signature you want to make default in Outlook from the drop-down menu.

- Once done, click on the OK button.
On Outlook for Mac:
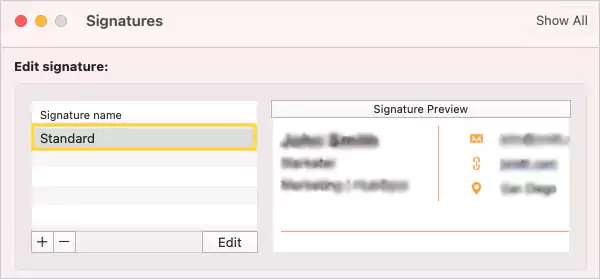
- Launch the Outlook app on your Mac.
- Click on the Outlook menu option from the upper left corner of the screen, and from the expanded menu, select the Preferences option.
- In the Preferences window, click on the Signatures option present under the Email section.
- Now, from the Edit Signature list, select the signature you want to change to default in your Outlook, and then click on Edit to make changes to it, if any. However, if you want to make a new signature, click on the Plus icon (+).
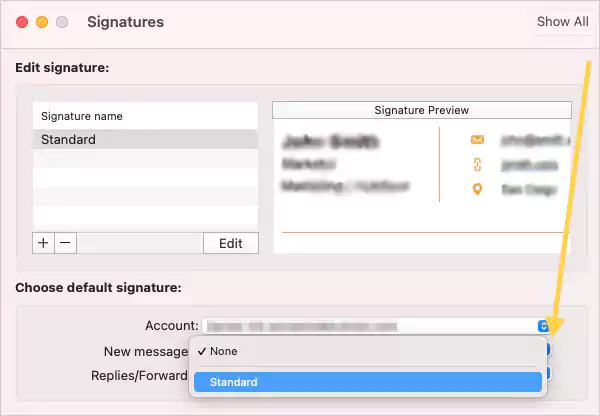
- Thereafter, a new window for making/changing the signature will open.
- After that, select the email account from the Email Account option, under the Choose Default Signature section, for which you want to make the selected signature default. Then, for both New Messages and Replies/Forward, select the name of the signature from the drop-down list to make it default.
On Outlook Web:
- First off, log into your Outlook account by visiting outlook.com on the browser.
- Click on the Settings icon from the top right corner of the screen, and click on the View All Outlook Settings option from the pane.
- Now, go to the Email tab and open the Compose and Reply sections.
- After that, select the signature from the drop-down menu that you can set as the default signature in Outlook. The subsequent signature will appear in the Edit Signature box, if you want to edit it, you can do that there.
- Once done, under the Select Default Signature section, for both New Messages and Replies/Forwards options, select the signature name that you want to change to default in your Outlook, from the drop-down menu.
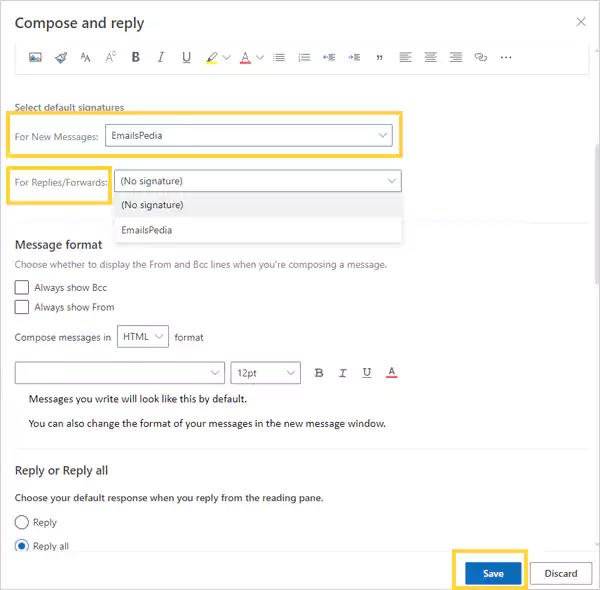
- Finally, click on the Save button, and close the window. After refreshing Outlook, compose a new email, and now, you will see that your default signature is automatically added to it.
Select Signature for Every New Email in Outlook
In case you have different signatures for various purposes, and often have to switch between them depending on the email you are sending and to whom, then the default option might not be as useful for you. Rather, you can select the signature suitable for the email at the moment of composing it. Here’s how you can do this:
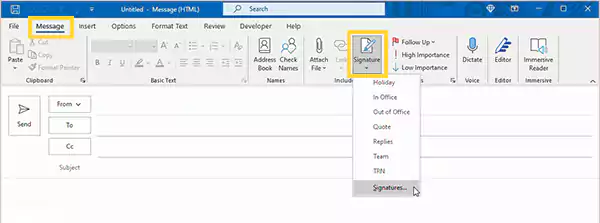
- Start by opening your Outlook on the device you are using.
- Then, click on the New Email option to write a new email.
- Now, to insert the signature of your choice, switch to the Message tab from the top menu ribbon.
- After that, click on the Signatures option, and from the drop-down menu, select the name of the signature you want to insert in the email.
Note: The steps for adding a signature in the email at the time of writing it, are the same for all Outlook versions for different devices, including Outlook web.
Bonus: How to Add a Handwritten Signature in Outlook?
Well, there is no such tool in Outlook to change your signature to handwritten. However, there’s a trick to it that you can use. To know what it is, jump onto the steps given below:
- First off, take a pen and a piece of paper, and sign your signature on it.
- Now, click a picture of it with the help of your phone.
- Crop the image to the signature’s size only, removing any extra space around it, and transfer it to your system.
- Now, open Outlook on your desktop, and follow the steps above (change your signature in Outlook) to access the Signature panel.
- Click on the New button, type the name of your signature and click OK. However, if you want to edit the existing signature in Outlook, select the same from the Select Signature to Edit list.
- Now, in the Signature Edit section, select the option to insert the image, and open your handwritten signature image.
- Once done, save the changes by clicking Save.
Now, when you will require to add this signature to your email, just place the cursor where you want to insert it in the email composing window. Then, click on Insert > Quick Parts > AutoText, and your handwritten signature will be added to your email.
Read More:
- How to Stop Avast from Inserting Its Signature at the Bottom of Outgoing Emails
- Personalize the Emails you Send by Adding a Signature to Your Yahoo Email Account
- Solutions to Get Rid of ‘Outlook Sync Issues’ on Windows 10 and Android
Share