How to Fix If Gmail Is Not Syncing with iPhone/iOS?
When Gmail is not syncing with your iPhone, all the basic functions such as sending and receiving emails, open and read messages, accessing calendars and contacts would stop working. Syncing errors of Gmail with iPhone, also affect the overall speed and performance of the Mail app and thus re-syncing becomes necessary in such cases.
Reasons Why Gmail is Not Syncing with iPhone
- The major cause that can induce sync issues is the glitch in data transfer taking place in the backend and affecting the smooth working of the iPhone mail app. Such errors don’t get resolved on their own and keep hanging the mail on the iPhone.
- Sudden Network connectivity issues, timeouts, or sending or receiving of the massive data file are a few reasons.
- Server issues are the next prominent cause for poor Gmail functioning on iPhone.
- Having an unstable or non-working internet connection is another cause.
- Disabled IMAP settings on Gmail.
- Incorrect email settings can affect the syncing process.
- Outdated email apps can also keep you from syncing Gmail on your iPhone.
These causes are quite helpful to figure out the solution that would work for you when your Gmail is not syncing on your iPhone. After finding the underlying cause, you are suggested to move to the next section that includes multiple solutions that can help you fix Gmail syncing problems if Gmail is not working on iPhone.
Solutions to Gmail Not Syncing With iPhone
Solution 1: Restart your device
Some issues occur due to problematic phone and syncing issues is one of them. Therefore, we recommend you restart your phone. Restarting is a very effective way to fix issues by ending the ongoing processes that are interrupting the Gmail syncing process.
Solution 2: Configure Push Settings
The next thing that can bother the Gmail syncing is the inappropriate Push Settings. These settings should be on point if you don’t want to invite the Gmail sync issues. Hence, Push Settings should be properly configured, if required you can perform manual setup using the steps given below:
- Go to Settings.
- Now, from the Settings menu, select Passwords & Accounts in the menu.
- Under this option, select Fetch New Data.
- Choose Gmail and click on Fetch.
Then, you close the app and refresh the page and this way sync would be completed.
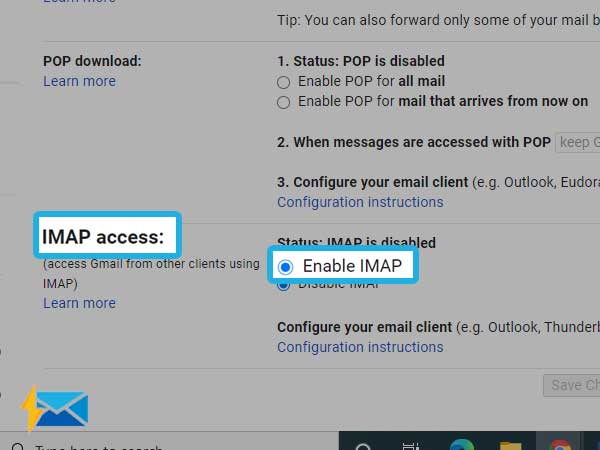
Solution 3: Enable IMAP on Gmail
When you access Gmail on your iPhone, it is important to keep IMAP settings enabled. Here is how you can enable Gmail settings on iPhone
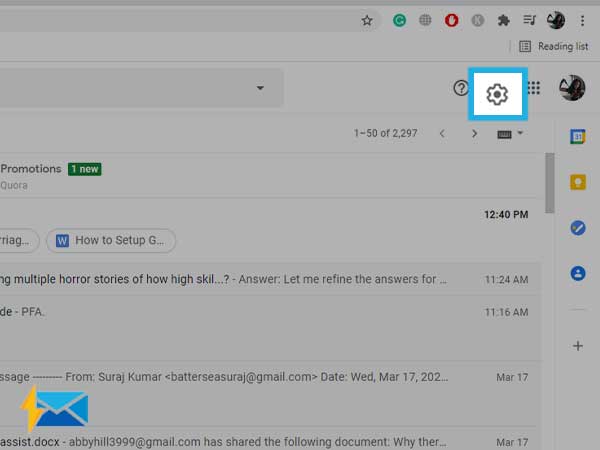
- Open Settings by clicking on the Gear icon from the top right corner.
- Now, choose the “Forwarding and POP/IMAP” tab
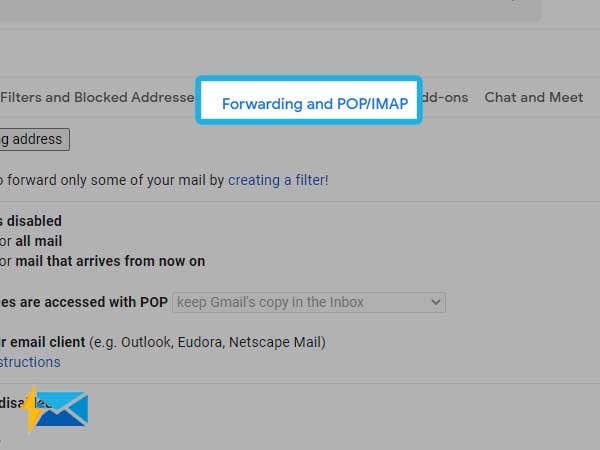
- Now, select “Enable IMAP” from the “IMAP Access” section.
Solution 4: Check if Device is Online
Without a stable and proper internet connection, syncing Gmail with iPhone is not possible to process. Hence, make sure that your device data is turned on or your device is connected to Wi-Fi.
To fix internet errors, restarting your router and removing obstacles near the router would be fruitful.
Solution 5: Delete and Reinstall Gmail App
Delete the Gmail app from iPhone and then install it again from the App store of your iOS device. This is a great way to get rid of syncing errors.
Solution 6: Remove and Reinstall your Account
If these issues are not resolved with the above-given methods, you need to remove and re-add the account. This is a way to clear all the traces of the previous account configuration. Removing a Gmail account, won’t remove your Gmail data for sure.
To Remove the Gmail Account from iPhone:
- Go to Settings and then Passwords & Accounts.
- Select your Gmail account and then select Delete Account.
- Again click on “Delete Account” for confirmation.
To Re-add the Gmail Account on iPhone:
- Go to Settings>>Mail.
- Now, click on Add Account.
- The Gmail settings should match with the following:
- Account type: IMAP
- Hostname: imap.gmail.com
- Username: your full email address
- Outgoing Server: smtp.gmail.com
Now, click on Save.
Share