How to Add a Signature in Gmail? Easy Steps to Create Your Gmail Signature
Jack: Hey, I am not sure why none of my emails are standing out. I am having trouble following up with my new clients.
Roy: Do you know how to add a signature in Gmail?
Jack: No.
Roy: You must use it to appear professional and authentic; additionally, it attracts many clients.
Ruth Bader Ginsburg said, “If you want to be a true professional, do something outside yourself.”
When it comes to attracting new business clients online, Gmail signatures are critical. To help you, I will explain how to create a signature in Gmail, and how to make your signature more appealing to the recipient.
- How to Add a Signature in Gmail?
- How Can You Edit Your Gmail Signature?
- How to Insert an Image to Your Gmail Signature?
- Add a Clickable Phone Number To Gmail Signature
- Add a Hyperlink to Your Gmail Signature
- How to Add a Signature in Gmail Using a Phone?
- How to Set an Auto Gmail Signature?
- What Are the Benefits of Using Gmail Signature?
- Why is Your Signature Not Showing on Gmail?
- Email Signature Gmail: A Way Towards Professionalism
How to Add a Signature in Gmail?
Now, let’s try to learn how to add signature in Gmail. I have provided a step-by-step guide below in this respect, along with the required illustrations to make you understand better.
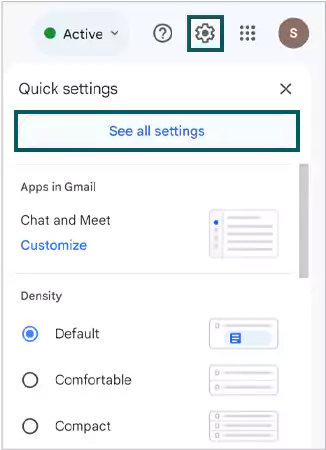
- Step 1: Visit your Gmail Settings. After signing in to your Gmail account, click the “Gear icon” and then “See all settings”.
Now you have to create signature in Gmail, give a name to it, and then add some essential details. To know how to get it done, continue reading the remaining guide.
- Step 2: Create a Gmail Signature: To create your Gmail Signature, follow either of the two ways:
- Click “Ctrl+f” (For Windows) or “⌘+f” (for Mac).
- Type “Signature” in the search bar and keep pressing “Enter” until you reach the signature editor settings.
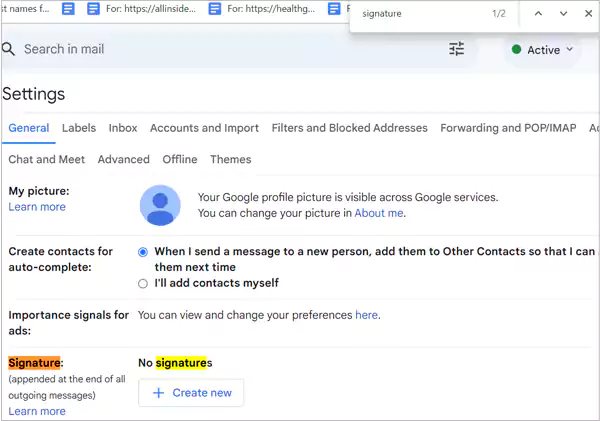
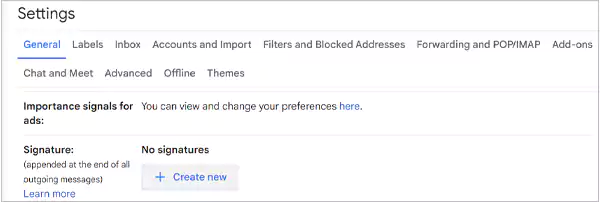
- You can also scroll downward and locate the section entitled “Signature”. Herein, you have to click the “Create new” button.
- Step 3: Add a Name to Your Signature: Give your Gmail signature a name by following the guidelines outlined below:
Click the “Name new signature” option. All you have to do now is type the name you want to use as your signature and then click the “Create” button.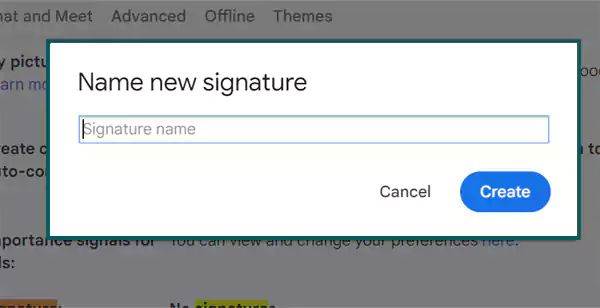
Reminder: Choose a name that is easily identifiable to you in the context of your Gmail signature later on.
- Step 4: Add Details to Your Gmail Signature: Once you give a name to your Gmail signature, add the necessary details to it. You have to click on the inner side of the signature editor text box and enter the following details:
- Your full name
- Job profile
- Company name and
- Contact details

I have included a sample below to assist you; you can use it as a starting point and even copy and paste it in its entirety into the text field of your Gmail signature editor.
Roy S. Cyrus
Business Partner at Sunrise Corporation Pvt Ltd
Website: www.sunrise.com
Contact: 202-428-5698
Address: 456 Park Ave, New York City, 10022
Note: I have provided an extremely simple signature format above. However, if you want to create something more advanced, then you should make a complex HTML Gmail signature.
Also Read: How to Sort Gmail By Size?
How Can You Edit Your Gmail Signature?
The next step is to edit your Gmail signature design to make your emails more professional and, thereby, more appealing than before. Just like you can change your email signature in Outlook, doing the same for your Gmail signature is also possible.
Furthermore, to raise the chances of a “Call To Action”, you must make some efforts to make your emails distinct from others. It’s time to understand how to edit a Gmail signature after it is created and added.
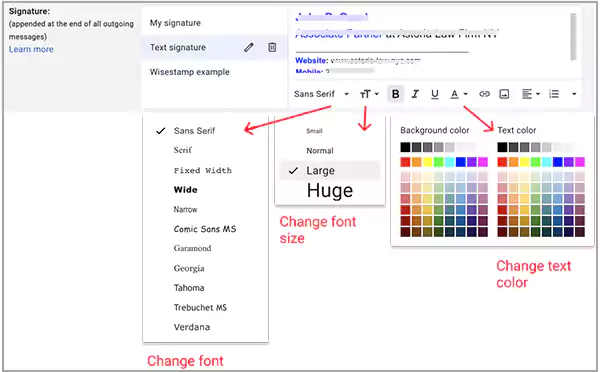
- Alter Font Size
- Firstly, choose the “text” that needs to be edited.
- Move your cursor towards the “toolbar” and click the “TT” icon. Select whether you want the text to be small, normal, large, or huge.
- Alter Text color
- Hit the “A” icon from the toolbar.
- To format the color of the text, use the “Text color” pallet. Select any of the colors you want for your text.
- Alter Signature Font
- From the toolbar, click on “San serif”.
- Now, you can select any of the fonts from the list you want to use for your signature.
My suggestions: To make your signature appear highly professional, always consider formatting both text size and text color. This will draw attention to its visual hierarchy.
The most crucial information, including your name, title, and company name, should be in “Large” text. Your name should also be bold or capitalized.
How to Insert an Image to Your Gmail Signature?
Read the following illustration and implement it yourself to add any image to your Gmail signature:
- Hit the “Gear” icon from the top of the right corner and subsequently choose the “Settings” option.
- Keep scrolling down till you reach the “Signature” section. If you have already created a signature, choose it before adding an image.
Note: If you haven’t created a signature yet, click on “Create new” and provide your personal as well as professional details.
- Now, it’s time to add an image to your Gmail signature. All you need is to click on the “Image” icon from the toolbar.

- Resize the image to fit Gmail’s resizing format, which includes small, medium, and large sizes. Otherwise, you can also retain the original size of the image.
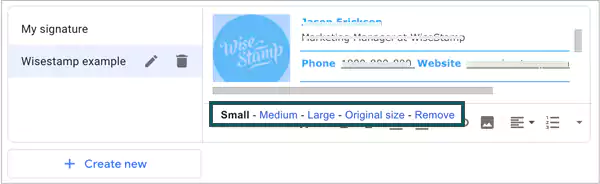
- Drag and drop or copy and paste the image to the location you want it to appear in your Gmail signature.
Note: At times, you may witness a bug while uploading an image directly from your computer, and it may pop up as a “Broken Image” icon. If this happens frequently, I recommend uploading the image with a URL.
- Simply scroll to the bottom of the Settings tab and click the “Save changes” button to finish the process.
I hope you have understood by now how to add an online image for your signature, let’s continue reading the remaining part of this article.
Also Read: How Do I Delete Emails From My Gmail Account?
Add a Clickable Phone Number To Gmail Signature
Read the following steps and learn how you can add a clickable phone number to your Gmail signature:
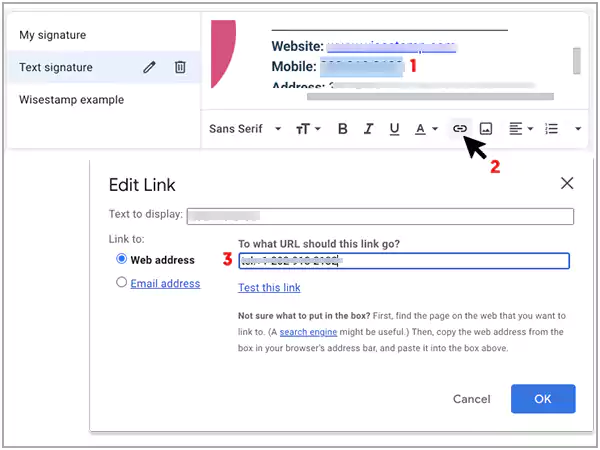
- First, select the phone number to which the link will be added.
- Now, move towards the bottom toolbar and click the “Link” icon.
- Enter “tel:” and then provide your phone number.
(E.g., tel:+1-674-392-1537)
- To save all the changes you have made, click on the “OK” button.
Add a Hyperlink to Your Gmail Signature
Just as you learned how to add a clickable phone number to your Gmail signature, it’s time to know the process of including a hyperlink to your company’s website. Read the steps mentioned below in this regard and you will get to know how to do it:
- Choose the text on which you want to insert the link
- Move towards the bottom toolbar and click the “Link” icon.
- Paste the complete “URL of your website” (including the https://).
- Finally, press the “OK” button to finish the process.
If you have included information about your company in your Gmail signature, you must include a hyperlink to text that will take the reader to your company’s website.
How to Add a Signature in Gmail Using a Phone?
When it comes to checking our personal as well as work emails, most of us check them more often on smartphones than on PCs/laptops. In such a situation, you should know how to add a signature in Gmail through your phone.
I have included a step-by-step guide with the necessary illustrations below to help you understand how to do it:
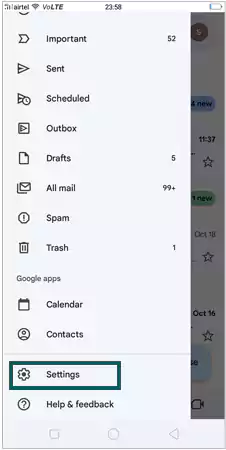
- Launch the Gmail app.
- Tap the three horizontal lines from the top left corner and scroll down till you locate the “Settings” option at the bottom of the list.
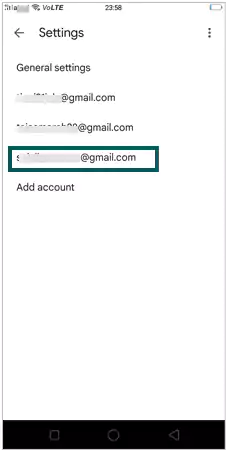
- Choose the Email ID to which the signature has to be added.
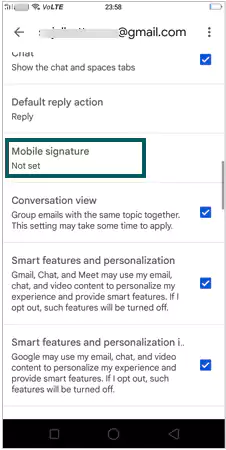
- After choosing the Gmail account, go to General Settings >> Mobile Signature.
- Fill in the name for your email signature. Use the return key to add additional information such as your designation, company name, and so on.
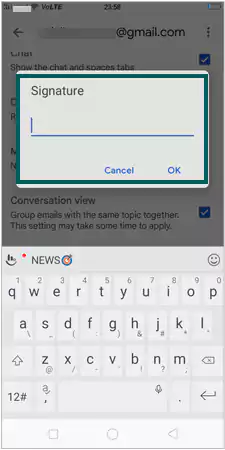
That is all there is for you to do. You only need to show your Gmail signature to your recipients via the Gmail mobile app.
Note: To create a Gmail signature on your iPhone or iPad, follow the same steps as I described above for Android.
Also Read: How to Fix If Gmail Is Not Syncing With iPhone?
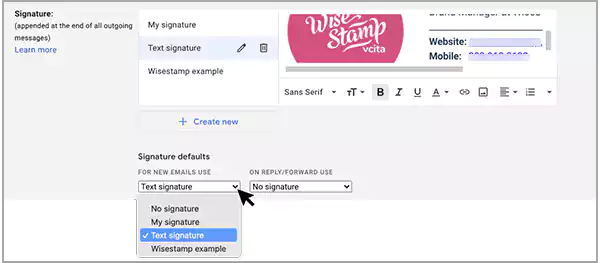
How to Set an Auto Gmail Signature?
If you have to send thousands of emails per day for work, you should consider setting up an auto Gmail signature, so you do not have to add it manually every time.
Simply follow the steps outlined below to learn how to do it:
- Go to the “Settings” within the signature editor option.
- Open “Gmail signature editor” >> “Dropdown menu”.
- Now select any of the signatures you want to set as automatic signatures, and you are done.
Also Read: Email Encryption: How to Encypt Mail
What Are the Benefits of Using Gmail Signature?
After learning every essential process associated with Gmail signature, let us now take a look at some of its benefits. If you use Gmail for business, they will help you realize how crucial it is to have a signature.
- Creates Your Identity: When your recipients forward your emails, your email will stand out if it includes your Gmail signature and details such as email ID, website details, contact number, and so on.
Following this method, many prospective clients can gather much information about you and your work, bringing you name and fame.
- Works not Less Than a Visiting Card
Yes, your Gmail signature resembles any business or a visiting card, using which your recipients can contact you for business purposes. As a result, by incorporating signatures into your Gmail, you can increase the number of business contacts, friends, leads, and new customers you have.
- Adds Authenticity to Your Work
It is very likely that your sent emails will be marked as spam instead of being delivered to the recipient’s inbox. If this occurs, it will harm your company’s reputation.
Having said that, there is no denying that a Gmail signature adds invaluable authenticity to your company and ensures that your recipients click it with complete confidence.
Also Read: How to Send HTML Emails in Gmail?
Why is Your Signature Not Showing on Gmail?
You might not be able to find your signature on Gmail at times. The reason behind this glitch is that you may still need to switch on the signature after adding it. To correct it, follow the process mentioned below:
- Visit the “Gmail signature settings”.
- Herein, check if the “No signature” option is checked.
- Choose “My signature” from the menu if it is currently set to “No Signature”.
By doing this, your Gmail signature will start appearing in all new emails and replies you send to recipients.
Email Signature Gmail: A Way Towards Professionalism
Knowing about the sender, company, designation, and other details will undoubtedly leave a lasting impression on the recipient. Furthermore, it is a strategy that can be used in email marketing as well.
Adding a Gmail signature to your email helps you a lot. It is one step toward turning your amateur business into a professional one.
Sources:
- Gmail Help, How to Create a Signature in Gmail?
Share