Little Known Information About Gmail Filters: Read This Before You Create One
Gmail Filters help you out in day-to-day managing your emails as not having an option is not an option. You can use these filters or create a new one as this allows you to direct your emails.
How to filter emails in Gmail is also one of the most commonly asked questions and you can answer that yourself by simply using one of the many filters to direct your emails to the folder of your choice.
What if you woke up one day and decided to sort the inbox of your email account, but the moment you try to begin, you see thousands of unread emails staring you dead in the eye. Scary right, and even more so when a majority of those emails are work-related.
Managing your emails can be very frightening, even for the disciplined ones.
Well, most of the emails do not provide a simple way out but you are in luck if you have a Gmail email account. Gmail allows its users to apply certain filters that make it easy for them to separate emails that are more important than others.
This blog focuses on the basic nature of Gmail filters and, to learn how a user can create these filters to manage his or her emails in the best way possible. But before we get into the details of exactly the work of Gmail filters and other things, let us know what a Gmail filter is first.
What Exactly Are Gmail Filters?
To be precise, filters in Gmail are generally automation rules that allow you to simply redirect your emails as soon as they enter your inbox. This in turn saves you from the trouble of sorting and managing emails manually.
Let us help you to better understand this with the help of an example.
The main purpose of Gmail filters is to help the user to direct a certain email from a certain sender straight to a separate inbox or even directly into the trash folder for that matter. Not only that, but you can also use filters to add labels of different types and colors along with important markers.
This method can overall help you to relieve you of all the stress that comes with the management of emails that do not matter. You can now focus on emails that are of utmost importance.
Now that we know the basics of Gmail rules AKA filters, let us look at how you can create filters in Gmail.
Ways to Create Filters in Gmail
There are a couple of ways that you can use how to create filters in Gmail. Most people also often call this as the guide on how to make rules in Gmail.
1. With the Use of The Search Bar
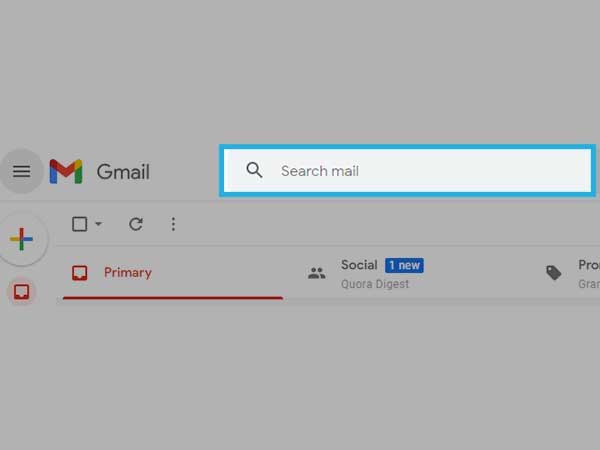
- First, you will need to sign-in to Gmail and locate yourself in the search bar of Gmail. Type any keyword or email address that you want to filter out and then click on the grey triangle icon once you are done.
- You will see a drop-down open up as soon as you click on the triangle. This dropdown will better help you to refine your filters. Simply click on the “create filter” option once you are done to proceed further.
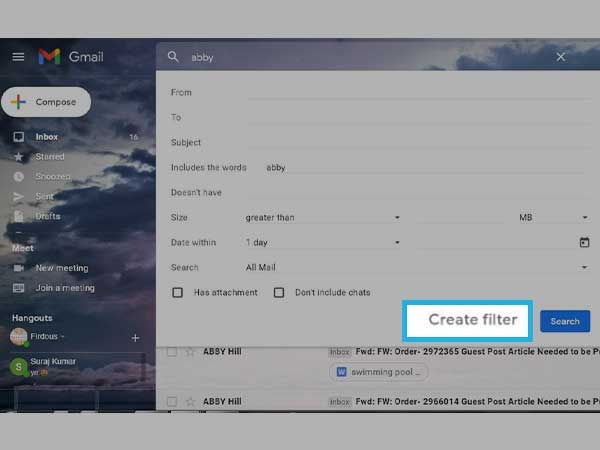
- Once you are done editing, this filter will do what you want it to. For instance, in case you want all of the emails that contain the keyword “Quora” and are from Mukes@macpatel.com, to go to the archive folder instead of the primary inbox, you can simply apply the filter needed to do so.
- Once you have clicked on the create filter option, all of the emails that have the keyword “Quora” and come from the email address Mukes@macpatel.com will now appear in the archive folder.
Note: Make sure to always click on the “also apply a filter for matching conversations” option. This will further add the pre-existing conversations in the same said folder if they fall in that category.
2. By creating a Filter From the Settings Menu in Gmail
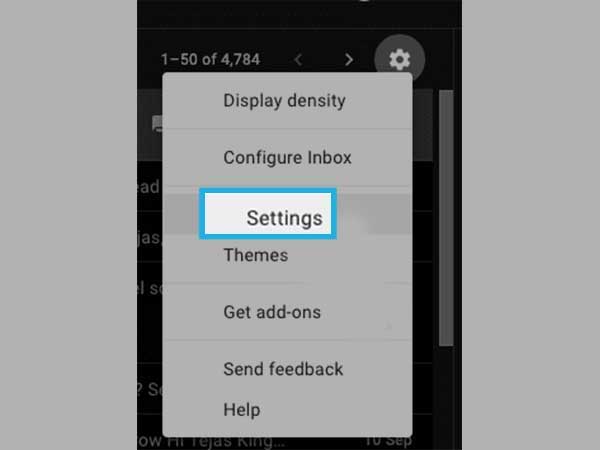
- To begin, you will need to click on the gear icon from the homepage of your Gmail account.
- Once the drop-down menu opens up, click on the Settings option.
- In the settings tab, you will now need to select the filters and blocked addresses. You will now be able to see the pre-existing filters of your Gmail which are already applied.
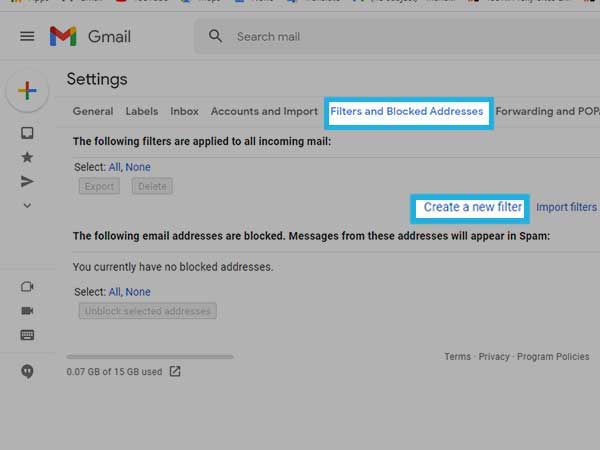
- Next, you will need to click on the “create a new filter” option that is available at the bottom of your screen.
- Now, a drop-down menu will appear again which is quite similar to the one that we saw in the first method. Simply follow the rest of the steps that you did in the first method to create a new filter.

You can use any of the two methods that are mentioned above to help you on how to create filters AKA rules to move an email to a folder in Gmail.
What kind of Things Can be Performed with the Use of Gmail filters
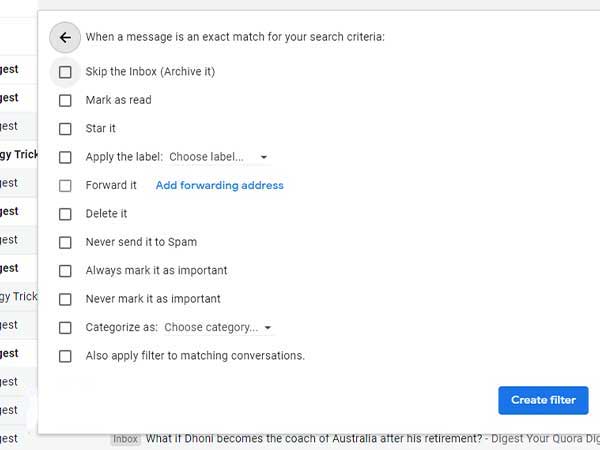
Here is a list of all the actions that you can perform, courtesy of the filters of Gmail.
- Skip the inbox– it can help you to archive an email so that it doesn’t show up in any of the email folders.
- Mark as read– the name says it all as you will already have an incoming mail marked as read.
- Star it– use this to make the email starred in case it is important or if in case it is a work-related email.
- Apply a label– lets you apply a specific Gmail label on an email.
- Forward it to– this lets you forward an email to another email address automatically.
- Delete it– simply send the email to the trash folder
- Never send it to spam– makes sure to tell Gmail to never send a specific set of emails to spam.
- Always mark it as important– this filter simply marks a set of emails important on its own.
- Never mark it as important– the emails coming in this filter will never be marked as important.
- Categorize as– in case you use a few categories of inboxes just like social, primary, updates, etc., this filter tells Gmail to add emails under a category.
Now that we know about the rules of Gmail as well as about creating rules AKA filters in Gmail, let us know how we can delete or edit the filters of Gmail.
How to Edit or Delete Gmail Filters?
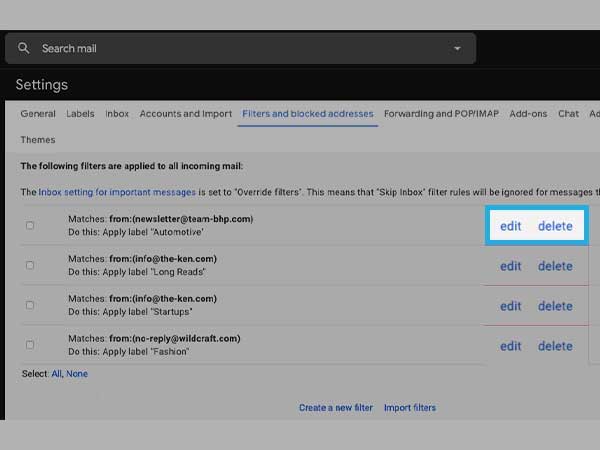
To edit or delete a filter in Gmail, you will need to follow the same set of steps that you saw in the second method of creating filters, that is,
gear icon<settings<filters and addresses, to begin with.
Once the list of pre-existing filters of Gmail appears on the screen, you will be able to see an edit and a delete button with every filter. You need to click on the edit option which will further open a drop-down menu. From there, you can simply refine your filter conditions.
How to Edit a Filter?
Let us learn more about this with the help of an extension
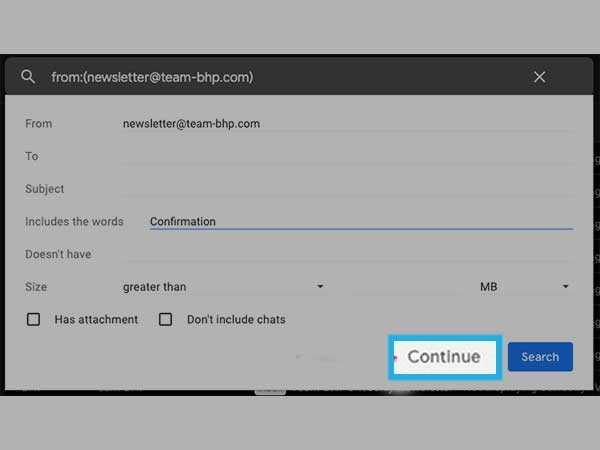
Think of it like this, you have now modified the filter and added a new condition that will make sure that the emails contain the keyword “confirmation”. Once you click on the “continue” option, a new drop-down will appear and you will further allow you to modify the action of the filter that you want it to take.
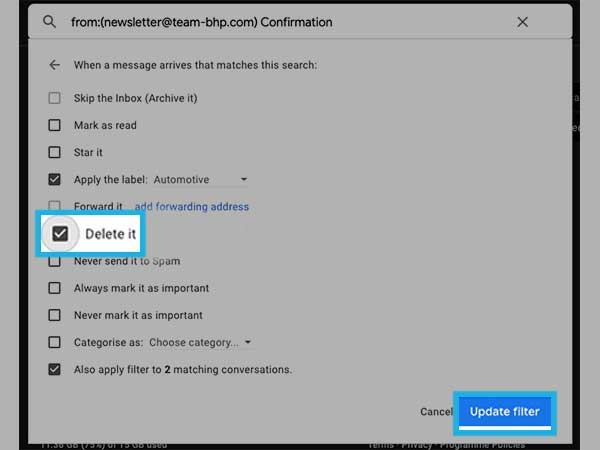
In this case, we will be selecting a label, that is to send the emails that contain the particular email to the trash folder also. Once you are done with the modifications, simply click on the “upgrade filter” option. This will update the condition of the filter.
How to Delete a Filter?
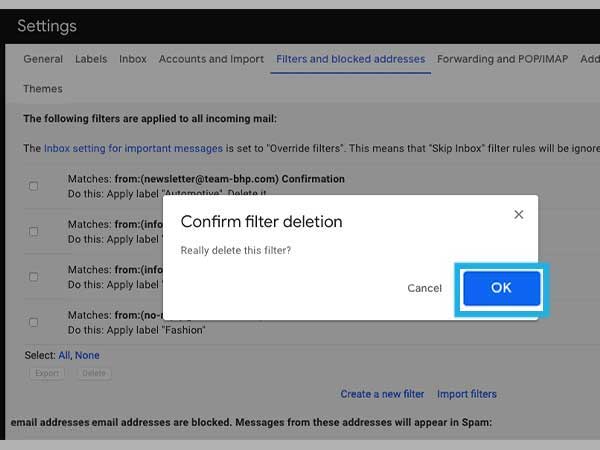
Deleting a filter from Gmail is pretty simple when compared to editing one. All you have to do is to click on the delete button and then confirm that you want to delete that filter and you are all done.
Note: You can choose more than one filter at a time since Gmail allows you to take bulk actions on filters. All you have to do is to use the checkboxes that are available on the left side of your screen.
You must be feeling like he-who-knows-it-all when it comes to Gmail filters by now right? Well, not exactly everything, which is why our next section will take a glance at the advanced options that are available for Gmail filters.
Import and Export Filters in Gmail
Earlier we talked about how you can edit or delete filters quite easily from Gmail but now we will be taking a look at how you can import and export the filters of Gmail.
In case you have made a new Gmail account and want to use the same filters on that account that you have on your previous account, you can simply use the same set of filters on the new account with the use of the import and export options.
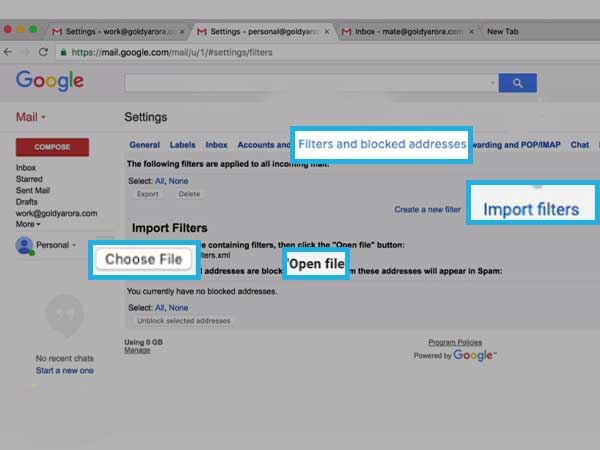
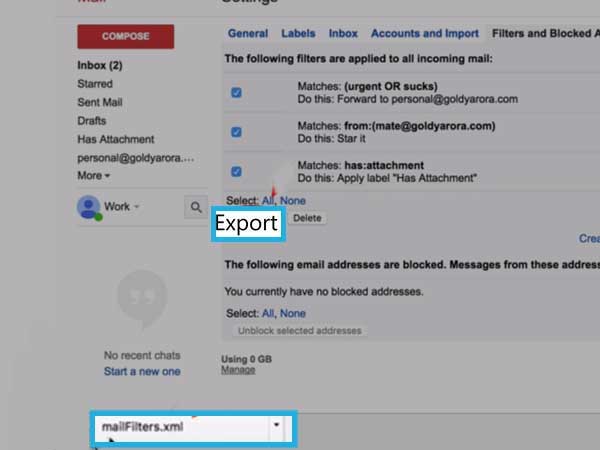
But first, you will have to revisit the same steps that you have gone through earlier in this blog. Gear icon<settings<filters and blocked addresses. Just like you read in the note, use the checkboxes available on the left side of your screen and select a filter or filters and then click on the Export option in Gmail.
Once you click on the export button, an XML file will be generated. You can edit this XML file with the use of a text editor or you can also save and import it into another Gmail account so you can easily replicate the filter setup too.
The same goes for the import process. Follow the same steps to get to the list of all the pre-existing filters, to begin with.
Once you are done, click on the import button and then upload your XML file. All you need to do is to tick the checkboxes that are just next to the imported filters. Click on create a filter and you are good to start using your newly created filters with ease.
Operators with Gmail Filters
Now that you know how to import and export Gmail filters, let us look at the operators or syntax that are used with Gmail filters. But before we begin, let us know a bit about what they do.
Several operators are supported by Gmail that further allows you to perform precise operations. You can even save these powerful searches as precise and powerful filters. Given below is a list of the operators that are supported by Gmail along with the functions that they perform.
- AND– it is by default that Google combines every search term with an invisible AND operator. For instance, if you search for Ricky and Raman, the search result shown will have all the emails that contain Ricky and Raman.
- OR– this helps you in finding one of the two terms or expressions that are mentioned at minimum. For instance, in case you have searched for Rakesh and Raman, the search result will show all of the emails that either have Rakesh or Raman in them.
- “”(double inverted commas)– this helps you to search for phrases (that are not case-sensitive). For instance, if you search for “words of wisdom”, the search results show the emails which have the same phrases.
- +(plus sign)- searches for the exact word that is typed. For instance, if you have searched for “flaws”, then the search will show all of the emails only for “flaws” and not for “flaw”.
- -(minus sign)- this is used to search for emails that do not have a specific term. For instance, if you search for “time”, then the results will show all of the emails that do not contain the word “time”.
- () (parenthesis)– searches for terms as a group. For instance, if you search for Ryan Wesley, then the search results will have all the emails that have Ryan and Wesley in them, although they might not be there as a phrase.
Must-Have Filters In Gmail
You should pat yourself on the back as you now know everything about Gmail filters. Let us now talk about some of the must-have filters in Gmail.
1. Auto-Delete Unwanted Files
This filter prevents emails from reaching your inbox. This way is a lot better than for you to have to deal with the emails once they are already in your inbox. However, you can also use Gmail’s block button or basic smart tools like unroll. me.
we can also come across some spam senders who do not intend on honoring your unsubscribe request and you are unable to block them either-even if you wanted to. You may also search for some emails which go through your barrier and may end up in your inbox.
You can get around those by using a filter. There is a major way.
- Start by creating a new filter that is based on the sender’s email address and then,
- You can instruct Gmail to delete these emails.
2. Mark Emails as Read
It is often seen that some of the emails are more equal than others. You should try to mark the less important emails as read as that may help you to focus on the more important emails.
Similar to the above way, you can;
- You can create a filter based on the keywords or the sender’s email address and then,
- Instruct Gmail to “mark as read”.
3. Move Emails to Specific Categories
You should use tabbed inboxes in case you do not do it. Tabbed inboxes allow you to divide your inboxes into tabs just like Primary, Social, Updates, etc., which further allows you to focus on important emails.
You can simply enable tabbed inboxes by clicking on the gear icon that is available on the top right corner of your screen, to begin with. From there, you will need to click on the “configure inbox” option that is available in the drop-down.
Now simply click on the tabs that you want to enable and then save the changes made by you.
Similar to the other two filters, you can
- Use the sender’s email address or keyword to create a filter and then,
- Choose the action as the “categorize as” filter option and then instruct Gmail to move the filtered emails under a specific tab in your inbox.
4. Automatically Add Labels to Emails
We all know that Gmail labels are quite powerful as a tool when it comes to organizing your inbox. Label creation can be made automatic so you can simply mark certain emails as important and also for follow-ups.
You can continue with automatic label creation by;
- Use a keyword or the sender’s email address to create a filter and then,
- Pick a label from the drop-down menu and use the “apply a label” option.
5. Automatically Empty Your Spam Inbox
You can simply create a filter that deletes every email that Gmail sends you to your spam folder. This option seems way better than manually deleting emails that come into the trash folder.
You can do so;
- Open your Gmail and click on the grey triangle
- From the drop-down menu, you should locate yourself to the “has the words” field and enter is: spam.
- In the next window, click on the “create filter” option.
- Now, simply use the “delete it” filter action and confirm the filter creation.
These are some of the more important filters that you need to create for your Gmail account. You can sort these Gmail filters or even create them. For those of you who want to know about how they filter emails in the Gmail app, this is your cue as these filters can also be used in the mobile version of Gmail.
As per the questions of many people, wildcard filters are not supported by Gmail, so you need not worry about them.
We know that you still have a lot of questions which is why we bring you the FAQ section to answer all of your queries.
FAQs
Ans: You can simply visit the settings of your Gmail account, to begin with. Now select the filters and blocked addresses option and you will see all of the pre-existing filters. You can even use the pre-existing ones or you can also try to create new filters on your own.
Ans: You can take help from tons of filters or you can create new ones for you like tons of great filters allow the user to direct the email to the folder of their choice.
Ans: The platform of Gmail allows you a total of 20 filters at once. In case you want to try a new filter, you will have to delete some of the previous filters from Gmail to add new ones.
Ans: Gmail filters are more like rules that allow the user to choose where he or she wants to direct the emails so that he or she doesn’t have to deal with a pile of emails every once in a while.
Share