How to Back Up Outlook Emails: A Guide on Native Microsoft Tools and Email Backups
Accidental file deletion, malware attacks, and other unexpected events threatening Outlook can disrupt email communication in organizations. Probably the most unwanted consequence of any issue is data loss.
To avoid such an inconvenience, organizations want to save Outlook emails and ensure their recoverability. In this article, we explain what email backup is and show the standard Microsoft tools that can be used to manage email data in Outlook. And finally, we show how to back up Outlook emails to keep them safe from unwanted or malicious deletion.
Also, Read: Outlook Contacts & Emails Not Syncing with iPhone: Get Best Solutions
What is an Email Backup?
A backup is a data duplicate that is stored in a remote location (a local disk, an organization’s server, cloud storage). When the original data is corrupted or lost after, for example, accidental deletion or a successful cyberattack, a backup can be used for recovery.
Therefore, an email backup is a copy of the original message sent to a different destination. The thing is that backups can be efficient only when neither backup nor recovery processes rely on the production infrastructure.
From this viewpoint, native Microsoft tools for data management and email recovery can be useful in particular situations. But they shouldn’t be perceived as backup means because of the limitations on recovery options, the flexibility to choose the version you need, and other issues.
How to Save Emails in Outlook and Recover Data when Necessary
You can save and restore deleted Outlook messages using the following ways:
- Recycle bin
- Export to PST
- Archiving
- Email forwarding
- eDiscovery
- The backup solution from NAKIVO or another third-party tool
Below we review every native Microsoft 365 tool to save and recover emails. Additionally, we explain why using a third-party backup solution for Outlook email backup is a more reliable choice to ensure the safety of your email data.
How to Save Outlook Emails with Native Microsoft 365 Tools
Microsoft provides a set of standard options to save and recover Outlook emails. You can use them to find and recover particular accidentally deleted messages. However, never forget that native tools available in Outlook are not backups, and perceiving them as such can reduce the security of your data.
Additionally, the shared responsibility model by Microsoft supposes that the company is responsible only for the delivery and availability of services. The safety and integrity of data stored in Outlook web mailboxes and Microsoft clouds is the customer’s job.
The Recycle Bin: Basic Recovery Tool
The deleted Outlook email falls to the Deleted Items folder and a 30-days retention period starts. After the expiration of this period, the message is removed from the Deleted Items folder. Duplicate email messages may trouble most Microsoft Outlook users frequently, so it’s good to have removed outlook duplicate emails.
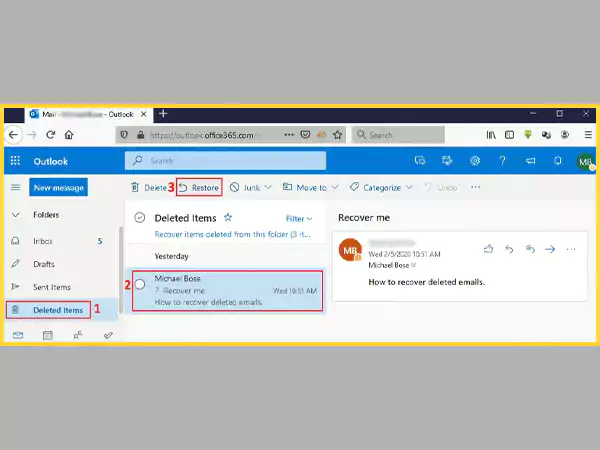
To recover a deleted message with the use of the Deleted Items folder, log in to Outlook.com and do the following:
- Hit Deleted Items in the left navigation panel.
- Choose Deleted Items to restore all messages available, or select the particular message that requires restoration.
- Hit Restore in the upper menu bar.
Note: Deleted Outlook emails can also be recovered by right-clicking a particular email, choosing Move in the context menu, and specifying the recovery destination (that can be the original inbox or a different folder.
In case you fail to find the wanted message in Deleted Items, check the Recoverable Items folder. The default retention period in that folder is also 30 days. The messages are moved to the Recoverable Items after:
- You manually delete the message from Deleted Items.
- The 30-day retention period expires.
- You empty the Deleted Items folder.
- You delete the email from your inbox with the Shift+Delete combination.
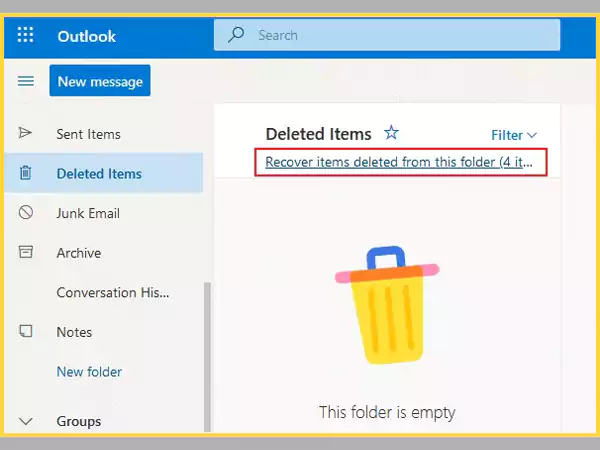
When you need to recover an email from Recoverable Items, open Outlook.com and follow these steps:
- Hit Deleted Items in the left navigation panel.
- Choose Recover items deleted from this folder.
- In the Recoverable Items folder, find the email you want to send to the original location and then hit Restore.
Exporting Emails as PST
Exporting Outlook email data in a PST file, first of all, requires ensuring that you’ve got enough disk space on a device to fit that data. When you are confident that the available storage is sufficient, do the following:
- Open Outlook and hit File at the upper left of the window.
- After that, select Open & Export in the left pane and hit Import/Export.
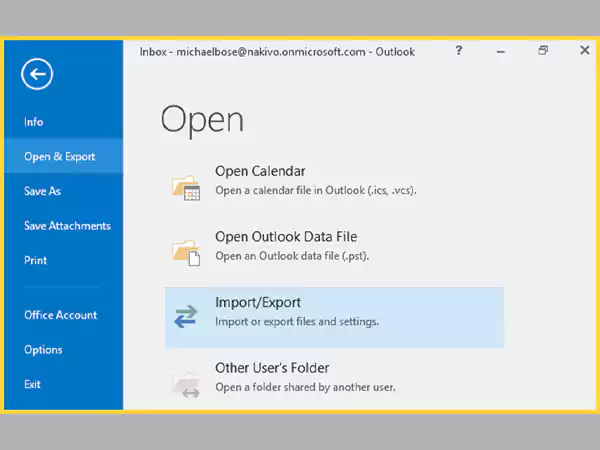
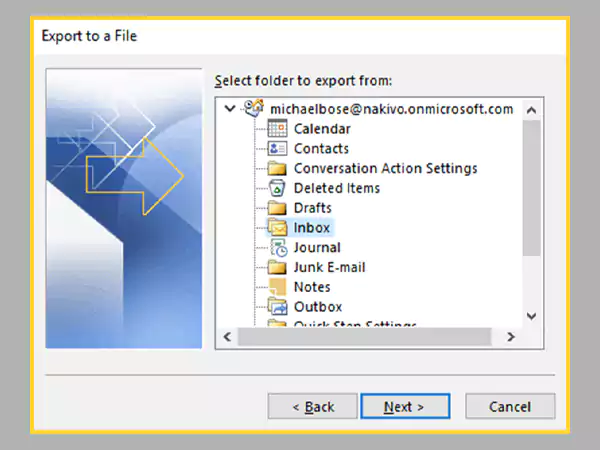
- A popup window appears showing the types of imports and export available. Select Export to a file then hit Next.
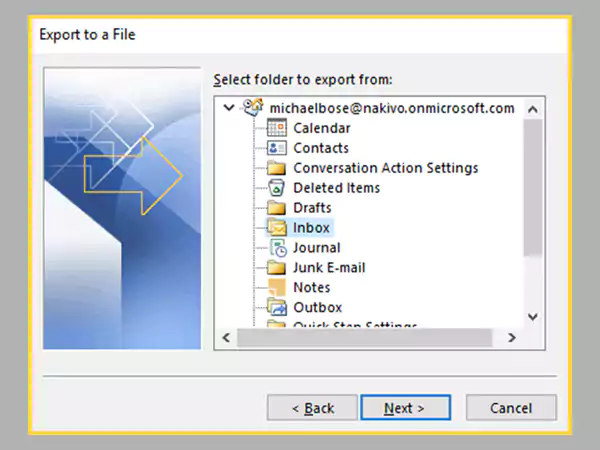
- A window opens, showing the file type you want to export. You can choose the Outlook data file (pst), then pick the inbox or folder you want to save. Once you’re done, hit Next to proceed.
- Choose the account to export. Keep in mind that you can export the data for one account at a time.
- Hit Browse to choose the destination location of the PST file. Set the name for a file, and then hit OK to proceed.
- Hit Finish.
A PST file can be considered as an Outlook backup file that can suit particular cases and individual use. However, the email data security needs of even the smallest organization most probably go beyond the possibilities that email exporting to PST can provide.
The Archive Folder
You can configure the AutoArchive feature in the Outlook desktop client to automatically save and export emails according to the particular retention criteria. Simply put, with this feature enabled and set once you remove a deleted message from an inbox, accidentally or not, that message can still be found in the Archive folder.
You can set the frequency of AutoArchive runs, the storage location, and the retention period for items in Outlook before archiving. Do the following:
- Hit File > Options > Advanced.
- Find and click AutoArchive Settings (under AutoArchive).
- Hit the box named Run AutoArchive every n days, then set the Auto Archive procedure frequency.
- Choose and set any other options you need. For example, you can set Outlook not to archive particular old messages but delete them.
Note: In case an email profile is connected to an Exchange Server, archiving and auto-archiving functions might be unavailable. Additionally, an organization can use mail retention policies overriding AutoArchive.
Email forwarding
Set automatic forwarding or redirecting emails by configuring Inbox rules. Create a secondary email address to serve as the additional storage for messages. Then return to the main mailbox and do this:
- Hit Settings > View all Outlook settings.
- Choose Mail > Forwarding.
- Choose Enable forwarding, then provide the forwarding email address, and hit Save.
For classic Outlook on the web, the action sequence is a bit different:
- Go to Settings > Mail.
- Find the Options menu, choose Mail > Accounts > Forwarding.
- Do one of the actions:
- If you need forwarding turned on, choose Start forwarding, provide the forwarding email address, and hit Save.
- If you need forwarding turned off, choose to Stop forwarding and hit Save.
This way, you can have a copy of your email messages in a secondary mailbox. When the emails are lost on your main account for some reason, their copies on the secondary account are still available and can be used to access messages and attachments.
Note: in case you need a copy of the original email to stay in your mailbox, choose to keep a copy of forwarded messages.
eDiscovery
With eDiscovery, you can find specific content in Outlook mailboxes. Set a hold on the particular data and export your search results to have evidence when legal issues take place.
As an admin, you can use the In-Place Hold in eDiscovery to find, retrieve and export the stored Outlook data even after that data deletion or modification. Note that recovering deleted emails is not possible with eDiscovery. The tool should be used exclusively for archiving and not as a backup solution.
Read This Also to Learn About 9 Methods to Resolve PII Code Error in Outlook Mail
Outlook Email Backup with NAKIVO
Contemporary all-in-one solutions, such as NAKIVO Backup & Replication, enable you to back up emails from Outlook and recover them independently even after the original messages have been permanently deleted. What’s more, using a specialized backup and recovery solution you can bypass the limits of standard Microsoft tools.
Most importantly, with the right third-party solution, you can store backups on-premises to have real control of your email data and recover any message or the entire mailbox whenever necessary. Thus, the data remains safe from accidental and malicious deletions, as well as from ransomware attacks and other breaches in Outlook causing data loss.
How to Back Up Emails from Outlook: Create a Backup Job
Before you start backing up your Outlook data, you need to:
- Download and install NAKIVO Backup & Replication
- Add a Microsoft 365 account to the solution’s inventory
- Create a backup repository (the storage destination for your email backups)
After that, backup jobs can be set and launched to save Outlook email data. The backed-up emails can be recovered when the original data is lost.
To begin creating the backup job:
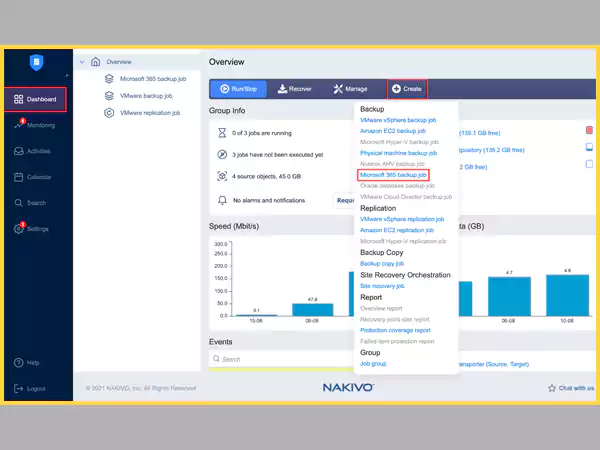
- Open the Dashboard in the web interface of the solution.
- Hit Create, then Microsoft 365 backup job.
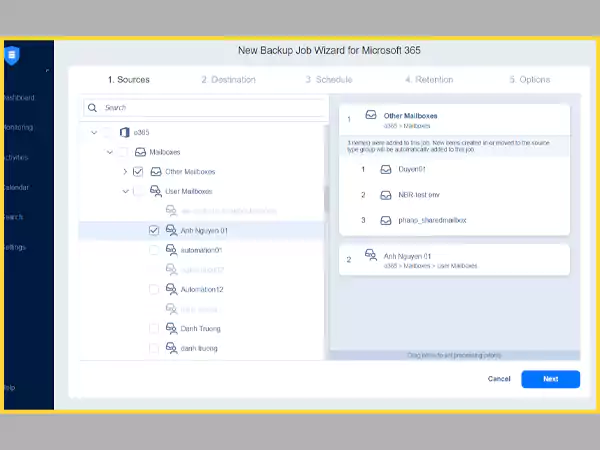
The backup job wizard opens. To finish creating a backup job, do the following:
- Sources: This pane to the left shows the items that you can add to the new backup job. Find and pick the mailboxes that require backing up. To confirm your choice, hit Next.
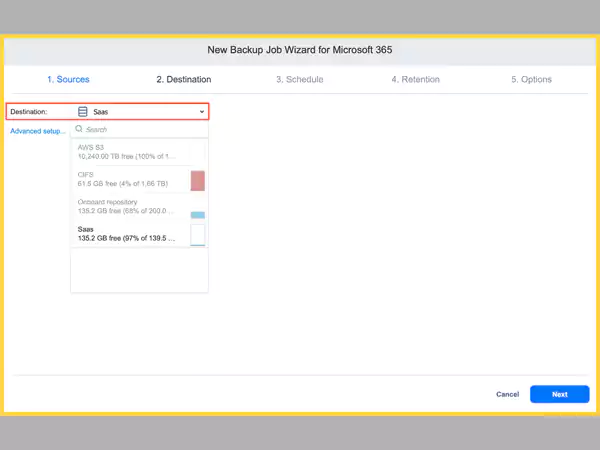
- Destination: Choose the SaaS backup repository where your backed-up mailboxes and messages would be sent. The choice is available per item, you can set the same or different repositories for each.
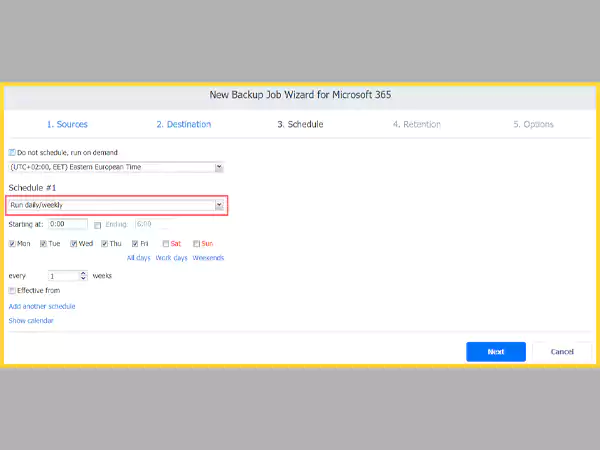
- Schedule: Here, you choose the schedule for the new backup workflow. You can run Outlook email backups manually on demand, or set daily, weekly, monthly and yearly schedules. Use job chaining to consequently launch backup workflows upon the completion of the previous ones.
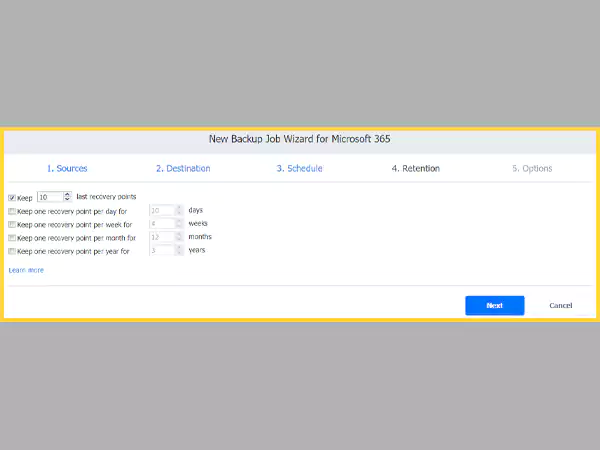
- Retention: The solution can create a recovery point for every item in a repository upon finishing every workflow and enable you to keep the grandfather-father-son (GFS) rotation scheme for backups. You can recover particular items or the entire mailbox this way. The number of recovery points to retain is customizable.
- Options: Use this tab to name the backup workflow and enable actions to be complete before and after the completion. For example, send backup reports or customize pre- and post-job scripts.

Hit Finish or Finish & Run to finish creating the backup workflow.
Conclusion
How to back up Outlook emails? In case you think that standard data management instruments provided by Microsoft, such as the recycle bin, archiving, exporting to PST and email forwarding can be considered backup tools, you are not right. These tools can help you recover emails after a minor accidental deletion. But in case of major system disruption or, for example, a ransomware attack, using native Microsoft tools for data recovery can be impossible. Additionally, the Microsoft shared responsibility model clearly states that the safety of the data stored on the company’s servers is only the client’s concern.
The only option to reliably save Outlook emails and recover them when necessary is to use a third-party backup solution, such as NAKIVO Backup & Replication. With the contemporary backup software solution, you can store Outlook mailbox data backups locally to receive real control of your emails. Initiate the recovery of emails on demand after the original messages are lost and recover Outlook data from backups to the original or different account.
Share