Is Your MacBook Keyboard Not Working? Try These 10 Most Effective Fixes!
You must be here because your MacBook keyboard is not working! Well, the reason behind it can be any. It can be because of Mac’s internal software issue, other applications you have installed on your system interfering with keyboard programs, hardware problems of the keyboard itself, or it can be a mere accumulation of dust and debris under your keyboard keys.
Nevertheless, the reason for your Mac keyboard not working can be any, and honestly, all of them couldn’t be known without digging deep and turning the keyboard inside out!
Well, we are not here for that, in fact, we are here to prevent going to that stage, which can only be seen as the last resort.
Now that the basic intro formality is done, we can just start right off with the solutions that will help you fix the problems you are having with your Mac’s keyboard. It is noteworthy that if you are facing issues with the trackpad as well, then most of the solutions given below apply to it also.
- Clean your MacBook Keyboard
- Restart your System
- Uninstall Recently Downloaded Apps
- Update your Mac’s OS
- Check if Slow Keys is Enabled
- Check Keyboard Layout
- Remove Preferences Files
- Reset Parameter RAM (PRAM)
- Reboot SMC
- Restore your System to an Earlier Version
- Get your Keyboard Replaced for Free!
- If you are using an External Wireless Keyboard
- Bonus – Restart the Trackpad when it is Not Working.
Note: Some solutions in the article require the use of a keyboard. Since your MacBook keyboard is not working, try using an external or on-screen keyboard to perform the required task.
Clean your MacBook Keyboard
If your MacBook keyboard isn’t working, the first thing that you can attempt to resolve this issue is to clean your keyboard. The keyboard of your Mac might be badly hampered by dust and other debris, which typically results in problems with some keys sticking and failing to register presses.
So, following Apple’s recommended cleaning method, you should hold your MacBook at a 75-degree angle from the horizontal and use the compressed air to spray out dirt from under the keys. While maintaining the 75-degree angle, turn your MacBook left and right, then spray again on each side. Additionally, you can use a keyboard cleaning brush for more thorough cleaning.
Restart your System
In case you haven’t already tried, turn off your system and open it again. This will help terminate any background program that might be interfering with the keyboard and trackpad, because of which they are not working.
This might seem a childish thing to do. However, numerous Mac customers claim that this fixes their MacBook trackpad and keyboard not working problem for an unknown cause.
Uninstall Recently Downloaded Apps
It isn’t usual, but certain programs may really change how your keyboard works. Remove all of your apps opened in the background on your MacBook to see if any are causing problems with the keyboard. For doing so, just select all the apps opened in the background and click on the Quit All button present in the menu bar.
If it is able to solve your ‘MacBook keyboard not working’ issue, then you should investigate your recently installed apps to identify the problematic software and remove it.
Listed below are the steps that will help you identify and uninstall recently downloaded apps:
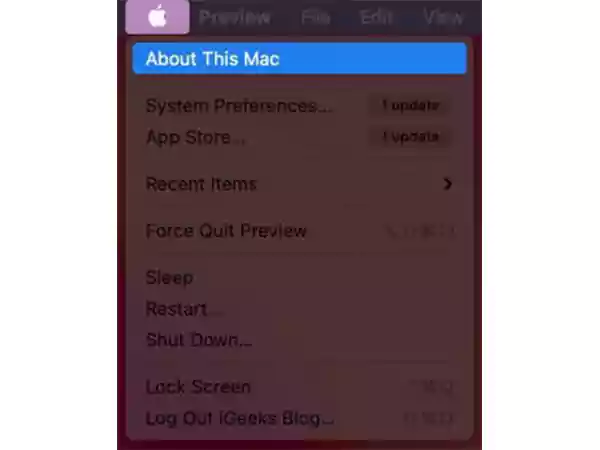
- First off, click on the Apple icon from the Menu Bar and then select the About This Mac option.
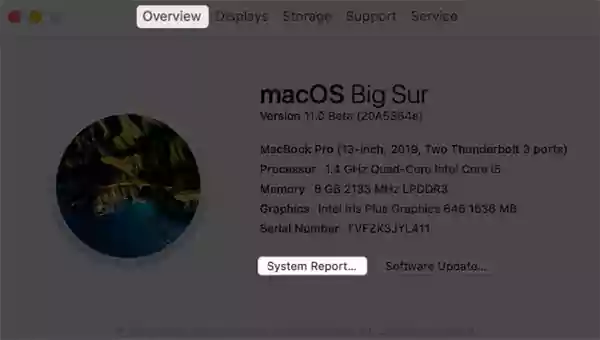
- Switch to the Overview tab in the new window and click on the System Report button.
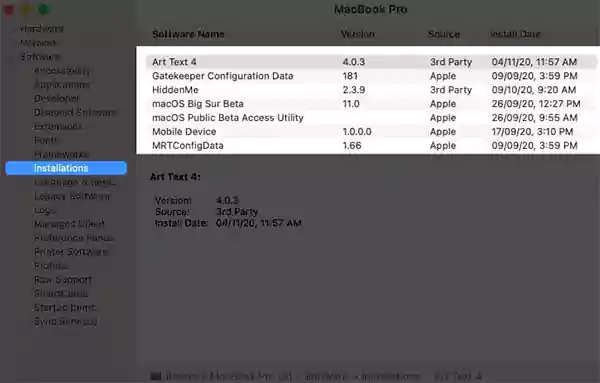
- Then, click on Installation from the left sidebar of the next screen and check in the Software Name section, which application you have recently downloaded or updated.
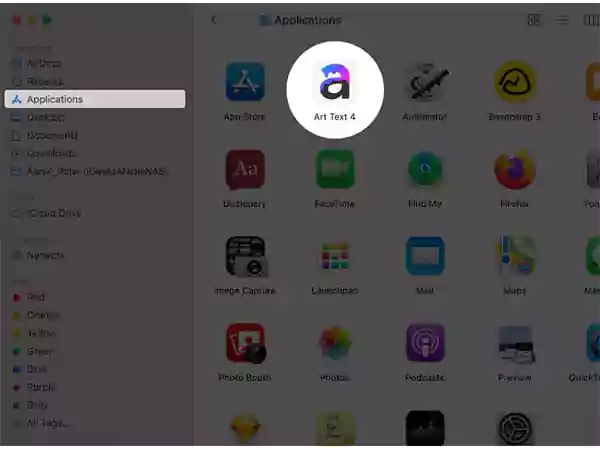
- After you have found the apps recently installed and updated, open Finder and go to Application by selecting it from the left side pane.
- Locate the app and drag it to the Bin to delete it from your Mac. You can also empty the Bin to permanently get rid of the application.
This should solve your MacBook Pro keyboard problems, but if you are still struggling with them, then hop on to the next method.
Update your Mac’s OS
You may not believe it, but outdated system software or internal programs can also lead to the ‘MacBook keyboard and trackpad not working’ issue. Nevertheless, the easiest and most efficient way of resolving it is to update your macOS.
If you already don’t know how to do that, refer to the steps given below:
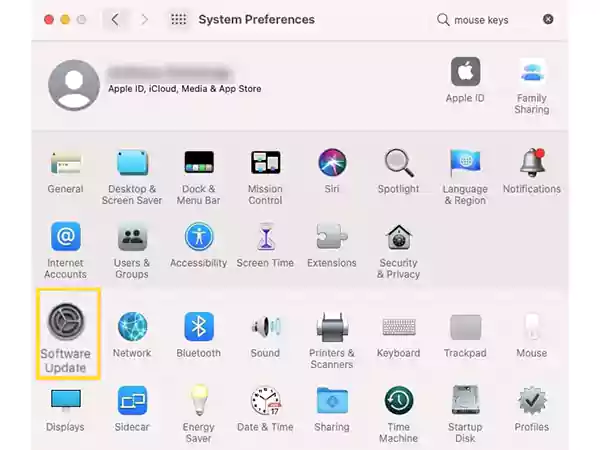
- To begin with, click on Apple Menu and select the System Preferences option.
- In the System Preferences Window, click on the Software Update option.
- After that, the system will check for any pending updates, and if there are any, you will see the option to download and install them.
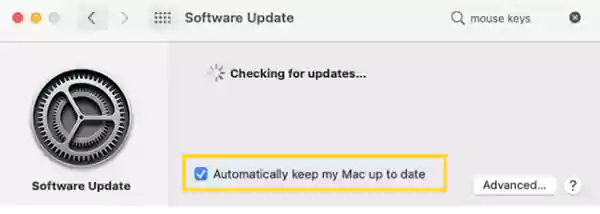
Note: You can check the ‘Automatically Keep My Mac Up to Date’ option present at the bottom of the screen to eliminate the need for manually checking and keeping your system updated.
Check if Slow Keys is Enabled
You may think that your MacBook keyboard is not working if the Slow Keys option on your system is turned on. With this option enabled, the keyboard works really slowly, because of which you might think that it has stopped working.
Nevertheless, you can get to this setting on your Mac, and turn it off, if this is the reason why your Mac keyboard is not working properly. Listed below is the process of how you can do this:
- To begin with, hit the Apple Menu on your system, and from the options available, select System Preferences.
- Then, click on the Accessibility section.
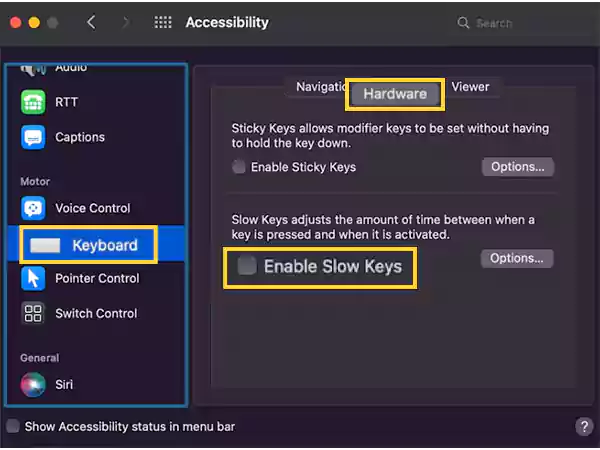
- After that, from the window that will appear, click on the Keyboard section.
- Finally, under the Hardware tab of the following screen, make sure that Enable Slow Keys option is not selected, if it is, simply click on the checkbox to deselect it.
Check Keyboard Layout
There could be an issue with your keyboard layout if you aren’t able to achieve the desired outcome when pressing certain keys. Looking at the keyboard layout you will if it is the reason for your ‘Mac keyboard not working’ problem. Here’s how you can check it:
- First off, open the Apple menu on your MacBook and select the System Preferences option from there.
- Now, select the Keyboard option and then click on Input Sources.
- After that, click on the option to display the input menu in the menu bar.
- Thereafter, you have to click on the Input menu icon that will be displayed on your Mac’s menu bar and select the Show Keyboard Viewer option from there.
- Lastly, when the keyboard appears on your system’s screen, ensure that the keyboard layout is as it should be.
Remove Preferences Files
Files with the .plist extension (Preference files) are used by macOS to store settings. Your program settings may have changed at some point in the past, which has led you to keyboard problems on your Mac. Thus, try removing these files to restore them to their factory default settings.
Thus, by resetting these, which may be the root of the issue, this method can assist with a variety of issues you are having with your Mac keyboard and trackpad.
For doing so, you will have to precisely follow the steps given below:
Note: Before moving forward it is advised that you take your system backup using Get Backup Pro, Time Machine, or any other software you find fit, in case anything goes wrong, you will have a backup of your data.
- After you have backed up your system’s data, open Finder on your MacBook.
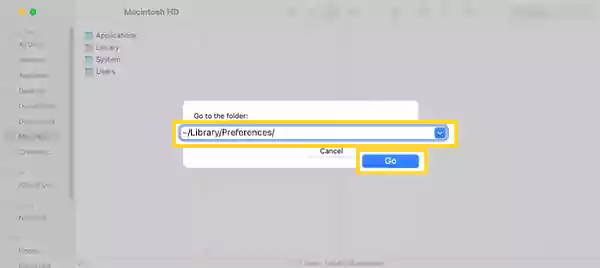
- Now, press the Cmd + Shift + G keys at the same time.
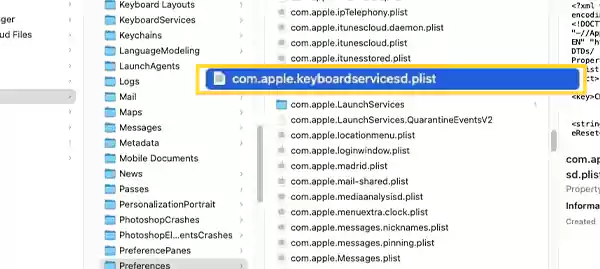
- In the small window that will appear, type ‘~/Library/Preferences/’ (without quotes) and press the Go button.
- In the folder that will open next, find the following files and delete them to resolve issues with both keyboard and trackpad:
- com.apple.keyboardtype.plist
- com.apple.driver.AppleBluetoothMultitouch.trackpad.plist
- com.apple.driver.AppleBluetoothMultitouch.mouse.plist
- com.apple.driver.AppleHIDMouse.plist
- com.apple.AppleMultitouchTrackpad.plist
- Com.apple.preference.trackpad.plist
- Once the files are deleted, restart your Mac and see if the keyboard is still not working.
Reset Parameter RAM (PRAM)
If your MacBook Air/Pro keyboard is still not working, then the next you can attempt to fix this issue is clear your PRAM or Parameter RAM. This will help in terminating glitches occurring in your system’s backend.
Go through the steps below to carry out the solutions:
- First, you have to turn off your Mac.
- After a minute or two, restart it. However, while the system is booting, you have to long-press the Cmd + Option + P + R keys simultaneously, until your screen turns gray.
- Then, after you hear the reboot sound, free the keys.
Reboot SMC
System Management Controller, also referred to as SMC, regulates a few basic Mac features, some of which have keyboard-related purposes. It is, therefore, a good idea to reset your Mac keyboard by resetting SMC if it has ceased functioning, and you are still not able to get through it.
Several factors, like whether it’s an Intel or M1 Mac, whether or not it has a T2 Security Chip in it, etc., affect how you accomplish this process.
Follow through the process jotted down to do so if you have a MacBook with or without T2 Chip:
MacBook with T2 Chip:
- Start by switching off your MacBook.
- Press and hold Ctrl + Opt + Shift keys on your keyboard.
- Hold all three keys down for a total of seven seconds before holding down the power button as well. As you hold the keys, your Mac will switch off if it is on.
- Keep holding all four keys for another 7 seconds and then free them.
- Finally, wait for a few seconds and then turn on your Mac by pressing the power button.
MacBook without T2 Chip:
- Shut down your system.
- Long press the Ctrl + Shift + Opt keys at the same time, from your keyboard.
- After that, with the above three keys pressed down, now, press and hold the power button as well.
- When it’s been 10 seconds of holding down the keys, release them all.
- Lastly, hit the Power button again to switch on your system.
For more information and how to reset SMC for other Mac versions, check out Apple’s Support Page.
Restore Your System to an Earlier Version
Even after all these solutions, your MacBook keyboard still fails to work properly, it can be due to a Mac software update error that has interrupted its working. In such a case, you can restore your MacBook to an earlier version to eliminate any issue caused by a software change.
However, before doing so, bear in mind that, after restoring your system to an earlier version, you will lose all your data stored in it after the backup date. Therefore, it is advised to take a backup of your current system, just in case anything goes wrong or in general, to prevent any data loss.
After you have made up your mind, jump right into the process below:
- Begin with restarting your MacBook.
- While the system is booting, hit the Cmd + R keys at the same time to open the Recovery Tool of your system.
- After that, select Restore From the Time Machine Backup option (or any other option that you find fit, when available) from the next screen.
- Finally, follow the steps shown on the screen to complete the process.
Get your Keyboard Replaced for Free!
Try an alternative keyboard if your ‘Mac’s keyboard not working’ problem is still haunting you. If you try a new keyboard, and it works fine, the issue is either with the program or the Mac itself. So, get it checked! However, if it turns out that the keyboard is damaged, you might require expert assistance because replacing a MacBook keyboard can be challenging.
The design of some MacBook Air and MacBook Pro keyboards is also known to generate problems with their keyboard. Nevertheless, your MacBook could be qualified for a free replacement, if an issue is found, which you check out by visiting the Apple Support Page.
If You are using an External Wireless Keyboard
If you are already using an external keyboard with your MacBook and having issues with it, then the following solutions can help you resolve them:
Check if Keyboard Batteries
The first thing to check is whether your keyboard’s battery is all consumed, which can be why it is not working with your Mac. If the batteries in your wireless Apple keyboard need to be changed, do so right away. However, if you’re using a device with a built-in battery, such as the more recent Apple Magic keyboard, be sure it’s charged and working just fine. Additionally, test a different USB port on your Mac and a separate charging cable. Your Mac keyboard could have stopped working for any of these reasons.
Examine the USB Connection & Wireless Dongle
Disconnecting the USB Mac keyboard and then connecting it back in sometimes tends to do the trick and solve issues. Also, make sure your USB ports are operational, which you can check by plugging anything else, such as your mouse, into the port after unplugging your keyboard.
However, some wireless keyboards connect to your Mac through a USB dongle. Your keyboard won’t operate even if its batteries are completely charged when it can’t connect to the dongle.
Sadly, it is challenging to check this issue. There is no reliable way to determine whether the wireless chips in the keyboard or the dongle are damaged. Nonetheless, you can try connecting the dongle to a different USB port and using a different computer. The keyboard and dongle are good as long as they function properly elsewhere.
See if Bluetooth is On and Connected
If you are using a Bluetooth keyboard, the Bluetooth setting itself might be the root of the issue. Check if you have turned on the Bluetooth on your Mac and whether the keyboard is even connected or not.
Further, if it is connected, and still it is not working with your Mac, the issue could be resolved by deleting your keyboard from the list of Bluetooth devices and putting it back in.
Here’s how to do this:
- Click on the Bluetooth option in the System Preferences window of your Mac.
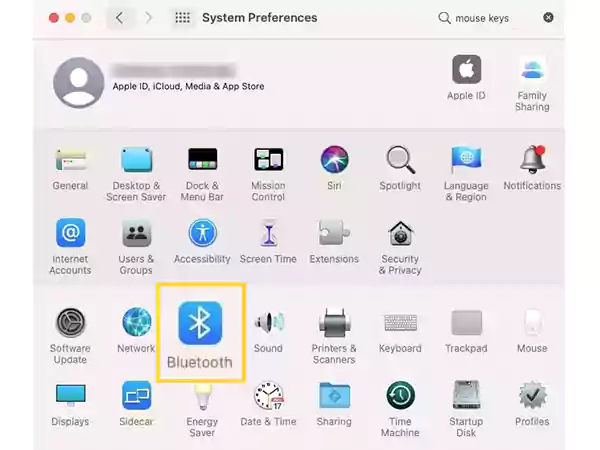
- Next, ensure that Bluetooth is turned on. If it is not, switch it on.
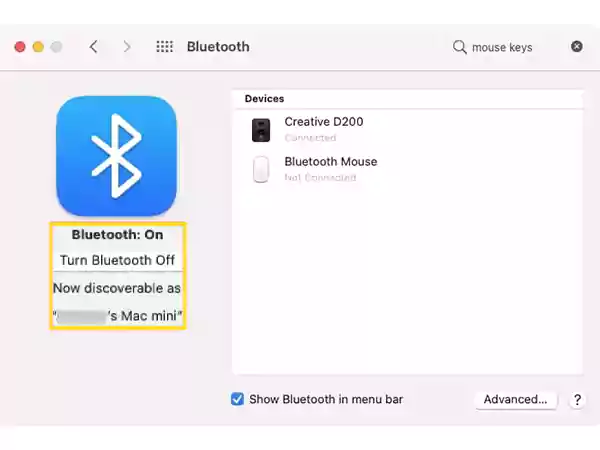
- Further, if your Bluetooth keyboard and Mac are linked, it should appear under Devices. In case the keyboard doesn’t appear there, connect it to your Mac.
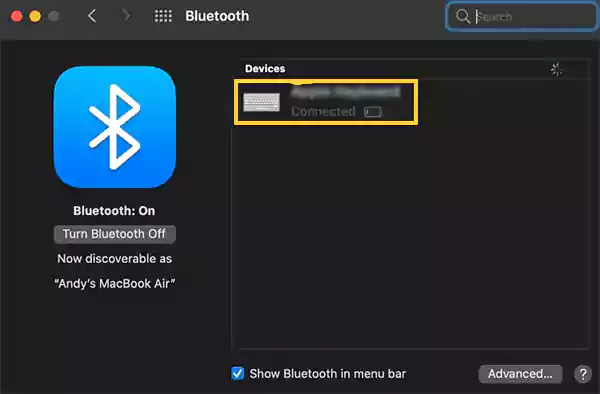
- If it is there– to delete your keyboard, select it and click the X icon.
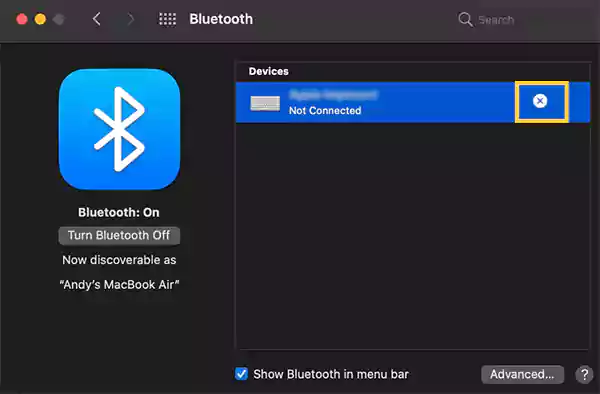
- After doing so, reconnect the keyboard to your MacBook.
Bonus – Restart the Trackpad when it is Not Working
In case you are following this guide if your Mac’s trackpad is not working along with the keyboard, all the above solutions are applicable for both. However, this solution is exclusively for Mac users having issues with their Trackpad.
When the Touch Bar on your MacBook Pro keyboard stops functioning, you can typically fix it via the terminal by restarting it. Follow the steps listed below to go through the process
- Open Finder on your system and go to Applications.
- Inside the Applications window, open Utilities.
- Inside the terminal, type ‘sudo pkill TouchBar Server’ (without quotes) and hit Enter.
- After that, type in “sudo killall “ControlStrip”;” (without external quotes) and press the Enter key.
- Then, you may be asked to enter your password. Fill it in and again press Enter.
- Once you are done, the Touch Bar will shut down and restart.
Hope this helps and that your Mac’s keyboard and trackpad are now working flawlessly!
Read More:
- Why are My Emails Disappearing from Inbox on Mac?
- How to Recover Deleted or Lost Emails on Mac
- [Fixed]External Hard Drive is Not Showing Up on Mac
- Suggestions That Will Increase Your Mac’s Speed
- The Best Google Voice Alternatives for PC, Mac, iOS, and Android
Share


