Top 10 Tips For Your MacBook
The MacBook is one of the most powerful beasts. Operating it is easier than other operating systems such as Windows and Linux. If you think you are a complete whizz concerning Apple’s MacBook, you are not. Because there are dozens of macOS shortcuts and tricks. These shortcuts and tricks will help you streamline your workflow.
Despite this, many of these shortcuts are easily overlooked or forgotten. In this article, you can look at 10 excellent tips you can utilize for your MacBook.
Update Your Mac on Time to Increase Productivity
Apple releases updates for macOS softwares periodically. An individual always craves what’s new to amp up the performance of their devices. It includes updates to apps and vital security updates. The moment you receive a notification regarding a software update, you can choose to install it immediately or later that night.
The inspection for the latest update can be done manually in two ways. Here is how you can do it:
- From macOS Software Updates: Choose the Apple menu and head toward the “System Settings”. Then, click on “General” (in the sidebar) and finally on “Software Update” (on the right).
- From App Store: To update the software from the app store, You have to click on the Apple menu. From there you can look at the number of updates available. If there is any, it will be shown next to the App Store. Choose the app store to continue in the app.
Make a Keyboard Shortcut
Making keyboard shortcuts from menu commands is proven to be an ideal approach to streamline the workflow. In case your MacBook keyword is not working, try to fix the before. Further, you can easily create your own in any macOS app including the Finder.
Interesting Fact
By Fortune, Apple’s founder, Steve Jobs, was named the “Most Powerful Person in Business” as he drew on French and Raven’s six forms of power i.e., legitimate, expert, reward, information, coercive, and referent.
More often, it may be useful as a global shortcut. Follow these steps to create a keyboard shortcut for your MacBook:
- Select the Apple menu. From there, click on “System Settings”.
- Then, click on the “Keyboard” from the sidebar.
- Afterward, click on the “Keyboard Shortcuts” on the right.
- Now, select App Shortcuts and click on the Add button “+”.
- Click the Application pop-up menu, and finally opt for a specific app or All Applications.
Open Certain Apps Automatically at the Login
You all have certain apps that we open as soon as you restart or login. Isn’t it great to make the most used applications auto startup on login into your MacBook? Fortunately, you can have various apps, documents, folders, or even server connections open automatically.
Add Automatic Items
- Open your Mac, and select the “Apple menu”.
- Now, select “System Settings”.
- Click on General (available in the sidebar).
- Finally, click Login Items on the right. To add a login item follow these steps:
- Hit on the “Add/+” button.
- From the list of Items select documents, apps, etc accordingly and click on “Add” to complete the process.
If you’ve forgotten your Apple ID password you can learn ways online to recover it.
Find the Wi-Fi Password For Your Other Devices
Do you know that macOS stores Wi-Fi passwords in its keychain? This saves you in case of a forgotten password for a Wi-Fi network. With this, devices that have joined the Wi-Fi network can share the password with you.
Synopsis for sharing passwords from Mac
| Choose App menu >> System Settings >> Network >> WiFi >> Advanced >> More >> Copy Password >> Paste the password somewhere else to see it. |
Add a Guest user to your Mac
Being an administrator of your Mac, You can use “Users and Groups Settings” and let people use it as a guest temporarily. Do you want to learn how to set up a new guest user?
Guest access works well with the Find My app to find your Mac in case you lose it. How? You can locate it if lost by logging in as a guest and using Safari to access the internet.
To add a guest user:
- Click on the Apple logo, scroll down to Users & Groups, and select “Add Account”. ‘
- Now hit on the “I” and toggle on “Allow guests to log in to this computer”.
Change Your Folders And File Icons
File storage are key aspect as it keeps them organized. Changing folders and file icons helps you find what you are looking for clearly. This is because visual solutions help individuals quickly recognize what they need. Consequently, it will boost your productivity.

Statistics
In January 2009, from its peak of 92.37%, Windows’ share of the US desktop OS market plummeted to its current level of 57.37%. However, the trajectory of Windows’ market share in the country is forecast to continue through 2023.
Nevertheless, you can use a picture icon for either a file or folder on a Mac. No matter, if using a photo or a logo for a file icon, you are open to making items stand out with their unique appearances on macOS.
Easily Preview Files
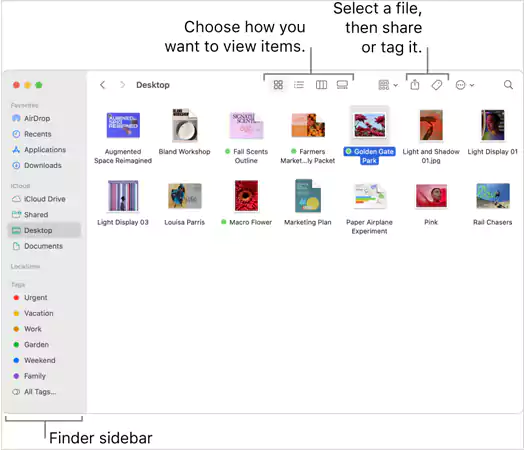
The macOS’s preview is used for simple viewing of a wider range of file formats. It also allows users to apply simple modifications to the files.
Regardless, the simplest way to preview the content of the file without opening it is the usage of “Finder icons” that represent each file. Finder contains a miniature representation of what you see on the first page of those documents. All you have to do is, click a file once and then press your space bar. However, the file is now viewable without facing the need to open the Preview app.
Take Screenshots of Any Size
With macOS, you can take a screenshot of the entire screen or a partial area. For that, there are a few different shortcuts to take screenshots:
- Press Command + Shift + 3: To take a screenshot of the entire screen.
- Press Command + Shift + 4: It will turn the mouse into a crosshair. With it, you can click or drag the frame for the part you want to take a screenshot of.
- Press Command + Shift + 4 + Spacebar: The mouse will turn into a camera icon with which you can take screenshots of the window, application, or other elements.
Use Split Screen
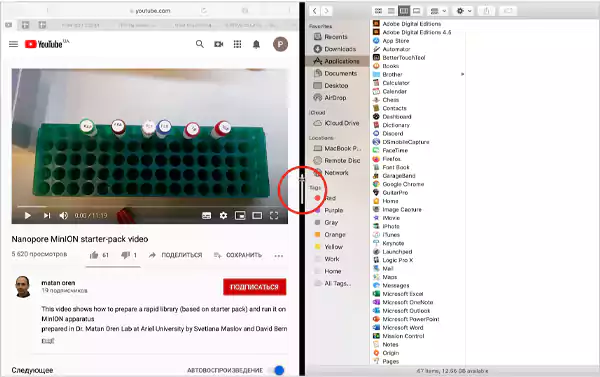
The split screen enables users to have two applications running simultaneously side-by-side on one screen without having to resize either window. For instance, you can access your mail on one side of the screen and research things on the other side of the screen.
To enter Split Screen View follow these steps:
- Start by merely hovering the cursor over the green icon Located in the upper left corner of the screen on one side.
- Now choose one out of three options i.e. “Enter Full Screen”, “Tile Window to Left of Screen”, and “Tile Window to Right of Screen”.
- Now, choose between left or right options and opt for a secondary app that you will be using on the other side.
Record Your iPhone or iPad’s Screen
Taking screen recording is way better. On macOS, you can now record your iPhone or iPad’s screen.
Do You Know?
In 2022, approximately 232 million iPhones, 61 million iPads, and 26 million Mac and MacBook units were sold.
This is not just useful for developers to show off the apps, etc. but be useful for creating tutorials or even just recording a bug. To use this feature, follow these steps:
Press command + Shift + 5 therein in the toolbar. Now click either of the icons highlighted below. Amongst them, the icon with a dashed border lets you set the border while the icon on the left allows you to record the whole screen.
After selection, click “Record” and here you go. Once you are done with recording, you can trim the clip and share it on different platforms. Conclusion
Conclusion
So, these were the few top 10 macOS tips and tricks. Despite these, there are a lot of features included in your macOS. These features not only streamline the workflow but make the work easier.
To find more of them, start exploring your macOS today. Annu will find more excellent features from media and creativity to productivity and accessibility.
Share