How to Split Large PST File into Multiple Parts?
Introduction
Microsoft Outlook is a tool of choice for every business to manage emails. But if your mailbox gets too large, it can slow down Outlook and impact the performance of Outlook which can lead to data loss. Splitting your large PST file into smaller pieces is the solution. This guide will explain why splitting your PST file is important and show you how to do it step-by-step. By the end, you’ll be able to make Outlook work faster and keep your emails safe.
However, when the PST file becomes too large, it becomes difficult to manage. Large or oversized PST files are also more prone to corruption and damage.
As a result, it is strongly advised that you keep an eye on the PST files. To do so, use a reputable PST Splitter tool to divide the PST file into smaller parts based on size, year, or date.
Understanding PST Files
A Personal Storage Table (PST) file is a database file format used by Microsoft Outlook to store email messages, calendar events, and other data.
PST files, also known as personal folders, are used in Outlook to back up or archive email messages and facilitate the transfer of email messages between computers or email accounts files are useful for:
- Backing up your Outlook data file
- Transferring data between different email Outlook accounts or computers
- Archiving old Outlook mailbox data
When a new email account is added to Outlook, a local copy of the information is created on the user’s device. This allows users to access previously downloaded or synchronized emails, contacts, calendar information, and tasks even when they are not connected to the internet.
Some Microsoft accounts, such as POP, store information in Outlook Data Files (.pst), whereas others, such as Outlook 365, Exchange, Internet Message Access Protocol (IMAP), and Outlook.com, store information in Offline Outlook Data Files (.ost). Email archiving is now linked to concepts and practices such as electronic discovery (e-discovery), compliance, and regulation.
However, PST files were originally designed to assist administrators in limiting the amount of storage available on their servers in order to improve performance and reduce backup times. Users could also increase their email storage space by creating local archives.
Benefits of PST File Splitting
Optimizing the performance and management of your Outlook email system can be significantly improved by taking the step to split large PST files into more manageable segments,
- Enhanced Outlook Performance: Outlook’s efficiency can be enhanced by dividing a bulky PST file, which otherwise hampers its speed and ease of accessing emails and other information. Fragmenting your extensive or oversized PST file into more manageable portions can enhance Outlook’s overall functionality and address common issues such as sluggish search results.
- Simplified Backup and Recovery: Managing smaller PST files proves more convenient when it comes to safeguarding and restoring data in the event of any data loss.
- Diminished Risk of Corruption: As previously noted, large PST files are prone to corruption, resulting in potential data loss. Dividing them into smaller segments serves to diminish the risk of corruption.
- Simplified Sharing: Smaller PST files can be effortlessly shared with others, as they are easier to transfer due to their reduced size.
- Improved Organization: The division of a PST file into smaller segments can facilitate a more efficient organization of your emails and other data.
Effective Strategies for PST File Splitting
Splitting a PST file can be accomplished through various methods. This becomes particularly valuable when a PST file has become unwieldy due to its size, and you wish to divide it into more manageable segments.
One way to achieve this is by utilizing the “Archiving” feature or the Import Export wizard within Outlook. These functionalities enable you to either archive or export older emails to a new local PST file. By employing these options, you can partition the PST file based on specific date ranges or mail folder sizes.
Another method for dividing a PST file is by categorizing it according to years or specific dates. Third-party PST splitter tools like Stellar Splitter for Outlook offer this capability, allowing you to segment PST files based on year, date, or size and email IDs.
Employing the PST splitter tool is straightforward; simply select the PST file, specify the desired splitting criteria (year or date range), and the tool will initiate the splitting process.
For those seeking a cost-effective solution, there are free online ‘PST Splitter tools’ available. These tools permit you to segment PST files based on factors such as size, date, and folders.
Once you have downloaded the tool, select the target PST file and specify the criteria for the splitting process.
Manual PST Splitting
Manually dividing a PST file can serve as a practical choice if you prefer a hands-on approach or if your criteria for splitting the file aren’t easily met by the previously mentioned automated methods. Below is a step-by-step guide for manually splitting a PST file:
- Safeguard Your PST File: Prior to making any modifications to your PST file, it is crucial to create a backup. Copy the original PST file to a secure location to prevent potential data loss in the event of issues during the splitting procedure.
- Launch Microsoft Outlook: Start Microsoft Outlook on your computer.
Generate a New PST File: In Outlook, navigate to “File” and choose “New” > “Outlook Data File” Select “Office Outlook Personal Folders File (.pst)” and click “OK.”
- Name and Store the New PST File: Assign a name to your new PST file and specify the location where you want to save it. This file will become one of the smaller segments of your original PST file.
- Transfer or Duplicate Items: At this point, you can begin transferring or duplicating items from your original PST file to the new one. This can be achieved by selecting emails, contacts, calendar events, or any other data within Outlook and then moving or copying them into the new PST file.
- Organize Segments: Based on your chosen criteria for splitting (e.g., by year, specific date ranges, or other factors), arrange the data within the new PST file accordingly. You can create folders within the new PST file to maintain order.
- Repeat as Necessary: If there are additional segments to create, repeat steps 3 to 6 until you have divided your original PST file into more manageable portions.
- Compact and Compress: Following the splitting and organization of the PST file, you may want to compact and compress both the original and new PST files. This process will optimize storage and enhance performance.
- Remove Outdated Data from the Original PST: To free up space in your original PST file, you can delete the data that has been moved to the new files. Don’t forget to empty your Deleted Items folder as well.
- Update Your Outlook Profile: If you have relocated a significant portion of your data to a new PST file, you may need to update your Outlook profile to reference the new file for convenient access.
Remember, manually splitting a PST file can take a lot of time, especially if the file is big and you have specific rules for how to split it. It’s very important to follow these steps carefully and make regular backups to avoid losing or damaging your data.
Overview of Stellar Splitter for Outlook
Stellar Splitter for Outlook specializes in splitting PST files within Microsoft Outlook, making the management and organization of your email data more straightforward.
By using Stellar Splitter for Outlook, you can effortlessly divide your PST files into smaller, more manageable segments, thus simplifying the process of handling and maintaining your email archives.
This software provides a convenient means to enhance the organization of your Outlook data and boost the overall performance of your email client.
Step-by-Step Guide with Stellar Splitter for Outlook
Here’s a step-by-step guide on how to use Stellar Splitter for Outlook to split PST files:
Step 1: Download and Install Stellar Splitter for Outlook
Step 2: Launch the Software
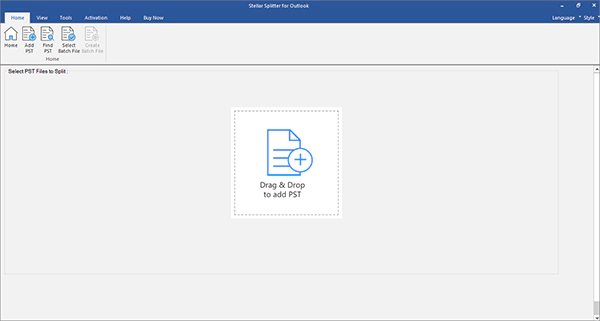
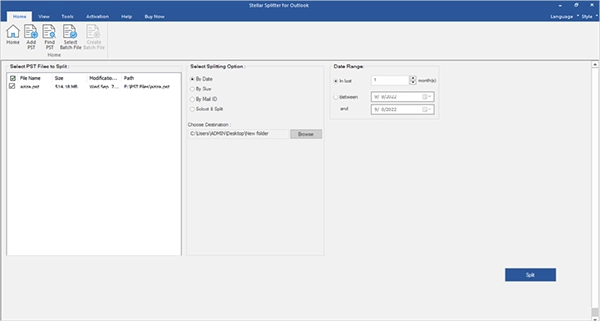
Step 3: Add PST File
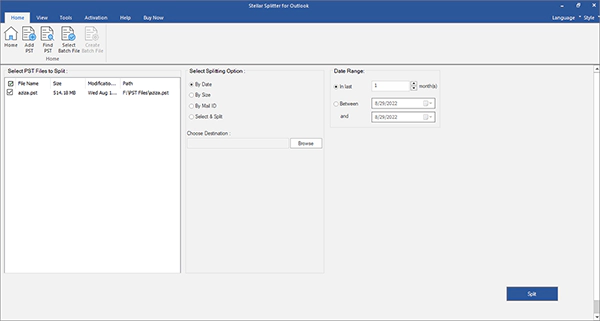
Step 4: Select Splitting Options
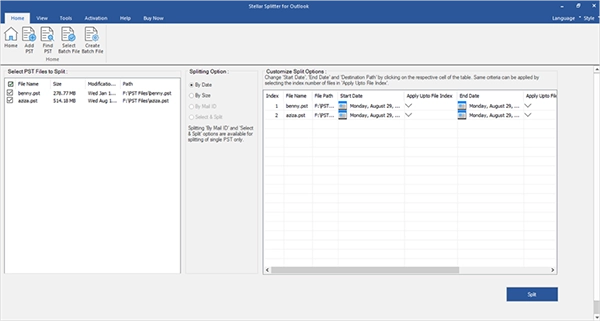
Step 5: Define Destination for Split PST Files
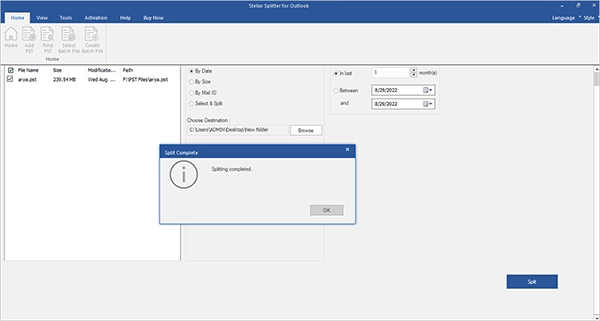
Step 6: Initiate the Splitting Process
Step 7: Monitor Progress
Step 8: Review Split PST Files
Step 9: Access Split PST Files in Outlook
Step 10: Complete the Process
Stellar Splitter for Outlook makes splitting PST files easy and helps you manage your emails.
Conclusion
In summary, PST files are important for keeping your emails and data in Outlook, but when they get too big, they can cause problems like slow performance and data errors.
To handle this, tools like Stellar Splitter for Outlook can be really useful. They make it easy to split those large PST files into smaller pieces, which makes Outlook work better.
It also helps with speeding things up, making it simpler to back up and recover data, reducing the chances of data problems, and making it easier to share and organize information.
Whether you go for automatic or manual methods, splitting PST files is a smart way to keep your Outlook system running smoothly.
Share