[Latest] Change Apple ID on iPhone/iPad/Mac/Windows within 5 Minutes

Change Apple ID within 5 Minutes: There are countable imperative reasons that contribute to the episode of changing Apple ID.
Primarily, lost devices, forgotten Apple ID & password, and unused Accounts are reported as the reason behind changing Apple ID, and sometimes it is as simple as using a new email address.
Taking care of all this, we have come up with a quick guide that will assist our iOS device users to change their Apple ID on iPhone/iPad/Mac/Windows in no time.
So, stay tuned till the end to get the best results!
Apple ID: Quick Overview
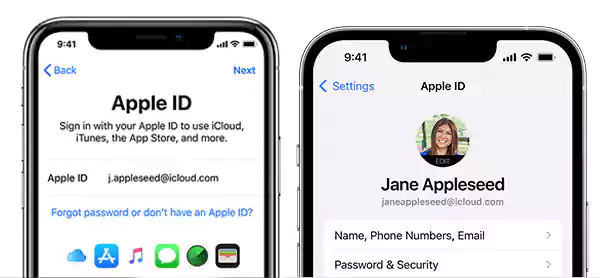
An Apple ID is an account that you are mandated to create in order to access exclusive Apple services. For instance: App Store, iCloud, Apple Music, Apple Pay, and FaceTime.
- Your Apple ID is connected to an email address. It can appear as an Apple email address (@icloud.com, @me.com, or @mac.com).
- In addition to the above, your Apple ID can be an email address such as yourname@gmail.com or any third-party email address.
- You can find your Apple ID by opening Settings> tap on your name> on the next screen; you will see your Apple below your name.
How Switching Apple ID and Changing Apple ID Indifferent from Each Other?
See, the majority of iOS device users are absolutely unaware of the fact that Switching Apple ID and Changing Apple ID are two different processes. As a result, most users end up losing their valuable data.
Acknowledging this, here we are to clear the air! Let’s check out the difference between the respective.
| Switching Apple ID | Changing Apple ID |
| The process is for logging into an entirely new ID. | The process is for editing the existing Apple ID. |
| Signing out from the current Apple ID will lead to a loss of purchased apps, including an Apple Music subscription and iCloud storage plan. | Changing Apple ID will not cause data loss. |
| With logging into the new ID, Apple allows you to merge the data on your iPhone with the iCloud account linked with the different Apple ID. | Editing your Apple ID will preserve all your data (Apple Music subscription, purchased apps, contacts). |
Verdict: Changing your Apple ID is a superior option as it eliminates the probable chances of any mishap and serves a buttery experience to its users.
Take a Look before Changing Apple ID
Now that you have made up your mind to change your Apple ID, here are some imperative steps that we advise you shouldn’t miss.
| • Prior to changing your Apple ID, keep yourself signed in to your iPhone and logged out from all the devices on which you have used that Apple ID. |
| • Devices profoundly include iPad, iPod, Apple TV, and Apple HomePod. |
| • After you have changed your Apple ID, use your newly generated Apple ID to log back into all your devices. |
| • Visit http://appleid.apple.com/, if you do possess an Apple ID which is your Apple email address (@icloud.com, @me.com, or @mac.com). |
| • Keep in mind that, you are authorized to change to other emails only that are in traction with your Apple email address in your account. |
Steps to Change the Apple ID on iPhone/iPad
Changing the Apple ID on iPhone/iPad is like a five-finger exercise. Desired iOS users can effortlessly tweak their Apple ID thanks to Apple’s intuitive interface.
So without any further ado, let’s move towards the steps to change Apple ID on iPhone/iPad.
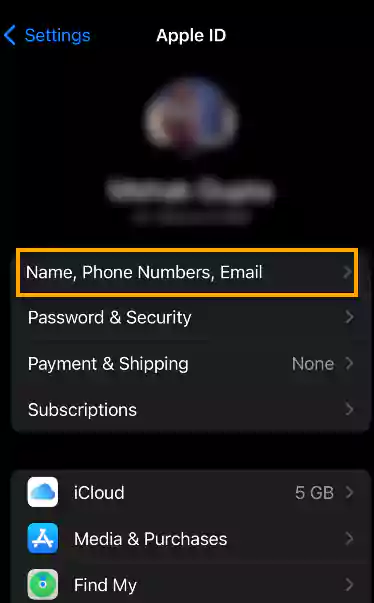
- Initiate by opening “Settings” on your Apple device.

- Next, press the “Apple ID banner (Displaying your Name)”.

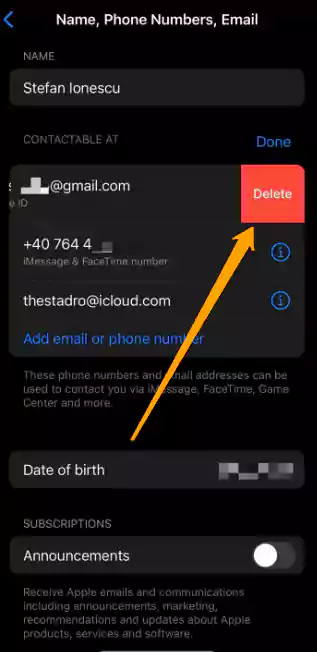
- Now, tap on the “Name, Phone Numbers, Email” tab.
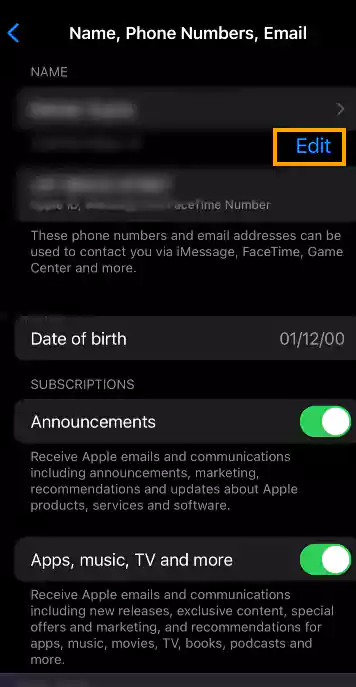
- Next to Reachable at/Contactable at, hit “Edit”.
- In this step, tap on the “Red Minus Button” followed by your Apple ID.
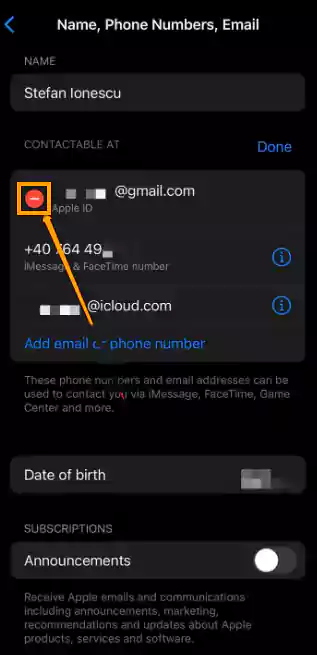
- Now, strike the “Delete” button.
- Next, you will come across a pop message displaying “Please choose another address to use as your Apple ID” and press “Continue”.
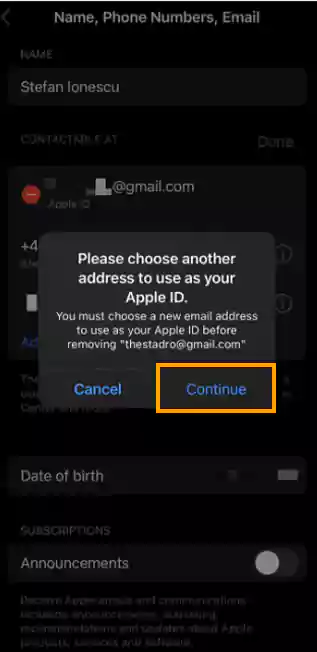
- After that, “insert your passcode” for authentication, and “fill out your new email ID”.
- In the end, you will receive a verification code, simply “insert the respective code in the given field”. That’s it!
Hurrah! You have successfully learned how to change the Apple ID on your iPhone/iPad.
Now, let’s step down and check out the process to change the Apple ID on Mac/Windows.
Steps to Change Apple ID on Mac/Windows
Similar to the above, changing Apple ID using Mac/Windows is also a seamless process. All you have to do is follow the simple steps in order to get the desired outcomes.
- Begin by heading to the Apple ID Change Official Portal.
- Next, perform Apple ID Sign up using your current Apple ID and password.
- Insert the code, if you have toggled on the Two-Factor Authentication.
- Next, you will notice “Edit” next to the Account section.
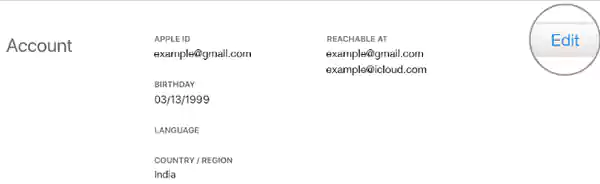
- Now, Select “Change Apple ID”.

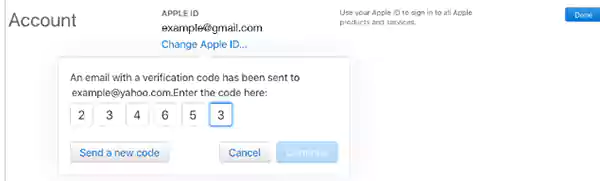
- After that, fill out the new email ID, and press “Continue”.
- Lastly, you will receive an email consisting of a verification code, simply validate it by entering the code and you are good to go!
Frequently Asked Questions (FAQs)
In this section, we have listed some frequently asked questions by the users corresponding to Apple ID.
Ans: Forgot your Apple ID or simply want to check? Here’s how you can find your Apple ID;
- Simply open the “Settings” App.
- Next, tap the “Apple ID” tab on the top.
- On the next screen, you will find your Apple ID under your name.
Ans: Absolutely not! Changing your Apple ID will not delete photos or any apps on your Apple Devices.
Ans: Willing to change Apple ID settings? Follow the mere steps listed below!
- Launch the “Settings” App.
- Next, “tap on your Name”.
- Now, you can perform the following:
- Update your contact information
- Change your password
- Add or remove Account recovery Contacts
- View and manage your subscriptions.
- Update your payment methods or billing address
- Manage family sharing
Worth Glancing
A Descriptive Guide for “How to Transfer Photos from iPhone to Computer”
How to Find Hidden Apps on iPhone?
6 Ways You Can Easily Hide Apps on your iPhone?
Share


