10 Most Steadfast Solutions if your Thunderbird is not Receiving Emails!
Has your Thunderbird stopped receiving emails? Don’t worry, you are not alone! Looks like everybody these days is having some kind of issue with Thunderbird because of which they are not receiving emails in it.
I need not tell you that because of its advanced capabilities, better user interface, high-security standards, and ease of use, Thunderbird has been one of the most trusted and favorite email clients for millions of people for years.
However, nowadays, it doesn’t seem like the same Thunderbird, the one with the glorious past. In a very short span of time, I have come across a number of people who are complaining that they are not receiving emails in Thunderbird. If you are also one of them, then you have reached the right place.
The following article outlines a number of solutions that can help to get your Thunderbird back to normal functioning. Now, without wasting much time talking, let’s jump into doing!
Also Read: Spectrum Mail Not Working? Here Are the Solutions For It.
- Solution-1: Basic Workarounds…
- Solution-2: Update Thunderbird
- Solution-3: Check Mail Server Settings
- Solution-4: Check SMTP Settings
- Solution-5: Check Refresh Time for New Messages
- Solution-6: Run Thunderbird in Troubleshoot Mode (Safe Mode)
- Solution-7: Add Thunderbird to Windows Security and Firewall
- Solution-8: Make New Thunderbird Profile & Remove Corrupt One
- Solution-9: Perform Thunderbird Clean Up
- Solution-10: Download the Previous Version of Thunderbird
- IMPORTANT: When Your Thunderbird is not Working with Gmail…
Solution-1: Basic Workarounds…
Check Server Status
If Thunderbird is not working and is not receiving any emails, the very first reason that comes to my mind is the email server issue.
If there is a problem with the servers of the emails, then no matter what you do, you will not receive emails until your email service provider resolves the issue. Thus, before proceeding further with the troubleshooting methods, make sure that the servers of your email service are up and working fine.
However, if the servers are down, then it is the sole reason for not getting any emails in Thunderbird. And, you have to wait till they are recovered to normal working.
Check Internet Connection
If the servers of your email service provider are working fine, but still you are not receiving any emails in Thunderbird, probably the poor internet connection is the reason behind it. To check the internet connection, open the browser and visit any website. If it loads just in time, then the problem is with not the internet. In that case, move ahead and try more technical approaches to this difficulty.
Solution-2: Update Thunderbird
Frequently, an outdated version of an app, Thunderbird, in this case, can lead to difficulties, which may stop it from receiving emails, or it can stop working altogether. Users having any issue with this email program are advised to first and foremost update Thunderbird.
You can update Thunderbird by following the steps given below:
- Open the Thunderbird program on your computer.
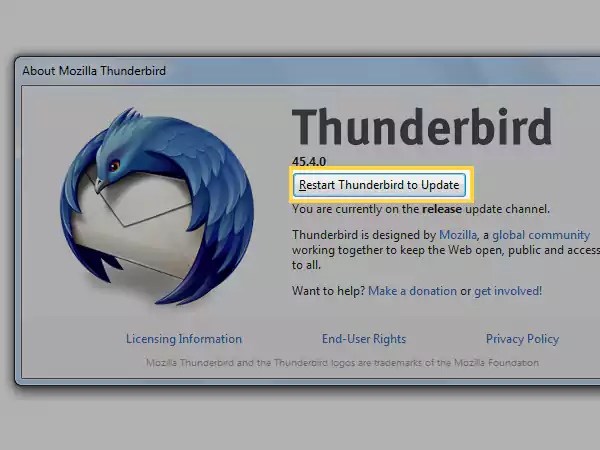
- Click on the Help menu, and select the About Thunderbird option from the menu.
- Then, the About Mozilla Thunderbird window will open. It will automatically check for any updates and download them.
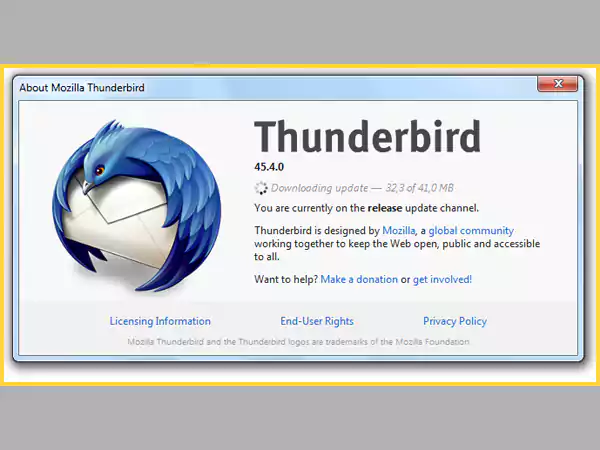
- If an update is downloaded, a Restart Thunderbird to Update button will appear. Click on it, and Thunderbird will restart with the new version installed.
Solution-3: Check Mail Server Settings
Mail server settings are significant for the proper functioning of an email. If these settings are misconfigured, your Thunderbird will stop receiving emails for the email account for which the settings are incorrect. Therefore, the first thing to check when your Thunderbird email is not working is the mail server settings. To check over these, follow the steps listed below:
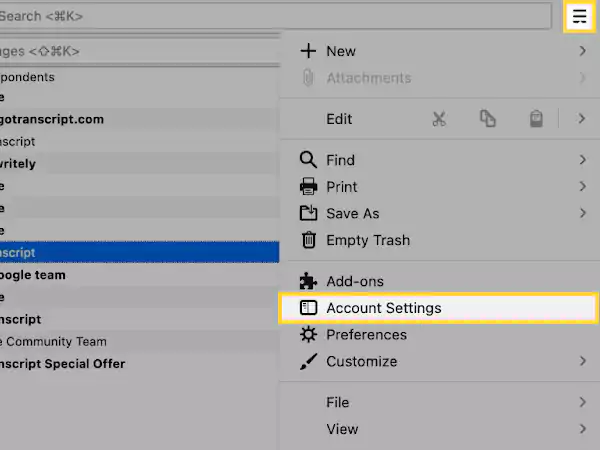
- First, open the Thunderbird program on your system, and switch to the email account which is not receiving emails.
- Now, select the Account Settings option present under Options (which appears under the menu by clicking on the menu icon in the top right corner).
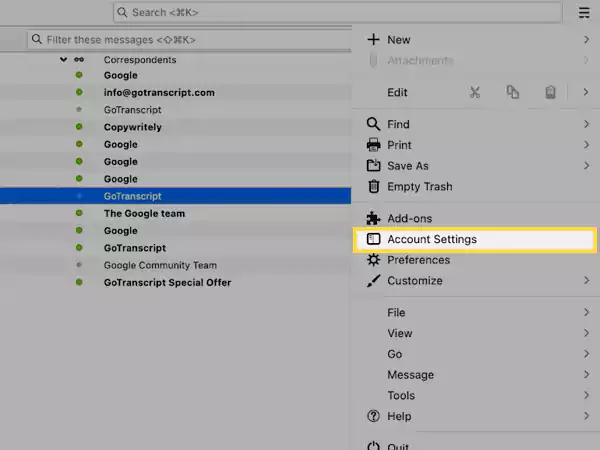
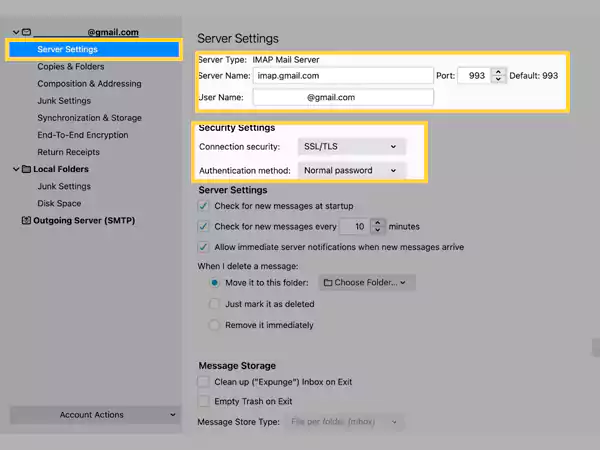
- Thereafter, click on the Server Settings option present on the left side pane of the next page.
- Then, the Server Settings page will appear, where you have to make sure that the following settings are correct:
- Server Type: IMAP or POP (IMAP is preferred)
- Server Name: imap.exampleEmail.com or pop.exampleEmail.com
- Port Number: 993 for IMAP and 995 for POP.
- Connection Security: TLS/SSL
- Authentication: Normal Password (Your email account password).
IMPORTANT: If you are not able to download your email locally on your device, it might be because IMAP must be selected in the Server Type setting. IMAP stores emails on the server and does not download them on the device. However, to download emails in your system, the Server Type should be set to POP, because it allows the downloading of emails.
Solution-4: Check SMTP Settings
SMTP protocol governs the outgoing mail server. If these settings are incorrect, then also your email account added in Thunderbird can stop sending or receiving emails, even after updating the inbox. You may be prompted with a message stating that ‘The message could not be sent because the connection to the outgoing server (SMTP) is interrupted’.
In order to make sure that SMTP settings are correct in Thunderbird, go through the steps given below:
- Again, begin with opening the Thunderbird program on your computer. Then, switch to the email account in which you are not receiving emails.
- Click on the menu icon (three horizontal lines) present in the top right corner of the screen, and select the Account Settings option.
- Next, click on the Outgoing Server (SMTP) option from the left sidebar of the account settings page.
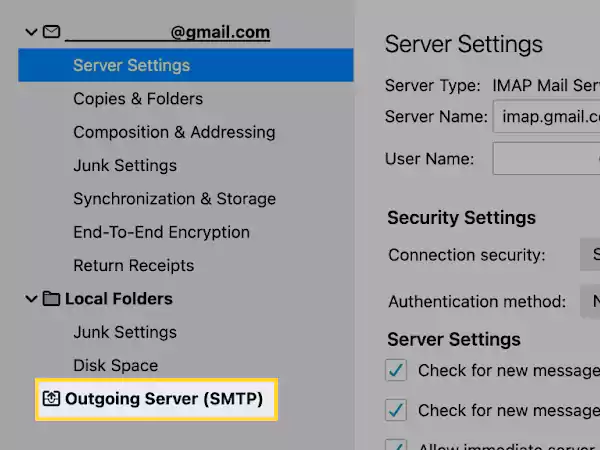
- Lastly, make sure that the following settings are correct:
- Server name: smtp.exampleMail.com
- Port Number: 587 or 465
- Connection Security: TLS/SSL
- Authentication: Normal Password (Your email account password)
Solution-5: Check Refresh Time for New Messages
If your Thunderbird is not receiving new emails, it might be because you have unchecked the settings that refresh your email account. And, because the setting is disabled, the inbox will not be updated with the new incoming emails. Thus, it is necessary that all the settings that refresh the inbox of the mail with the new content are checked. Here are the steps that you need to follow to check and enable these settings:
- To begin with, open the Thunderbird app on your system, and click on the email account that is having issues.
- Now, click on Option, and then click on the Account Settings option.
- From the left sidebar of the following page, switch to the Server Settings section.
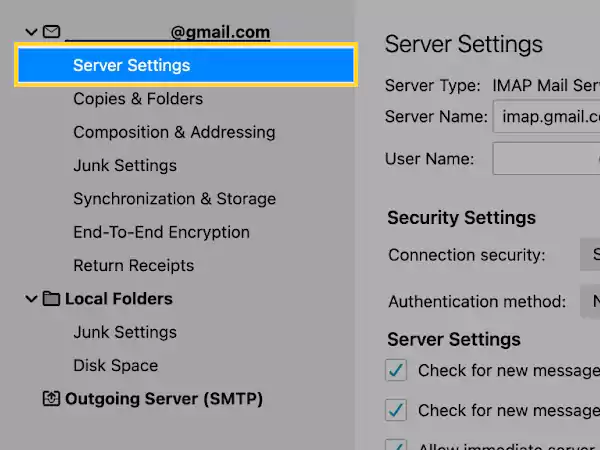
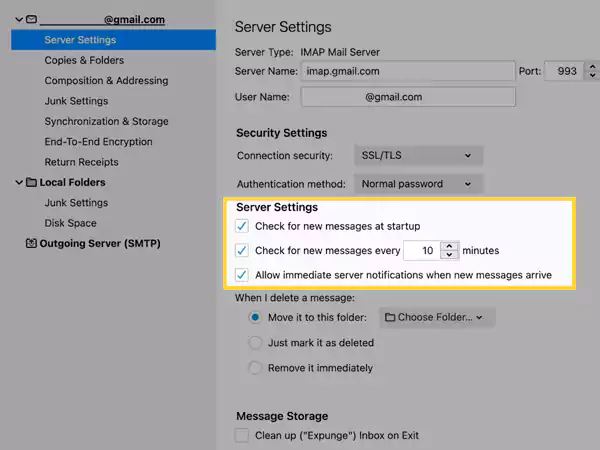
- Thereafter, the Server Settings page will appear. Make sure that the following options are checked:
- Check for new messages at startup: It will refresh the inbox every time you open Thunderbird.
- Check for new messages every x minutes: This will refresh the inbox and new emails will be received after every x minutes. Make sure that you set these minutes as low as possible so that there is no delay in receiving emails.
- Allow immediate server notifications when new messages arrive: Every time a new email will be received, you will be notified.
Solution-6: Run Thunderbird in Troubleshoot Mode (Safe Mode)
Troubleshoot Mode is a unique way to launch Thunderbird that can be used to identify and address issues with your Thunderbird installation. To prevent potential sources of issues, Troubleshoot Mode will temporarily disable your add-ons and reset certain custom settings, which will be retained when you exit this mode.
If the ‘Thunderbird not working’ issue with your Thunderbird installation appears to be resolved in Troubleshoot Mode, one of your add-ons or a customized configuration is probably the root of the problem.
Note: Thunderbird Safe Mode, which has nothing to do with Windows Safe Mode, was the prior name for Thunderbird Troubleshoot Mode. ‘Restart with Add-ons Disabled’ was the name of the menu item in Thunderbird versions before version 91.
To enter the Troubleshoot mode of Thunderbird, follow the steps given below:
- Launch the Thunderbird app on your PC.
- Click on the hamburger menu icon (three horizontal lines) and click on the Help menu.

- Next, select the Troubleshoot Mode option.
- Click on the Restart button present in the Restart in Troubleshoot Mode prompted window.
- Thereafter, the Thunderbird Troubleshoot Mode dialog box will appear, where you have to click on the Continue in Troubleshoot Mode button.
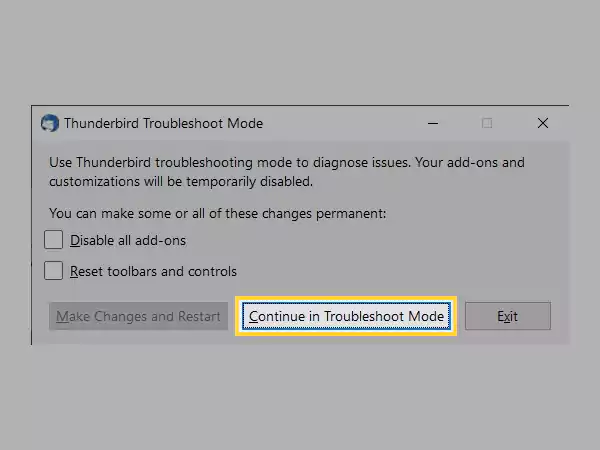
After this, Thunderbird will open in the specified mode, and then you have to check whether you are still not receiving the emails or if it’s working fine.
If you start receiving new emails, then the problem lies with add-ons or your custom settings. Try to identify and disable them in the normal Thunderbird mode.
Turning off Troubleshoot Mode
- Click on the menu icon (three horizontal lines) present in the top right corner of the screen.
- Select Help from the menu.
- Lastly, click on the Turn Troubleshoot Mode Off option. This will immediately restart Thunderbird in the normal mode
Solution-7: Add Thunderbird to Windows Security and Firewall
If your email account added in Thunderbird has stopped receiving email after updating it, the reason behind it can be the new version of Thunderbird itself. It’s probably the case that the firewall or antivirus program in your system may not trust the latest version of Thunderbird. Thus, blocking it from doing any activity.
Now, what you need to do is, give special permission to Windows Security and Firewall to whitelist Thunderbird.
Here are the steps that you need to take:
Whitelisting Thunderbird in Windows Security:
- Open the Settings on your PC.
- From the left side pane of the Settings window, switch to the Privacy and Security section, and then select the Windows Security option.
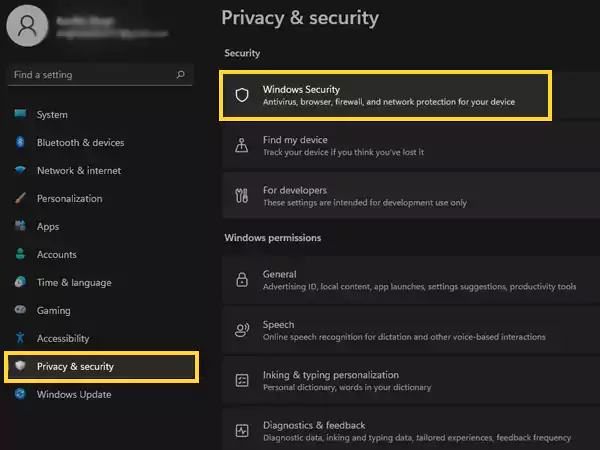
- From the following page, click on the Virus and Threat Protection option.

- Then, a new window will open, where you have to click on Manage Settings under the Virus and Threat Protection Settings section.
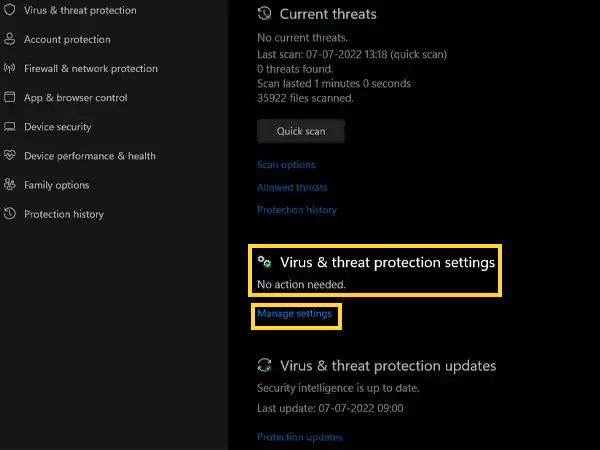
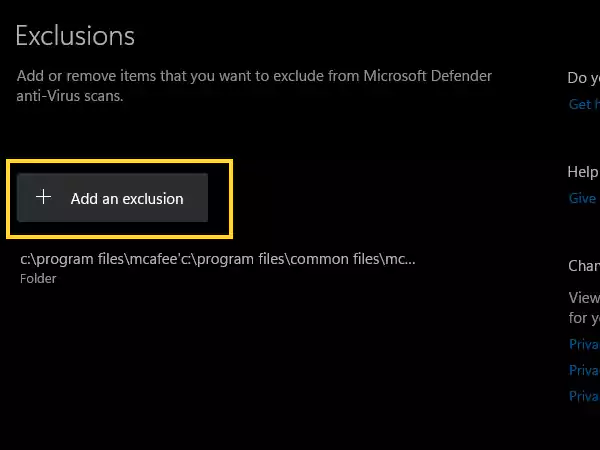
- Thereafter, scroll down to the Exclusions section and click on Add or Remove Exclusions.
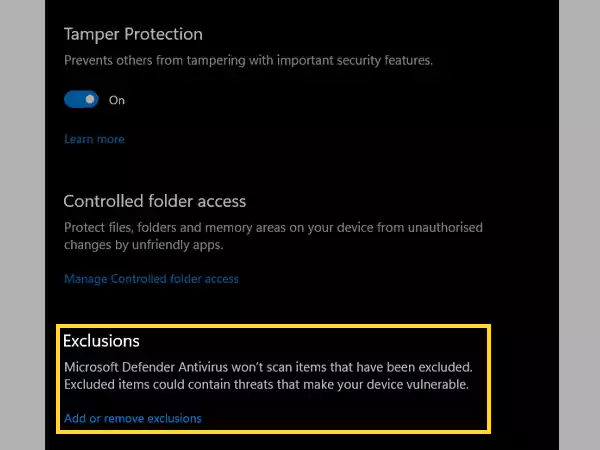
- Select Yes from the prompted dialog box asking you to allow the program to make changes to the system.
- Lastly, click on Add an Exclusion button, select the Folder option, navigate to the location where the Thunderbird folder is downloaded, and select it.
Whitelisting Thunderbird in Windows Firewall:
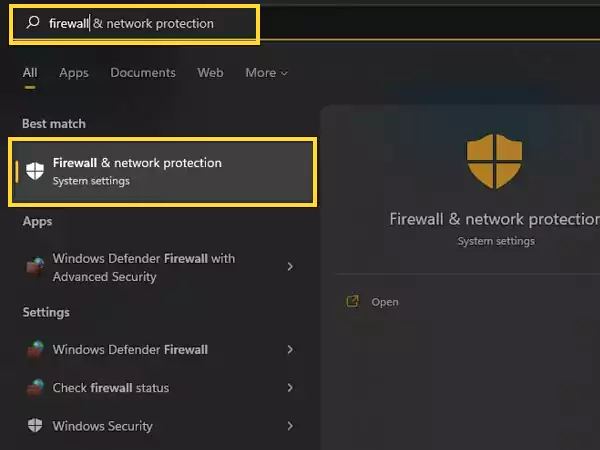
- In the search bar of your system, type firewall and select the Firewall and Network Protection from the search results.
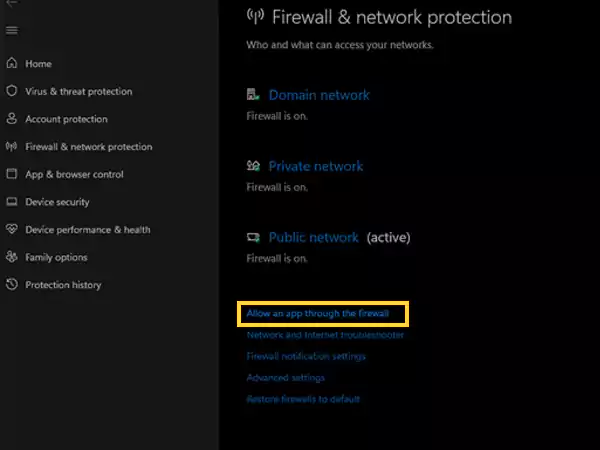
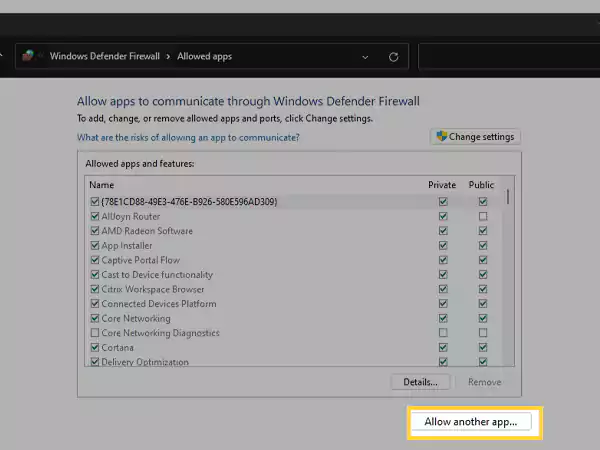
- On the window that will open, click on the Allow an App Through the Firewall option.
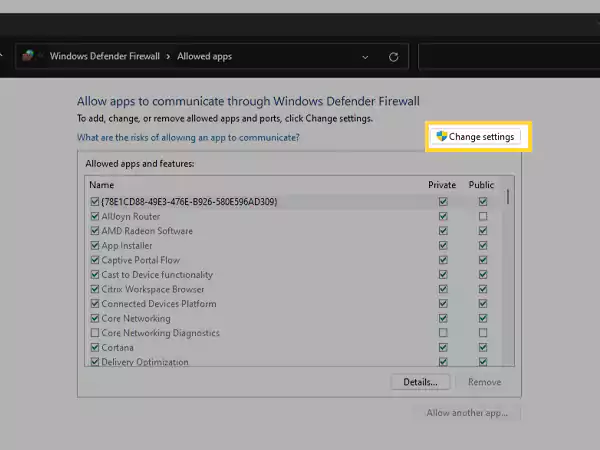
- Click on the Change Settings button present in the following window.
- Then, click on the Allow Another App button.
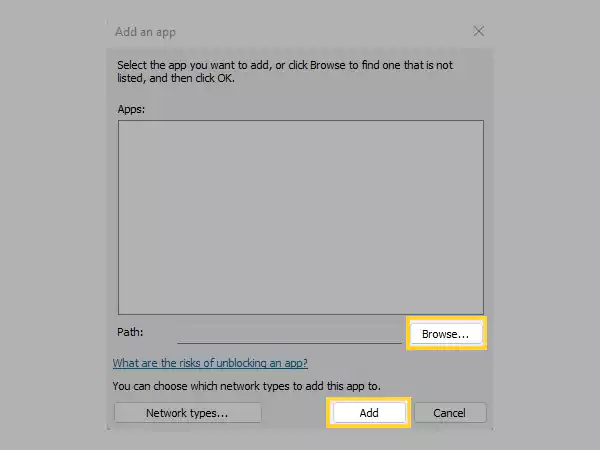
- Click on the Browse button to locate the Thunderbird folder and add it by clicking on the Add button.
Note: The above methods were only for the Windows inbuilt security and firewall programs. However, if you are using any other third-party antivirus program or firewall, then you have to go to their respective help pages to know how you can whitelist Thunderbird in them if they are stopping it from receiving new emails.
Solution-8: Make New Thunderbird Profile & Remove Corrupt One
The MBOX file linked to your specified email profile contains all of your mail items and information, including messages, contacts, passwords, etc. You might not be able to send or receive emails if your profile is damaged. To resolve this problem, you can add a new profile and remove your corrupt profile.
Here’s how to do this:
Create New Profile:
- Open Thunderbird in your system, and click on the menu icon (three horizontal lines) present in the top right corner and click on the Help menu.
- Then, select the Troubleshoot Information option.

- Next, the Troubleshooting Information page will appear, where you have to click on the about:profiles link.
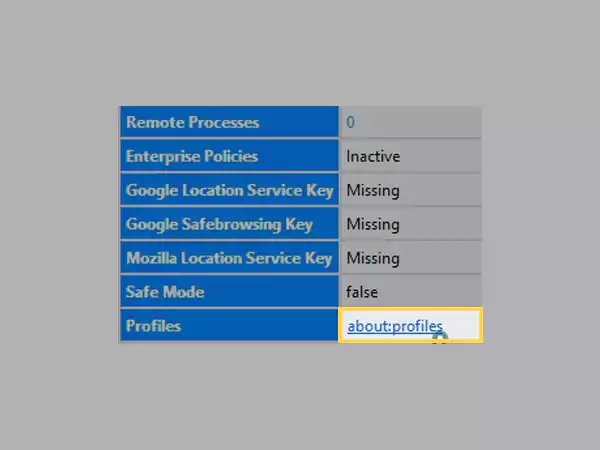
- This will take you to the About Profiles page, where you have to click on the Create Profile button.
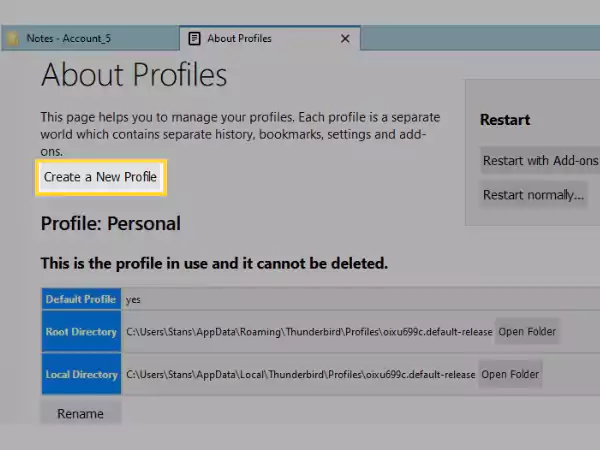
- Next, a Create Profile Wizard window will open, click Next on it.
- Then, enter the name of your profile (You can write anything you want, this won’t be visible to any of your recipients while sending emails).
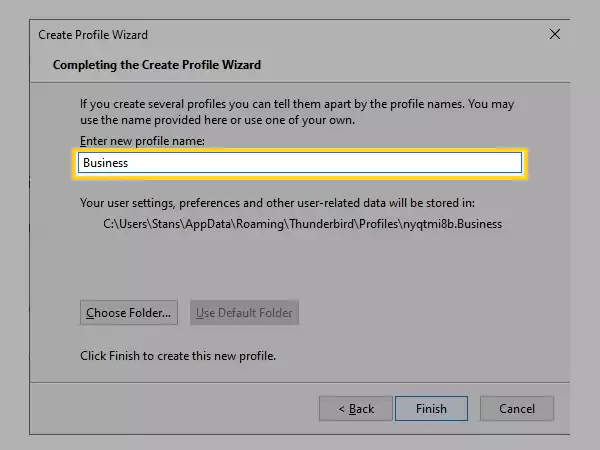
- Lastly, click on the Finish button.
Note: In the Create Profile Wizard window, you can click on the Choose Folder button to browse the location if you want to store the profile at a specific location in your system. To do so, make sure you choose an empty folder because if you delete the profile and choose the Delete Files option, everything in the folder will be deleted (including the files previously stored in that folder if you do not choose an empty folder).
Remove Corrupt Profile:
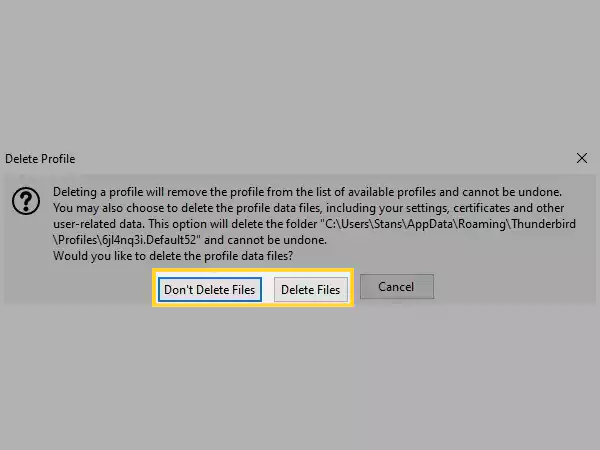
- Follow the steps given in the Create New Profile section (above) , and reach the About Profiles page.
- There, scroll down to the profile that is corrupted, and click on the Delete Profile button.
- A confirmation window will open, where you can choose either of the two following options to remove the profile:
- Don’t Delete Files: This option keeps the profile data files on your computer in the storage folder while removing the profile, ensuring that your information is not lost. This option is preferred as it preserves the old profile’s folder and enables you to restore the files to a new profile.
- Delete Files: The profile folder and files will be removed, and you cannot reverse the action.
Note: If you want to move the data from the old profile to the new one, then visit this Mozilla Support page for doing so.
Solution-9: Perform Thunderbird Clean Up
A lot of information and messages stored in your email account might be stopping Thunderbird from receiving new emails. In order to overcome this problem, you will be required to perform a clean-up of your email account, and remove unwanted messages and other data. To do so, follow the steps given below:
- First off, launch the Thunderbird app on your computer.
- Click on the Tools menu, and then select Options.
- Next, switch to the Advanced tab, and then click on the Clean Up button.
- Thereafter, a window will be prompted with a list of folders. Select the folders that you want to clean up, and click on the OK button.
Solution-10: Download the Previous Version of Thunderbird
If Thunderbird is not working or is not receiving emails after you have updated it, probably it is because it might be using advanced security standards that your email service provider doesn’t support. In such a case, you have to uninstall the latest version and download the one you were using earlier.
Therefore, first, uninstall the Thunderbird from your system without removing any data or profiles from it. Then go to the Thunderbird website, where all the Thunderbird releases will be listed. Select the version from there that you were earlier using and download it. Once downloaded, install Thunderbird and finish its setup.
If you uninstalled Thunderbird without removing its database files, then all your data will be intact, and you will not have to log in to every account again after installing it again. Otherwise, you manually have to log in to all your accounts and previously stored information will be lost.
Once you have downloaded the required version of Thunderbird, you have to remove the ‘Automatic update’ settings from it, so that it doesn’t update itself, and you are again in the same position from where you had started.
So follow the steps given below to remove Automatic Updates settings from Thunderbird:
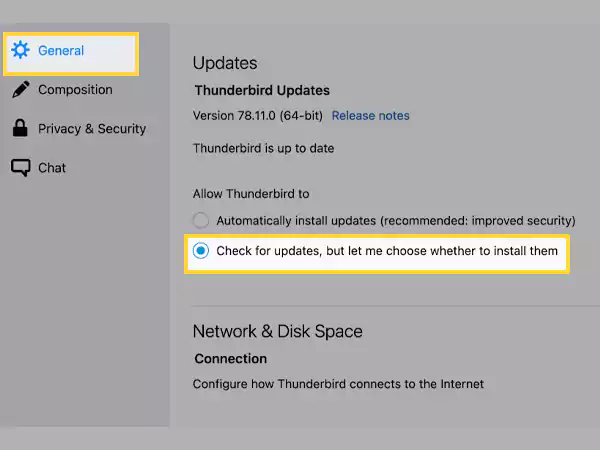
- Open the Thunderbird program and click on the Menu option.
- From the expanded menu, select the Preferences option.
- Then, in the General section, scroll down to the Updates section.
- There, select the Check for Updates, But let me Choose Whether to Install Them option. Thus, every time an update is released, Thunderbird will ask whether to install it or not.
IMPORTANT: When Your Thunderbird is not Working with Gmail…
If you are a Gmail user and your email is not working in Thunderbird, then the most probable reason for the issue is as follows:
Google has said that from May 30, 2022, third-party programs (which, I presume, includes Thunderbird) will no longer be able to access Gmail accounts using only username and password because they will activate 2-step verification.
In such a case, what you need to do is stated in the further steps:
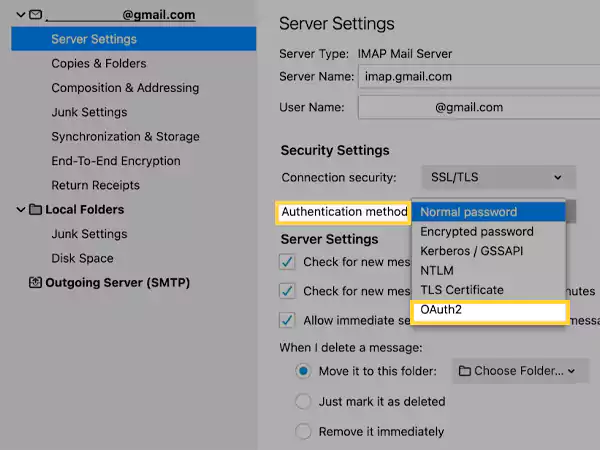
- First, open the Thunderbird app on your system.
- Click on the Tools menu and then select the Account Settings option.
- From the left side pane of the next page, switch to the Server Settings tab.
- Inside the Server Settings page, locate the Security Settings option, and change the Authentication Method to OAuth2.
- After doing so, close Thunderbird and reopen it.
- Upon reopening, you will be asked to log into your Gmail account. So, log into it.
- Thereafter, you will be asked to grant Thunderbird the access to the account, the setting of which you have just changed. So, do it as well.
After doing as stated above, again close Thunderbird and open it. If it opens without asking anything, then you are good to go, and you need not do anything else.
Tip: If switching to OAuth2 in Authentication worked for the Gmail account, then probably it will also work for other email service providers as well which are having 2-factor authentication.
However, if the above method didn’t work, and your Gmail is not working with Thunderbird, then you need to remove the Gmail account password and log into it again. In order to do so, follow the below-listed instructions:
- Open Thunderbird, and click on the Tools menu.
- Then, select the Preferences option, and click on Privacy and Security.
- Now, highlight your Gmail account which is not working with Thunderbird, right-click on it, and select the Remove Password option.
- Now, close Thunderbird and reopen it. You will be prompted to log into your account and grant Thunderbird access to it. After doing so, you should be able to use your Gmail account in Thunderbird without any difficulty.
I hope the above solutions were helpful, and you are now able to freely use your email account in Thunderbird!
Share


