Centurylink Email Configuration Setup Process for Android & iPhone Device
Have you recently signed up for the Centurylink email service and are wondering whether it will let you set up your Centurylink.net account on your respective mobile email client or not? If yes, then let us tell you that Centurylink like many other popular email service support configurations on email clients of multiple devices.
So, owing to the above said fact, if you want to set up your Centurylink.net email account on your mobile be it iPhone or Android, then consider reading this blog further. Here, we’ve mentioned the complete step-by-step instruction guide on “Centurylink Email Setup” for both android and iPhone devices. However, before directly jumping onto the instruction guide, let’s read what all you need in advance to setup your Centurylink account on iPhone/Android:
Meet These Basic Requirements to Setup Centurylink Email on iPhone & Android
- Keep your phone up to date with the latest version.
- Make sure you connect your respective mobile with a strong and secure network connection.
- Confirm and write it down all the account information of your Centurylink.net email account such as its ‘Username, Email Address and Password.’
However, also note that along with these aforementioned requirements, you’ll need the IMAP/POP3 and SMTP Server Settings of Centurylink email because without them the configuration setup process cannot be completed.
So, in order to configure your Centurylink email on your respective Android or iPhone device, you’ll require to use the following “Centurylink.Net Email Settings.”—
Centurylink IMAP Settings for Incoming (IMAP) and Outgoing (SMTP) Server
| Incoming Server Settings | Outgoing Server Settings |
| Incoming Server: mail.centurylink.net | Outgoing Server: smtp.centurylink.net |
| Incoming Secure Port: 993 | Outgoing Secure Port: 587 |
| Security type: SSL | Security type: TLS (Always use TLS if available) |
| Requires an encrypted connection: On | |
| Type of encrypted connection: SSL | |
| Username: Enter your CenturyLink Account’s Full Email Address | |
| Password: Enter your CenturyLink Account Password | |
| ‘Server’ Limit: Set to 20 MB (by default) | |
| IMAP ‘Send To’ limit: 100 Contacts (You can purchase extra) | |
| SMTP ‘Send’ limit: 500/hr. | |
Centurylink POP3 Settings for Incoming (POP) and Outgoing (SMTP) Server
| Incoming Server Settings | Outgoing Server Settings |
| Incoming Server: pop.centurylink.net | Outgoing Server: smtp.centurylink.net |
| Incoming Secure port: 995 | Outgoing Secure Port: 587 |
| Security type: SSL | Security type: TLS (Always use TLS if available) |
| Requires an encrypted connection: On | |
| Type of encrypted connection: SSL | |
| Username: Enter your CenturyLink Account’s Full Email Address | |
| Password: Enter your CenturyLink Account Password | |
| ‘Server’ Limit: Set to 20 MB (by default) | |
| POP3 ‘Send To’ limit: 100 Contacts | |
| SMTP ‘Send’ limit: 500/hr. | |
Now, without any further ado, let’s get started with the configuration process that helps you to setup your Centurylink.net email account on your iPhone or on your Android device.
Centurylink Email Setup for iPhone
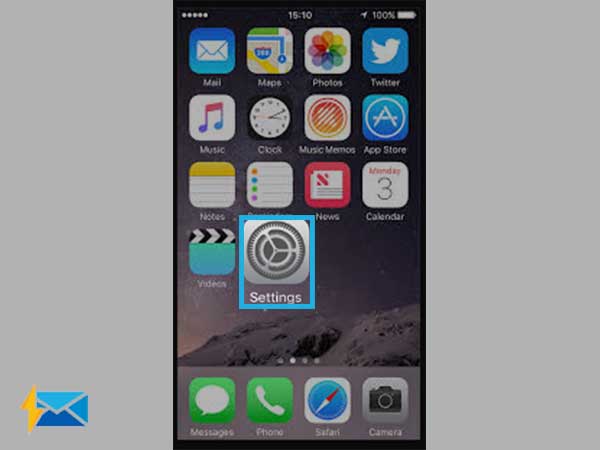
Step 1: Open ‘Settings’
- First and foremost, go to the “Settings” of your iPhone device by clicking on its icon from the home screen.
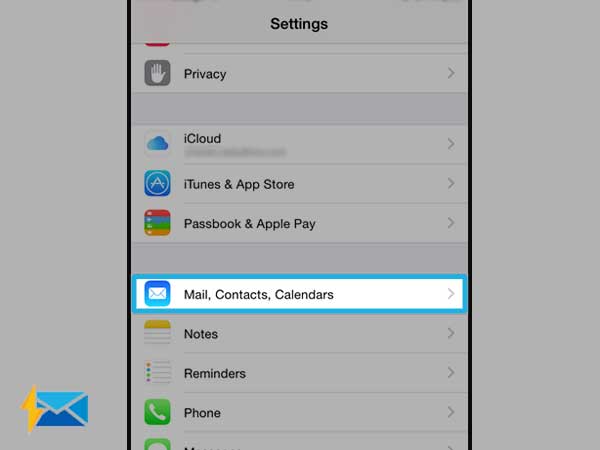
Step 2: Tap on ‘Mail, Calendar, Notes or Contacts’
- Inside settings app, scroll down its menu to tap on the “Mail (Calendar, Notes or Contacts)’ option. In doing so, you’ll be directed onto the ‘Mail, (Calendar, Notes or Contacts)’ settings page.
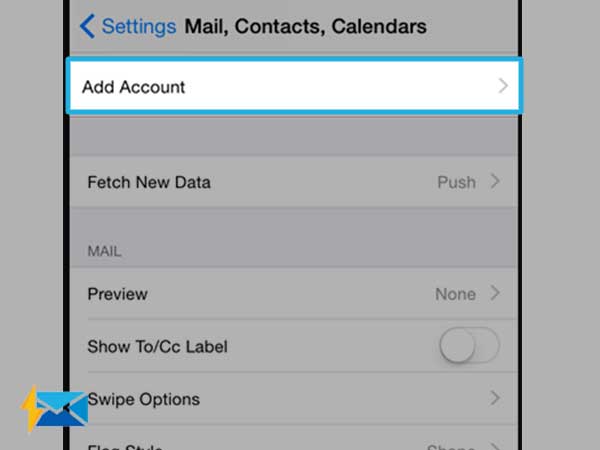
Step 3: Select ‘Add Account’
- From there, tap on the very first option that reads “Add Account.”
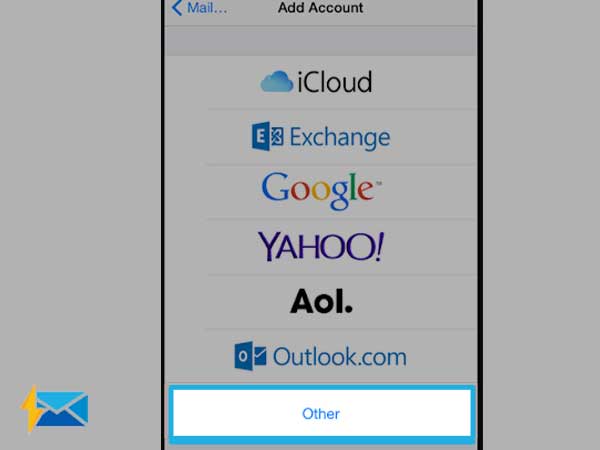
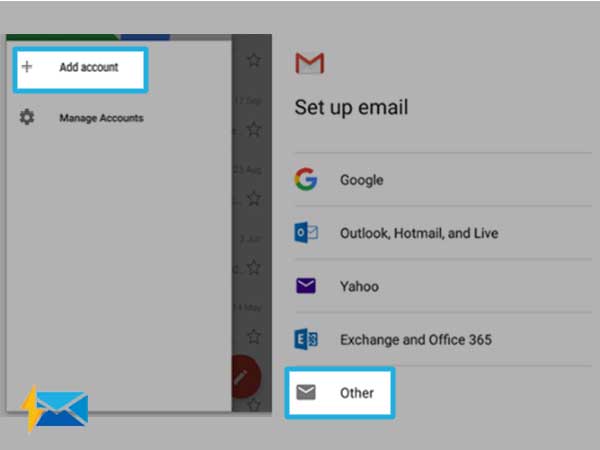
Step 4: Tap on ‘Other’
- Then on the next screen, you’ve to choose the ‘Other’ option if Centurylink.net email service provider name isn’t there in the available list of options.
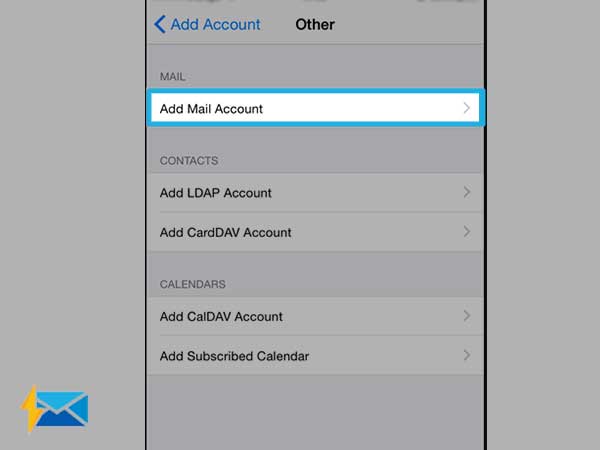
Step 5: Add Mail Account
- Once you tap on the ‘Other,’ you’ll reach onto the next page where you’ve to simply tap on the ‘Add Mail Account’ option.
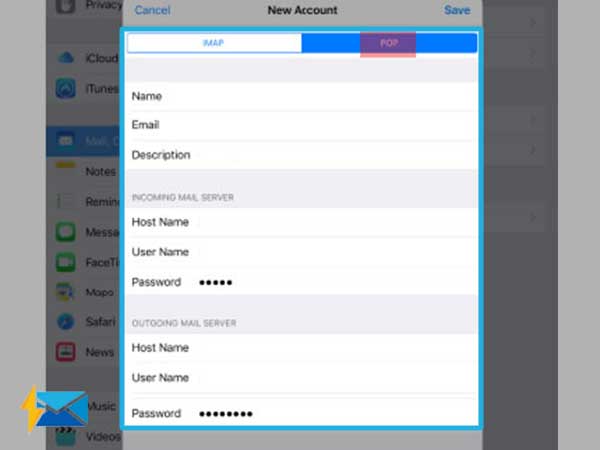
Step 6: Enter ‘User-Data’ of Centurylink.net Email Account
- Now, to continue setup your Centurylink email account on iPhone, enter the following asked details of your account—
- Name: Your Full Name
- Email: Your Centurylink Account’s Email Address
- Password: Your Centurylink Email Account Password
- Description: Enter Centurylink Email Service Name only.
- Once you’re done entering these details related to your Centurylink.net email account, hit the ‘Next’ button to reach onto the server settings page.

Step 7: Input ‘Incoming & Outgoing Mail Server’ Settings of Centurylink.net Email
- Here, on the server settings page, you’ve to first select either ‘IMAP’ or ‘POP3’ protocol tab and based on your selection, input correct ‘Name, Email, and these Centurylink Email Settings for iPhone’ at “Centurylink Incoming Mail Server”—
| Incoming Mail Server: | IMAP Host Name: mail.centurylink.net |
| POP3 Host Name: pop.centurylink.net | |
| User Name: Your full Centurylink.net Account’s Email ID | |
| User Name: Your full Centurylink.net Account’s Email ID |
- Similarly, scroll down a little and enter these following Centurylink email settings at “Centurylink Outgoing Mail Server”—
| Outgoing Mail Server: | SMTP Host Name for both IMAP and POP3 |
| Protocols: smtp.centurylink.net | |
| User Name: Your full Centurylink.net Account’s Email ID | |
| Password: Your Centurylink.net Account Password |
- After you finish entering the aforementioned settings, tap on the “Save” button to save the setup process.
Step 8: Navigate to ‘Advanced’ Settings
- Once you save the setup process, make sure at the same time, you also turn the toggle switch of ‘Mail’ option to green.
- Now, close the settings app and again navigate to “Settings > Mail > Accounts” option for selecting your newly setup ‘Centurylink Email Account’ from there.
- Consecutively, tap on the “Advanced” option to ensure whether the following information under ‘Incoming and Outgoing Settings’ appears on the screen or not! If not enter manually.
| Incoming Settings | Outgoing Settings |
| Use SSL: On | Use SSL: On |
| Authentication: Your Centurylink.net Account Password | Authentication: Your Centurylink.net Account Password |
| Server Port: 993 for IMAP and 995 for POP3 | Server Port: 587 for both IMAP and POP3 |
Step 9: Hit ‘Finish’
- Once you’re done ensuring and/or entering the advanced settings of your Centurylink.net account then, simply end the setup process by tapping on the “Finish” button.
Step 10: Quick ‘Restart iPhone’
- In the end, after finishing the setup process of configuring Centurylink email on iPhone, give a quick ‘Restart’ to your iPhone in order to activate your configured Centurylink.net email account for using it on the same.
Centurylink Email Setup for Android
Step 1: Open ‘Mail App’
- In order to start the configuration process of setting up your Century.net email on your android device, touch the ‘App Icon’ from the home screen and select “Gmail or Email” application.

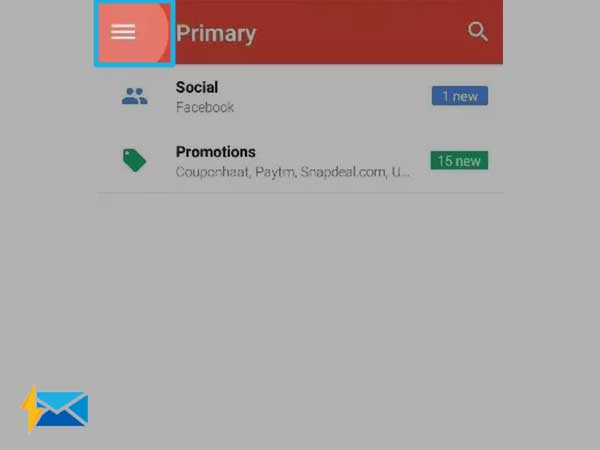
Step 2: Go to ‘Mail Menu’
- Once the selected email application opens and there, if you already have other email accounts added then, you’ve to expand the email app’s “Menu” from the top-left corner of the screen.
- From that expanded menu, simply tap on the ‘Settings’ option.
Step 3: Select ‘Add New Account’
- Inside the settings of your email application, select the “Add New Account” option and, along with that, also tap on the “Other” option in the ‘Setup Email’ section.
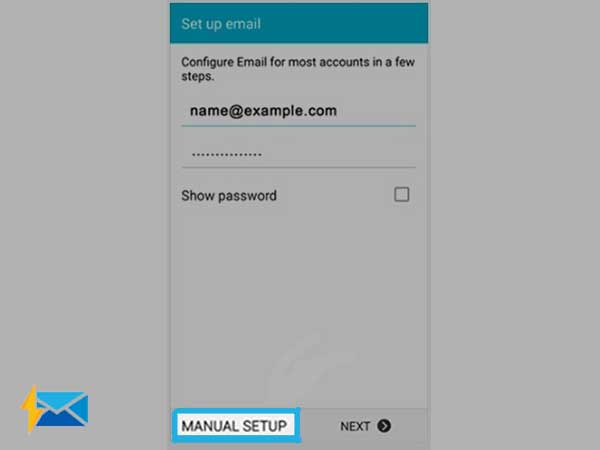
Step 4: Enter ‘Account Login Information’
- Now, enter your Centurylink.net email address in the “Full Email Address” text-field and its password in the “Your Password” text-field. [Note: In case you don’t have other email accounts added on your mail app then, you’ll be asked to directly enter your centurylink.net email address and password in the required text-fields.]

Step 5: Choose ‘Manual Setup’
- After you finish entering your Centurylink.net email account information, tap on the “Manual Setup” button to continue further with the configuration setup process of Centurylink account on android.
Step 6: Input ‘Incoming and Outgoing Mail Server Settings of Centurylink.net Email’
- On the next screen, you’ll be asked to select either ‘Personal IMAP or Personal POP’ account-type.
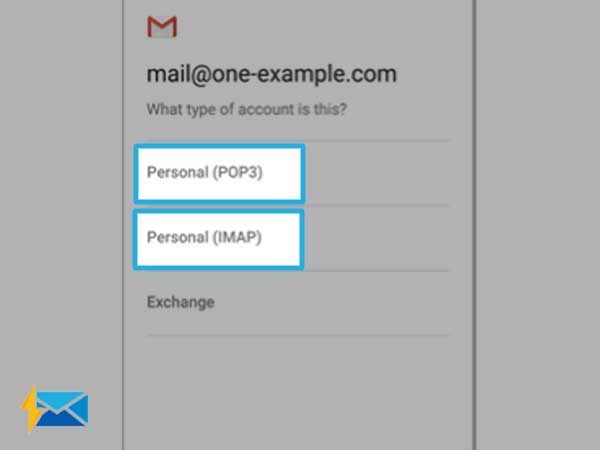
- So, based on your preference select either one of them to enter these ‘Centurylink Email Settings for Android’ at “Incoming Mail Server”—
| Incoming Mail Server | IMAP Host Name: mail.centurylink.net |
| Secure IMAP Port: 993 | |
| POP3 Host Name: pop.centurylink.net | |
| Secure POP3 Port: 995 | |
| User Name: Your Full Centurylink.net Email Address | |
| Password: Your Centurylink Account Password | |
| Security Type: SSL |
- To continue, hit the ‘Next’ button and similarly, enter these following Centurylink email settings at “Outgoing Mail Server”—
| Outgoing Mail Server | SMTP Host Name for both IMAP and POP3 Protocols:smtp.centurylink.net |
| Secure SMTP Port for both IMAP and POP3 Protocols: 587 | |
| User Name: Your Full Centurylink.net Email Address | |
| Password: Your Centurylink Account Password | |
| Security Type: SSL |
Step 7: Tap on ‘Login’
- After entering the above server details, click on the ‘Login’ button. In doing so, you’ll be navigated onto the next screen.
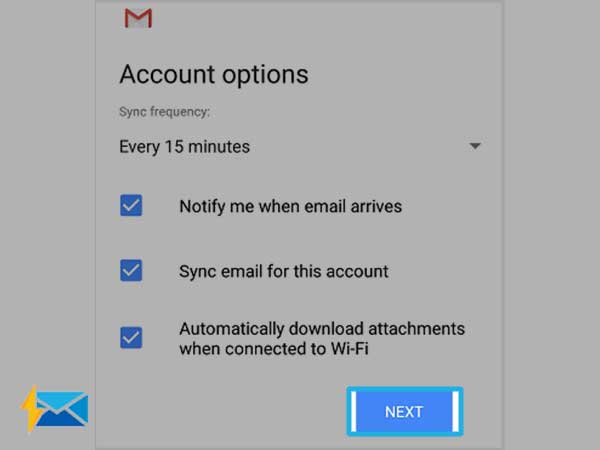
Step 8: Select ‘Email Check Frequency’
- There, you’ve to select a particular email frequency range and simply for the same, you can select the option— ‘preferably for every 15minutes.’ Then, hit the “Next” button.
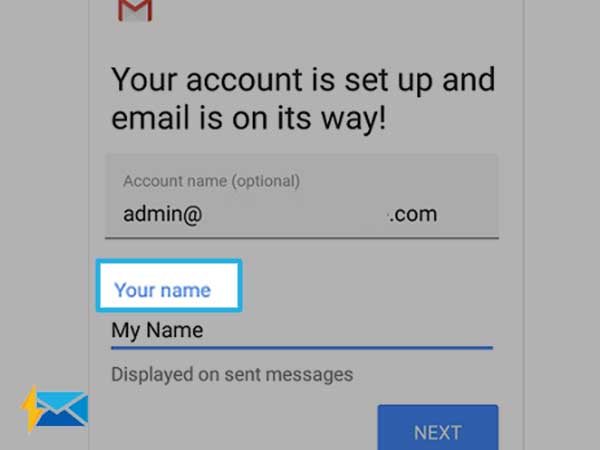
Step 9: Give ‘Name’
- Last but not least, you’ll be asked to give a “Name” to your Centurylink.net email account that you’ve recently configured. So, as asked, provide a name to your Centurylink account.
Step 10: Press ‘Done’
- In the end, simply press the ‘Next’ and “Done” button to finish the configuration setup process. Now, you can exchange centurylink.net emails using your Android device.
That’s all! This is the complete step-by-step guide on how you can setup your Centurylink email account on your iPhone and/or on your android device. Hopefully, executing the above-given instructions correctly, you can configure your Centurylink email account on your respective mobile device to access it at your convenience.
Share