How to Manually Setup Comcast Email Account in MS Outlook with Proper Comcast Mail Server Settings?
Out of many available third-party email clients like Mailbird, Apple Mail, and Thunderbird, MS Outlook is one of the most popular and preferred desktop email clients that the majority of the email users opt for configuring all their email accounts with the motive of using them hassle-free.
Basically, the process of checking, exchanging, and managing emails of your multiple accounts on MS Outlook is fast, simple, and easier to handle.
So, having the same motive in mind, if you’re also planning to start using your Comcast email account from MS Outlook instead of using it on your web browser then, let us tell you that this guide will take you through its setup process step by step.
You May Also Like: Set up Xfinity Email Settings on Windows 10
However, before beginning with the setup process of configuring a Comcast email account on MS Outlook, you first need to meet the following prerequisites:
- A strong and stable internet connection.
- A data backup of your Comcast email account to steer clear of any important data loss during the configuration process.
- Your Comcast webmail account details such as the email address, username, and password to properly set everything up.
- The correct server settings of Comcast email service for MS Outlook because the server setting of your Comcast email varies as per the different Outlook versions.
Now, after meeting all the aforementioned prerequisites, you’re completely ready to start with the configuration process of setting up Comcast Email in Outlook. So, have all your attention here to perform the below-mentioned steps correctly in the same given order:
Steps to Configure Comcast Email Account in MS Outlook 2013 or Above
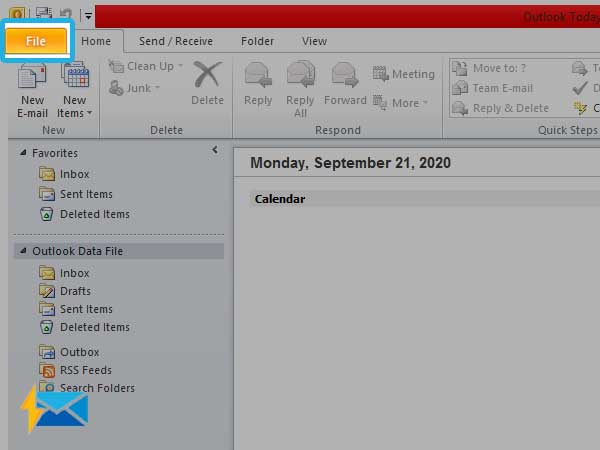
- To begin, you need to first launch the main interface of the MS Outlook.
- Once you launch the application on your desktop, locate the ‘File’ option, and click on the same to open its ‘File Group.’
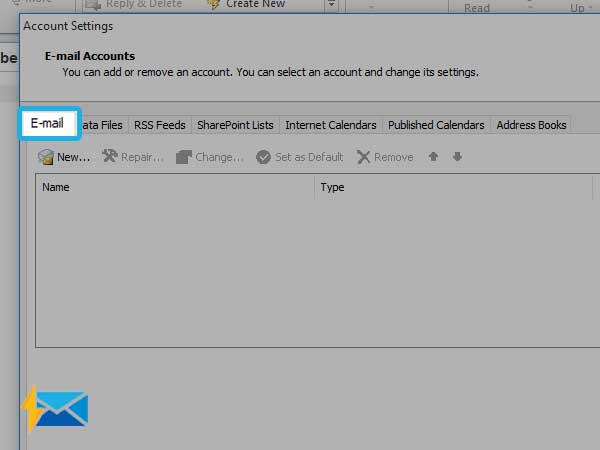
- From the file-group menu, click on the ‘Info’ option in order to further click on the box-like icon under which ‘Account Settings’ is written.
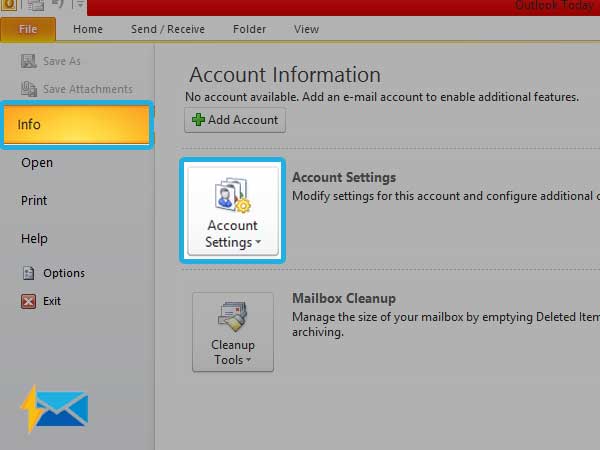
- Doing so will let you select the ‘Account Settings’ option from the drop-down list.
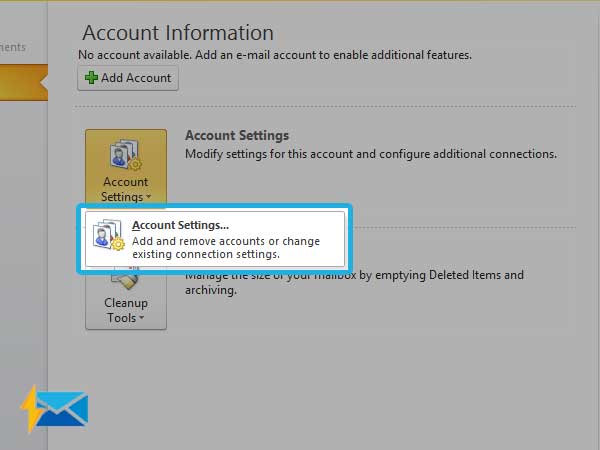
- As soon as you select it, a pop-up box will appear in front of you, and under it, you need to click on the ‘Email Tab.’
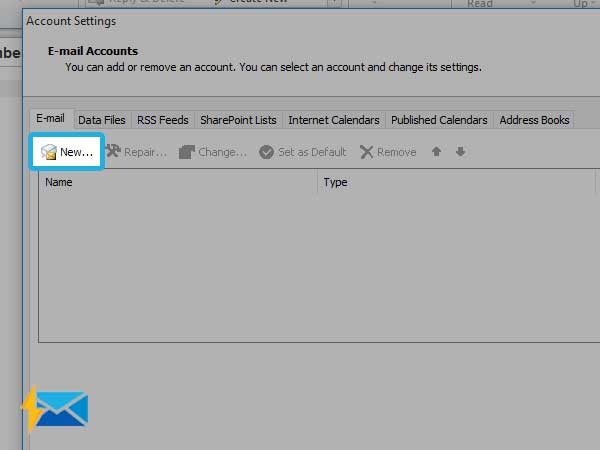
- Then, click on the ‘New’ option to launch the ‘Add New Account wizard.’
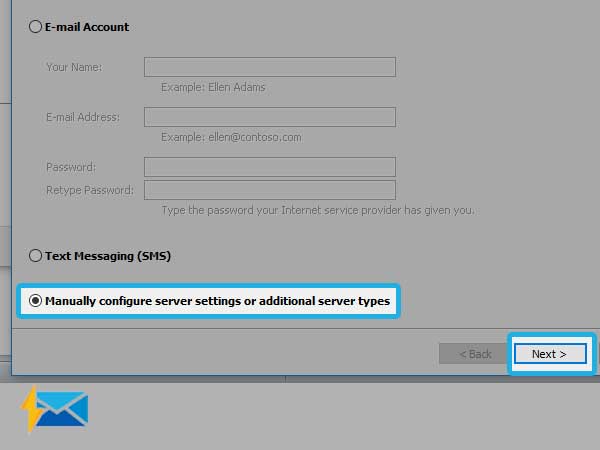
- In the ‘New Email Account’ dialog box, leave all the text fields blank and click on the checkbox that reads—“Manual setup or additional server types” along with the ‘Next’ button.
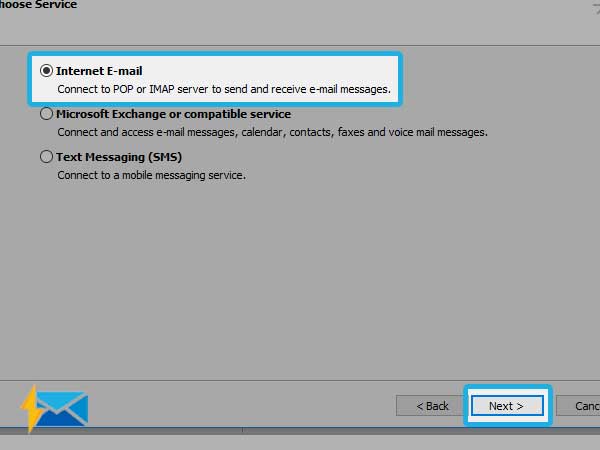
- After doing so, select ‘Internet Email’ option from ‘Choose Service Page’ and again hit the ‘Next’ button.
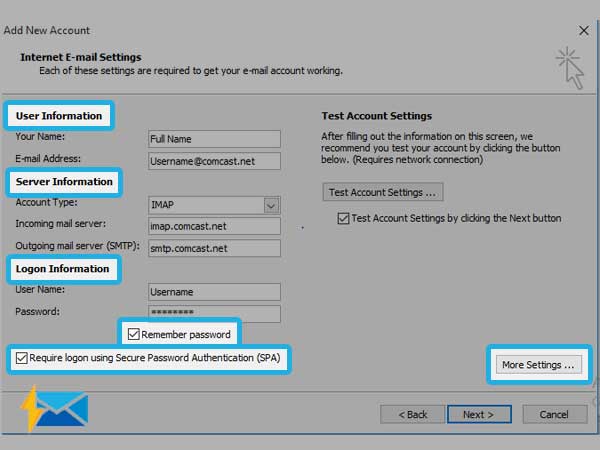
- Doing so, you will be directed to the next dialog box where you need to first click on the “User Information Tab” to input the user data of your Comcast webmail in the required blank fields—
- Once you finish entering the user data information, what next you have to do is click on the ‘Type of Account’ option to choose either “IMAP” or “POP3” from the drop-down list.
Note: Here, POP stands for ‘Post Office Protocol,’ and IMAP stands for ‘Internet Message Access Protocol.’ From both, “IMAP” is recommended by the majority as ideal because unlike POP that removes the mail from the webmail server of your email account, IMAP left the copies of your messages on the webserver so that you can access them anytime from any of your devices.
- If you selected ‘IMAP Account Type’ then, the Comcast email server settings for Outlook are:
| Incoming Email Server: | imap.comcast.net |
| Outgoing Email Server: | smtp.comcast.net |
- If you selected ‘POP3 Account Type’ then, the Comcast email server settings for Outlook are:
| Incoming Email Server: | mail.comcast.net |
| Outgoing Email Server: | smtp.comcast.net |
- Step 11: In continuation, enter the following Comcast email account information in the “Logon Information” section—
- Username: ______ (Your Comcast Account Username)
- Password: ________ (Your Comcast Account Password)
- Tick-mark the “Remember Password” checkbox to have Outlook saves your password.
- Also tick-mark the checkbox that reads— ‘Require logon using Secure Password Authentication (SPA).
- Step 12: As soon as you finish entering the aforementioned details, click on the ‘More Settings’ button to further move on with the setup process.
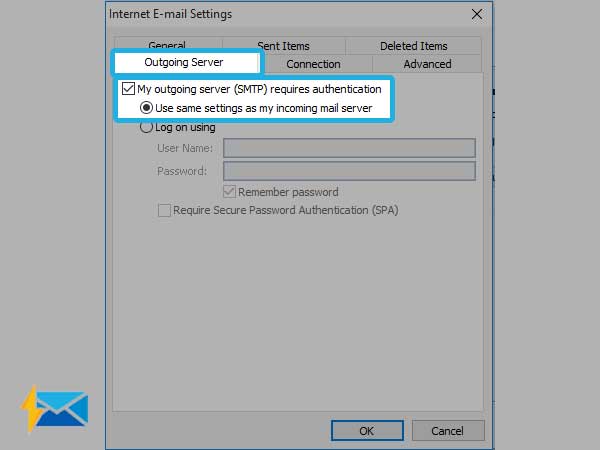
- Step 13: Select the ‘Outgoing Server’ tab in order to open it and under the same, click the checkbox for ‘My Outgoing Server (SMTP) requires authentication. And, at the same time, also confirm to use the ‘Use same settings as my incoming mail server’ by selecting its radio button.
- Step 14: Moving on, click on the ‘Advanced’ tab and there, based on your server selection fill out the following Comcast’s advanced email server settings and then, hit the ‘OK’ button.
- If you’ve selected ‘IMAP’ as your ‘Account Type’
| Incoming Port: | 143/993 |
| Incoming Encrypted Connection: | SSL |
| Outgoing Port: | 465 |
| Outgoing Encrypted Connection: | TLS |
| Requires Authentication: | Yes |
- If you’ve selected ‘POP3’ as your ‘Account Type’
| Incoming Port: | 993 |
| Incoming Encrypted Connection: | SSL |
| Outgoing Port: | 587 |
| Outgoing Encrypted Connection: | TLS |
| Requires Authentication: | Yes |

- Step 15: Now, in the end, click on the “Test Account Settings” option and the ‘Next’ button to make sure that your Comcast email account has been configured properly in Outlook.
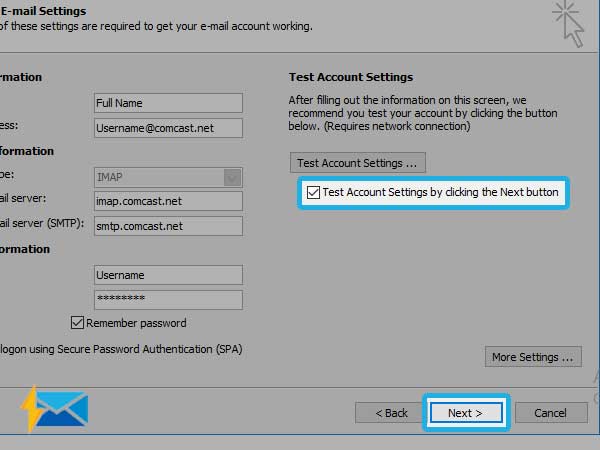
That’s it! After the test completes, if everything looks fine then, just click on the “Finish” button to finally close the process of setting up the Comcast email account in MS Outlook.
Share