11 Proven Methods when iCloud is not Receiving Emails on iPhone & Other Devices
Apple promises to make the most secure gadgets that cannot be easily hacked and deliver the most dependable security measures to its users. Indeed, it’s true, but it’s also undeniable that every now and then we have to deal with a new problem arising out of nowhere in these devices. This time, we are here to look into one such prominent issue, ‘iCloud Mail not receiving emails on iPhone and other Apple Devices.’
There can be a number of situations in which iCloud may not be working and, thus, not receiving emails; they range from a simple network issue to misconfigured mail server settings. Depending on which device you are using and through which platform or email client you are accessing iCloud Mail, there exist a lot of solutions.
However, you need not worry, in the following article, I have tried to cover all possible resolutions that will surely help you overcome this problem.
A few Things to Note…
Before we begin our discussion on how to get your iCloud email to work again, there are a few things that you need to keep in mind:
- The first thing you need to check is the availability of a stable internet connection. If your network is having issues, then it can be one of the reasons why you are not receiving emails in iCloud on your iPhone or any other device.
- When you back up iOS or iPadOS in iCloud or iTunes, it saves your email settings but not your emails. Previously downloaded emails may be erased from your device if you delete or modify your email account settings.
- Make sure that there isn’t a service outage. If there is, then you will not be able to receive an email on your iCloud mail.
- Also, keep your device OS updated. If there is a long-pending update, then install it before moving to more solutions.
- If your iPhone is up-to-date, but still not receiving emails on iCloud, then you can try restarting the phone. Doing so, will remove all the background apps, and clear up the RAM, over-usage of which might be causing issues.
Things to do when iCloud is not Receiving Emails on iPhone
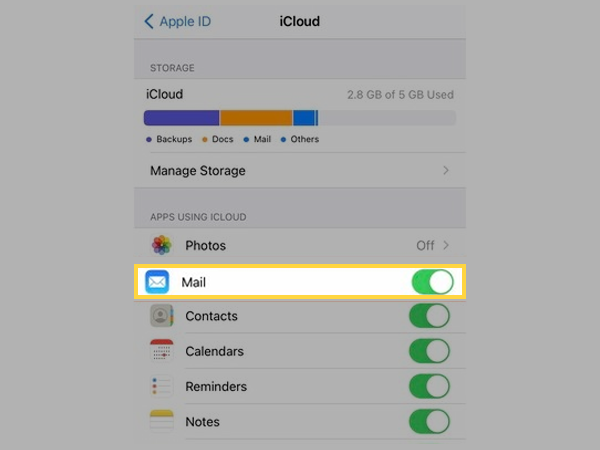
Method-1: Ensure you have Enabled Mail in iCloud
Please bear in mind that you will not receive emails in iCloud till you enable Mail in it. Yes, in order to use iCloud Mail, having the @icloud extension, you specifically have to enable it on your device. If you haven’t done it yet, or somehow it is turned off, then you won’t get emails in the iCloud email inbox on your iPhone. To enable it, follow the steps stated below:
- On your device, open the Settings app.
- Tap on your name at the top of the Settings screen.
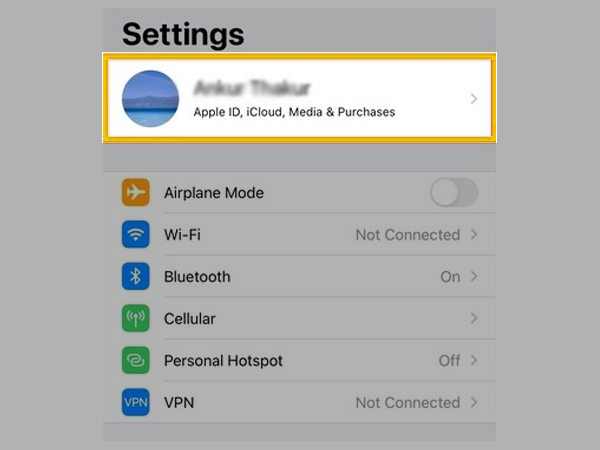
- From the next page, select the iCloud option.
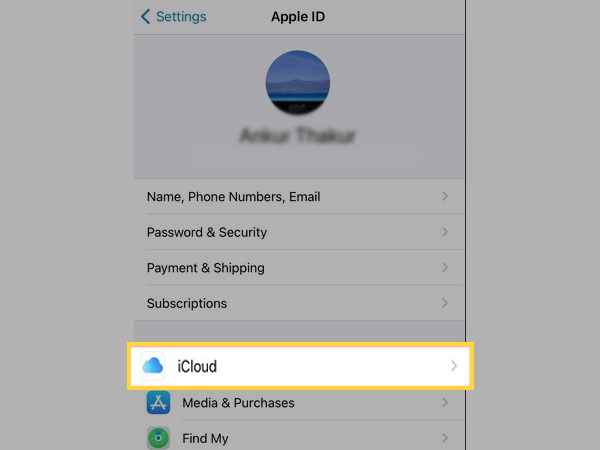
- Now, on the next screen, to enable Mail in iCloud, tap on the toggle button adjacent to it. When the toggle button is turned green, the iCloud Mail will again start receiving emails.
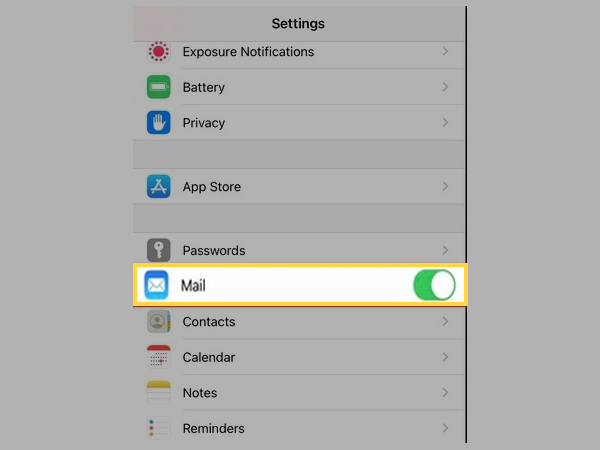
Method-2: Turn on Mail for Third-Party Email Service Providers
If instead of @icloud email you have been using the email of some other email service provider like Gmail, Yahoo, Outlook, etc. on your iCloud Mail, then also you have to enable the Mail option to receive emails in iCloud on your iPhone. Listed below are the steps following which you can do so:
- Again, go to the Settings of your phone.
- Scroll down in the Settings till you see the Mail section, and tap on it.
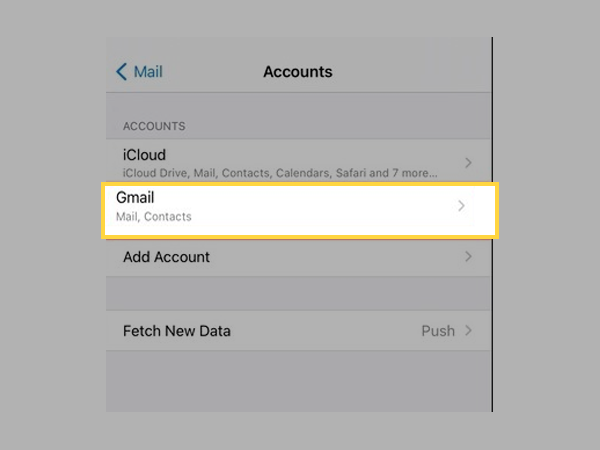
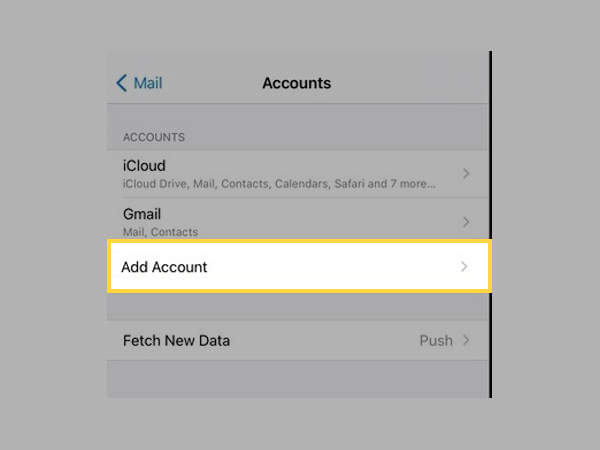
- On the next page, select the Accounts option.
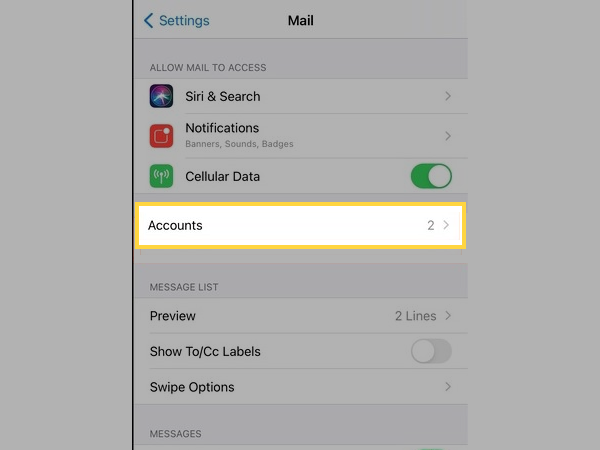
- Now, from the next page, select the account for which you want to receive emails in iCloud Mail (like, if you are not receiving emails on your Gmail account added in your iPhone, then, select it).
- Finally, on the next page, make sure that the toggle button of Mail is turned on. However, if it’s not, then it is the reason why you were not getting your emails in iCloud Mail. Therefore, to again start receiving emails, tap on the toggle button to turn it on.

Furthermore, if you do not see your email account, for which you are not getting emails, on the Accounts page, your email account must be mistakenly removed from your phone. In order to add that account again:
- Tap on the Add Account option.
- Select your email service provider from the next page.
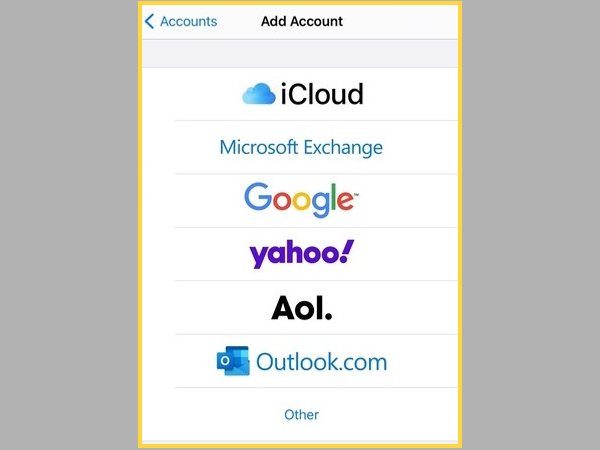
- Lastly, fill in your login information and save the changes.
Further, for the added email account, turn on the Mail option (steps given above) to receive emails in iCloud Mail.
Method-3: Check iCloud Email Fetch & Notification Settings
By default, Fetch New Data settings are based on what your email service provides. If Push is not an option, your account will default to Fetch. These options will have an impact on how your device receives emails. To change these settings:
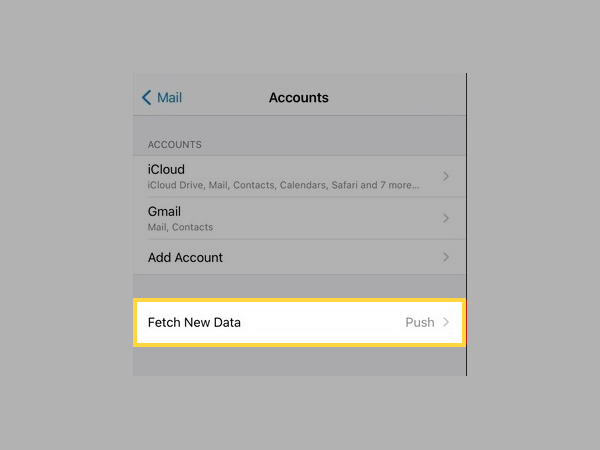
- Navigate to Settings on your phone, and tap on Mail.
- Next, select the Accounts option.
- Then, tap on the Fetch New Data option on the Accounts page.
- From the next page, turn on the Push toggle button and select the email account for which you are facing an email receiving issue.
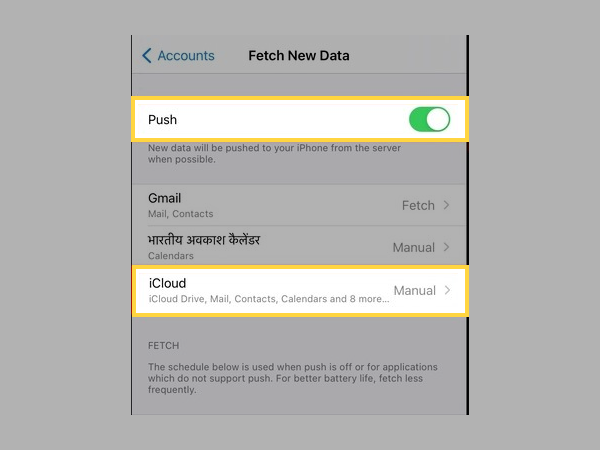
- On the next page, select the Push option for that account, or select an option, such as Automatically or Manually. By selecting manually, you will yourself have to set up a schedule for how frequently the Mail app will retrieve data.
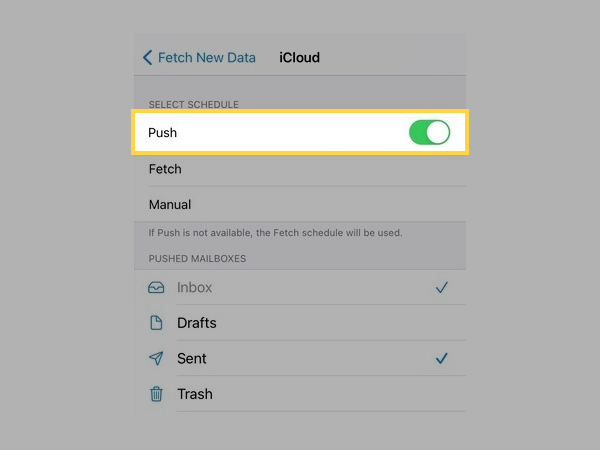
Note: You can turn on Push for only one account at a time.
‘Automatically’ is the default setting in iOS 11 and beyond, as well as iPadOS. When your device is charging and connected to Wi-Fi, then only it will only acquire fresh data in the background.
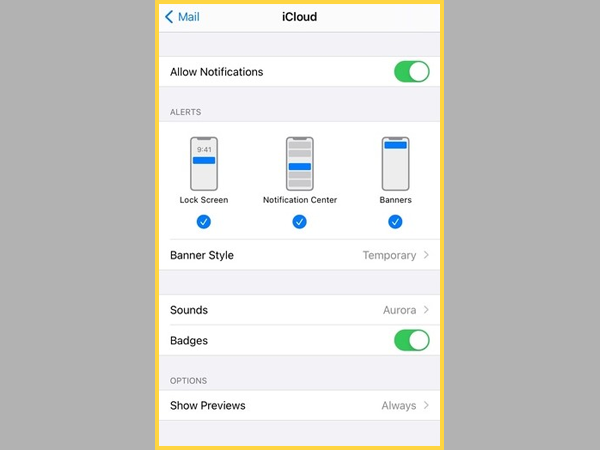
Further, it is important to make sure that you have correctly configured Mail notification settings. As it can be the case that, your emails are received in the iCloud mail, but you don’t get a notification, leading you to think otherwise. Thus, check if your Mail app’s Notification settings are correct by following the steps below:
- Open the Settings app on your phone, and tap on the Notifications section.
- Then, select the Mail app.
- Next, make sure that the Allow Notifications option is turned on.
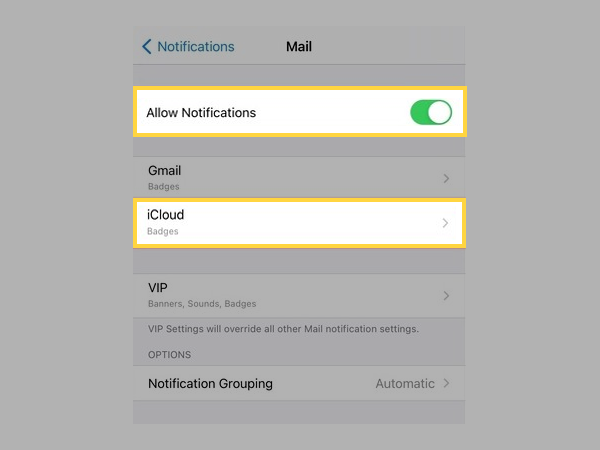
- To set specific notifications for different email accounts, select the email account from the Mail page. On the next page, make changes to your Alerts, Badges, and Sounds.
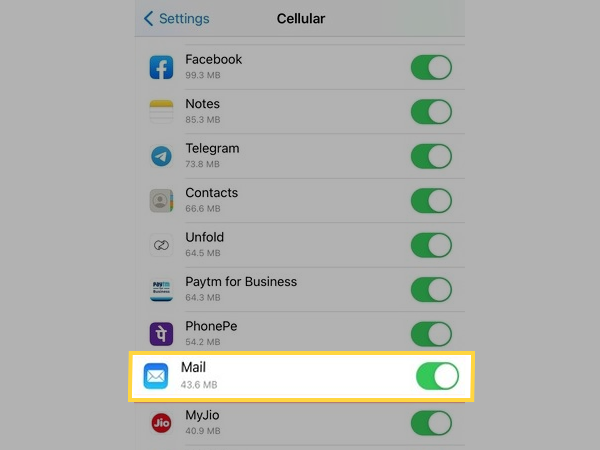
Method-4: Enable Mail to use Cellular Data
When your device is connected to Wi-Fi, all apps utilize the internet. However, in cellular data, the internet data limit is specific. So some apps, for which using cellular data isn’t allowed, simply won’t work in the absence of Wi-Fi. Thus, if you are using your cellular data, make sure that Mail is enabled to use it. If it’s not, then it goes without saying that you won’t be receiving emails in it.
To check, if it’s the case, follow the steps jotted down:
- Open the Settings app on your device.
- Inside it, tap on the Cellular Section.
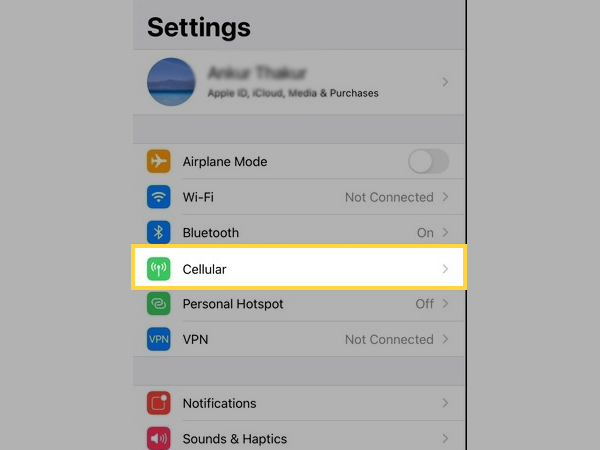
- On the next page, you will see all the apps that are allowed to use cellular data. Scroll down on the page, locate the Mail app, and tap on its toggle to enable it to use your mobile data.
Method-5: Check iCloud Server Status
If nothing has worked so far, and you are still not getting emails in your iCloud Mail on your iPhone, probably the servers of iCloud will be out of service. If the servers are down, then you will not be able to either receive or send emails from your iCloud Mail.
In such a case, to ensure that the server downtime is causing the issue, you can visit the Apple System Status Page. The page will display all the information, whether there is an ongoing issue, or there was an issue that has been resolved now or there is no problem.
However, if you are not satisfied with the provided information, you can visit other websites like Downdetector, Is it down right now, etc. These websites will provide the server status of iCloud over a period of time.
Method-6: Try Resetting Network Settings
If there is a network glitch, it is probably the cause for email not arriving in the Icloud Mail on your iPhone.
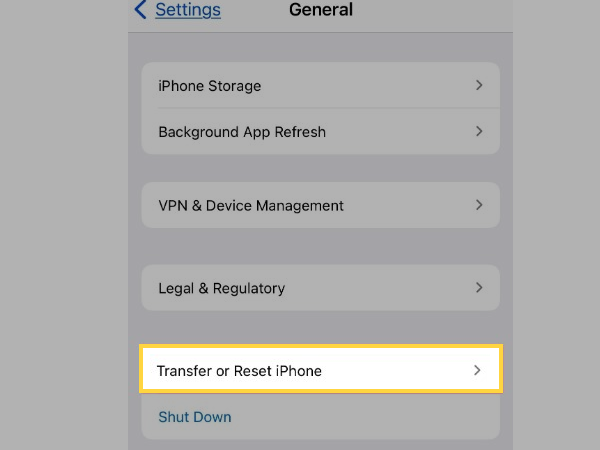
To ensure that your device is properly connected to the network and there remains no connection glitch, reset your phone’s network settings. Doing so will re-establish the connection between your device and network. Here’s how you can do this:
- Navigate to the Settings of your phone and select General.

- Select the Transfer or Reset iPhone option present on the General page.
- From the next page, choose the Reset option.
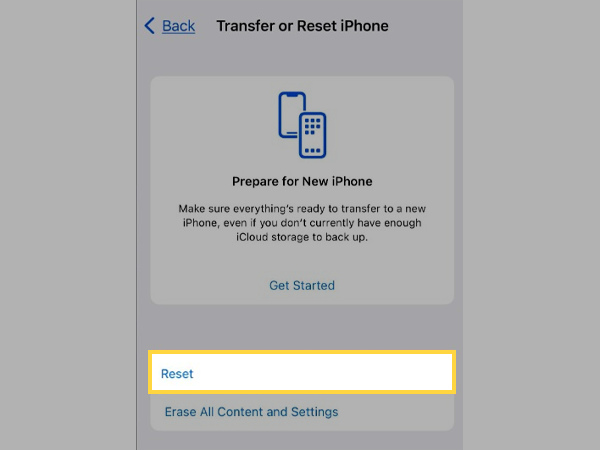
- At last, tap on the Reset Network Settings option.
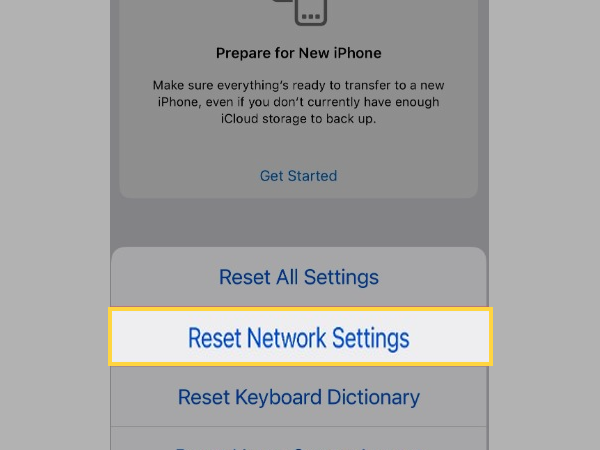
After it’s done, reconnect to your Wi-Fi by entering its password, or if you use cellular data, turn it on.
Note: All the Bluetooth-connected devices with your iPhone will be disconnected and will be forgotten, after resetting network settings. You again have to pair them all.
Method-7: Free up iCloud Storage
One of the most important things, which is neglected by most people, is iCloud storage. iCloud has limited storage, and generally, there are so many things stored in it, that the storage gets filled easily.
Your attention may not go in that direction until you receive a ‘Not sufficient storage’ message, or you won’t be able to upload and save files in it.
Furthermore, the unavailability of the storage in iCloud is another reason for Mail not receiving emails. Thus, if your iCloud storage is full, then free up some space by deleting unnecessary or no-more-important files, to make room for new incoming data.
If you don’t know how to check the storage occupancy of iCloud, go through the following steps:
- Again, open the Settings app on your iPhone.
- Tap on your name present at the top of the Settings screen.
- Select iCloud from the next page, and on top of the following screen, you will see the iCloud storage status.

Method-8: Sign out of iCloud and Sign in Again
Sometimes the simple off and on works when the more advanced methods have already failed. So, to resolve the issue of your iPhone not being able to receive emails in iCloud, you can sign out of it and again sign in to it. To achieve this, follow the process stated below:
- Again, go to the Settings of your iPhone.
- On the top of the Settings screen, tap on your name.
- Scroll to the bottom of the next page, and tap on the Sign Out button.
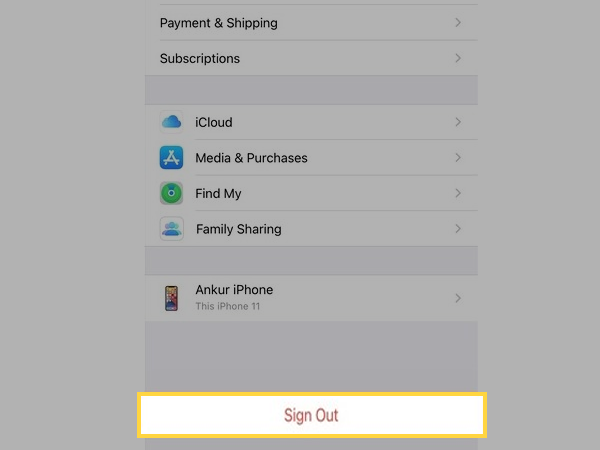
- After doing so, you will be asked to enter your Apple ID password to turn off the ‘Find My’ feature of your iPhone. Do as directed.
- Next, select the option to keep your contacts and data stored in iCloud on your phone to prevent any data loss. Once it’s done, you will be signed out.
Now, to again log into your iCloud account, again, open the Settings app, and from the top of the Settings page, tap on the Sign In option. Afterward, fill in your login credentials, and you will be signed back into your account. Check if you are getting emails on iCloud, if not, then move to the next method.
Method-9: Uninstall the Mail App & Again Install it
Deleting and reinstalling the program is a proven way to resolve any potential in-app difficulties. This will reset any settings you may have messed with and may resolve the issue of your iPhone’s iCloud Mail not receiving emails.
Despite the fact that Mail is part of the iPhone’s stock app portfolio, you can reinstall it like any other app. That should offer you a clean slate to start setting up your email accounts from scratch, eliminating any problems with the present configuration.
Listed below are the steps for doing so:
- Visit Settings on your phone, and tap on the General tab.
- Next, select the iPhone Storage option.
- Navigate to the Mail app, and tap on it.
- From the next page, select the Delete App option.
After the app is deleted, visit the Apple App Store to download it again. Launch the app and sign in to your account.
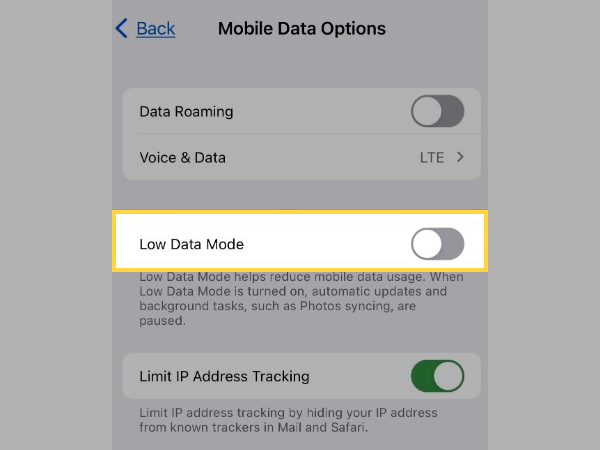
Method-10: Turn off Low Data Mode
iOS includes a Low Data Mode that helps you save Wi-Fi and cellular network usage. If you previously activated the option, it might be the cause of your iPhone Mail not getting emails, since it may be blocking internet activity on the app.
To give the Mail app full internet access, make sure you don’t have Low Data Mode activated for both Wi-Fi and Cellular Data.
To turn off Wi-Fi Low Data Mode, do as stated below:
- Navigate to Settings, and tap on the Wi-Fi section.
- Tap on the Info icon next to the active Wi-Fi connection.
- Then, deactivate the toggle button next to Low Data Mode.
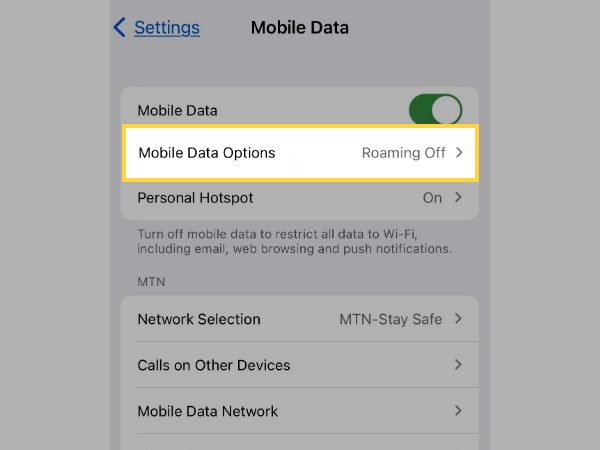
To turn off Cellular Low-Data Mode:
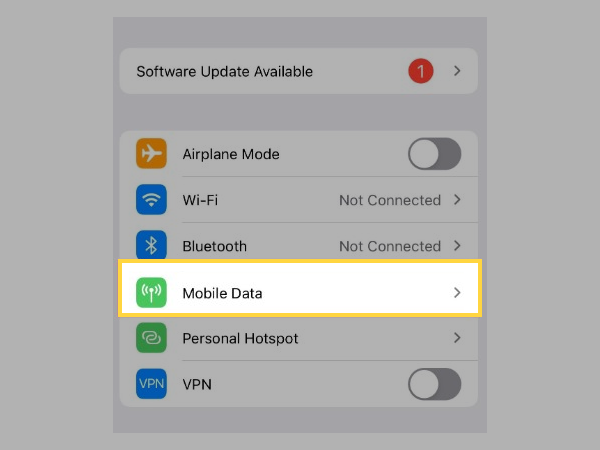
- Go to phone Settings, and select Mobile Data/Cellular Data tab.
- From the next page, tap on Mobile/Cellular Data Options.
- At last, turn off the Low Data Mode toggle present on the next page.
Method-11: Turn on Background App Refresh
Apps being in the background for an extended period of time get stuck in that state and are not updated when new information is received. Thus, for apps to refresh themselves while being in the background and update new information, enable the Background App Refresh option provided on your iPhone. Here are the steps to take:
- Open Settings on your phone and tap on the General tab.
- Tap on the Background App Refresh option.
- On the next page, locate the Mail app and turn on the toggle button next to it.
Note: If your Gmail app is not receiving email on your iPhone, then you can turn on Background App Refresh for the Gmail app too by following the above steps.
Troubleshooting Methods when Mail is not Receiving Emails on iCloud.com
If iCloud Mail is not working or not receiving emails when you are accessing it on iCloud.com through your browser, then there are some simple methods listed below that you can try to get your iCloud Mail to work again:
Method-1: Use the Latest Browser
Whatever browser you are using to access iCloud, make sure that you use its latest versions. Older versions of the browser may not support the updated security functions and settings of iCloud, which may lead to a hindrance in its accessibility and usage. Thus, make sure you update your browsers on a timely basis.
If you are using Safari, the following steps can be followed to update it:
On Mac:
- Click on the Apple menu in the corner of the screen and select the System Preferences option.
- Now, select the Software Update option from the System Preferences window.
Note: If System Preferences don’t show the Software update option, Use the App Store to Update Safari
- The available system update will be listed on the next screen. Click on the Upgrade Now button to update your OS. The latest version of Safari is included in the latest version of macOS.
On iPhone/iPad/iPod Touch:
- Go to the Settings app.
- Tap on the General section.
- From the next screen, choose the Software Update option.
- Now update your device to the available version. The latest version of Safari is included in the most up-to-date iOS or iPadOS.
Note: Apple no longer provides Safari upgrades for Windows users. Safari 5.1.7 for Windows was the latest version released for the platform, which is now outdated. Therefore, if you are accessing iCloud Mail through Safari on Windows, you will face problems while using it.
Method-2: Clear Your Browser’s Cache
Caches are the temporary files stored by websites on the browser for fast retrieval of data whenever the user visits the websites again. Since these are the files that the browser fetches first, when the user makes any request, if these files are corrupted, unwanted or unintentional issues are faced.
The same can be the case with iCloud.com. If the caches are damaged, it can be the reason for iCloud Mail not working and not getting emails.
In order to clear caches from different browsers, you can visit their respective manual pages. To clear cache from Safari, follow the steps below:
- Open Safari and select the Preferences option.
- Next, switch to the Advanced tab.
- Thereafter, choose the ‘Show Develop menu in menu bar’ option, and then close the Preferences.
- Then, click on the Develop menu, and choose the Empty Caches option.
Method-3: Turn off Browser Extensions
If you are using some browser extensions or plugins, they can be the center of the problem. When some extensions are enabled, you unknowingly provide them to access your personal information whenever you visit any website. Thus, if such an extension is trying to access your information on iCloud, to prevent it from doing so, iCloud may not work. Therefore, you are required to find that extension and disable it.
Solution When iCloud is not Receiving Emails on Mac
If you are using Mac and could get emails on the iCloud mail, then the following solution can help you resolve the issue:
- Find the name of your iCloud email account on the left side of the main Mail window. Your account is offline if your account name is dimmed and has a lightning-bolt symbol adjacent to it.
- This goes without saying that you need to connect to the Internet to take your account online.
- Select Mailbox and you will know that all your accounts are already online if Take All Accounts Online is written in dimmed effect.
When Using iCloud Mail in Third-Party Service Provider
If you are using your iCloud email in other email service providers like Outlook, Gmail, etc. and it is not working, then you may need to set up Mail Server settings manually.
Note: In Apple devices, iCloud mail uses the System Preferences Settings, and thus, changing Mail Server settings options won’t be visible in them. Thereby, if you are not receiving emails on iCloud on your iPhone or Mac, or any other Apple device, then consider the solutions provided above.
For instructions on how to utilize these settings, refer to the documentation for your email client. iCloud Mail employs the IMAP and SMTP protocols, which are supported by the majority of current email clients. POP is not supported by iCloud.
The following are server settings for iCloud:
For Incoming Mail Server – IMAP
- Server name: imap.mail.me.com
- SSL Required: Yes (If an error is displayed when SSL is selected, switch to TLS instead)
- Port Number: 993
- Username: Name before @icloud.com. (If an error appears, try using the full email address, abc@icloud.com)
- Password: Use an app-specific password
For Outgoing Mail Server – SMTP
- Server name: smtp.mail.me.com
- SSL Required: Yes (If an error is displayed when SSL is selected, switch to TLS or STARTTLS instead)
- SMTP Authentication Required: Yes
- Port Number: 587
- Username: Name before @icloud.com. (If an error appears, try using the full email address, abc@icloud.com)
- Password: Use an app-specific password (Same as IMAP Server settings)
Hope your problem is solved by now. However, after all the solutions provided above, if the problem still persists, connect to Apple Support to get further help.
Share